-
数据(配置文件)
-
归档WAL日志
-
表空间目录
数据库备份方式
逻辑备份:适用于跨版本和跨平台的备份恢复
物理备份:适用于小版本的恢复,但不支持跨平台和大版本
1)逻辑备份
1.1)pg_dump和pg_dumpall
pg_dump 的具体使用语法如下:
用法:
pg_dump [选项]... [数据库名字]
**一般选项**:
-f, --file=FILENAME 输出文件或目录名
-F, --format=c|d|t|p 输出文件格式 (c=custom, d=directory, t=tar,p=plain,plain就是sql纯文本 (默认值))
-j, --jobs=NUM 执行多个并行任务进行备份转储工作
-v, --verbose 详细模式
-V, --version 输出版本信息,然后退出
-Z, --compress=0-9 被压缩格式的压缩级别,0表示不压缩
--lock-wait-timeout=TIMEOUT 在等待表锁超时后操作失败
--no-sync 不用等待变化安全写入磁盘
-?, --help 显示此帮助, 然后退出
**控制输出内容选项(常用)**:
-a, --data-only 只转储数据,不包括模式,只对纯文本输出有意义
-s, --schema-only 只转储模式, 不包括数据
-c, --clean 在重新创建之前,先清除(删除)数据库对象,如drop table。只对纯文本输出有意义
-C, --create 指定输出文件中是否生成create database语句,只对纯文本输出有意义
-n, --schema=PATTERN 指定要导出的schema,不指定则导出所有的非系统schema
-N, --exclude-schema=PATTERN 排除导出哪些schema
-O, --no-owner 在明文格式中, 忽略恢复对象所属者
-t, --table=PATTERN 指定导出的表、视图、序列,可以使用多个-t匹配多个表,使用-t之后,-n和-N就失效了
-T, --exclude-table=PATTERN 排除表
-x, --no-privileges 不要转储权限 (grant/revoke)
--disable-triggers 在只恢复数据的过程中禁用触发器
--exclude-table-data=PATTERN do NOT dump data for the specified table(s)
--if-exists 当删除对象时使用IF EXISTS
--inserts 以INSERT命令,而不是COPY命令的形式转储数据,使用该选项可以把数据加载到非pg数据库,会使恢复非常慢
该选项为每行生成1个单独的insert命令,?在恢复过程中遇到错误,将会丢失1行而不是全部表数据
--column-inserts 以带有列名的INSERT命令形式转储数据,例如insert into table_name(column,...) values(value1,...)
--load-via-partition-root 通过根表加载分区
--no-comments 不转储注释
--no-tablespaces 不转储表空间分配信息
--no-unlogged-table-data 不转储没有日志的表数据
--on-conflict-do-nothing 将ON CONFLICT DO NOTHING添加到INSERT命令
**控制输出内容选项(不常用)**:
-S, --superuser=NAME 指定关闭触发器时需要用到的超级用户名。 它只有在使用了--disable-triggers时才有影响。一般情况下,最好不要输入该参数,而是用 超级用户启动生成的脚本。
-b, --blobs 在转储中包括大对象
-B, --no-blobs 排除转储中的大型对象
-E, --encoding=ENCODING 转储以ENCODING形式编码的数据
--binary-upgrade 只能由升级工具使用
--enable-row-security 启用行安全性(只转储用户能够访问的内容)
--extra-float-digits=NUM 覆盖extra_float_digits的默认设置
--disable-dollar-quoting 取消美元 (符号) 引号, 使用 SQL 标准引号
--no-publications 不转储发布
--no-security-labels 不转储安全标签的分配
--no-subscriptions 不转储订阅
--no-synchronized-snapshots 在并行工作集中不使用同步快照
--quote-all-identifiers 所有标识符加引号,即使不是关键字
--rows-per-insert=NROWS 每个插入的行数;意味着--inserts
--section=SECTION 备份命名的节 (数据前, 数据, 及 数据后)
--serializable-deferrable 等到备份可以无异常运行
--snapshot=SNAPSHOT 为转储使用给定的快照
--strict-names 要求每个表和(或)schema包括模式以匹配至少一个实体
--use-set-session-authorization
使用 SESSION AUTHORIZATION 命令代替
ALTER OWNER 命令来设置所有权
**联接选项**:
-d, --dbname=DBNAME 对数据库 DBNAME备份
-h, --host=主机名 数据库服务器的主机名或套接字目录
-p, --port=端口号 数据库服务器的端口号
-U, --username=名字 以指定的数据库用户联接
-w, --no-password 永远不提示输入口令
-W, --password 强制口令提示 (自动)
--role=ROLENAME 在转储前运行SET ROLE
pg_restore用法
[postgres@pg01 pg_backup]$ pg_restore --help
pg_restore 从一个归档中恢复一个由 pg_dump 创建的 PostgreSQL 数据库.
用法:
pg_restore [选项]... [文件名]
一般选项:
-d, --dbname=名字 连接数据库名字
-f, --file=文件名 输出文件名(- 对于stdout)
-F, --format=c|d|t 备份文件格式(应该自动进行)
-l, --list 打印归档文件的 TOC 概述
-v, --verbose 详细模式
-V, --version 输出版本信息, 然后退出
-?, --help 显示此帮助, 然后退出
恢复控制选项:
-a, --data-only 只恢复数据, 不包括模式
-c, --clean 在重新创建之前,先清除(删除)数据库对象
-C, --create 创建目标数据库
-e, --exit-on-error 发生错误退出, 默认为继续
-I, --index=NAME 恢复指定名称的索引
-j, --jobs=NUM 执行多个并行任务进行恢复工作
-L, --use-list=FILENAME 从这个文件中使用指定的内容表排序
输出
-n, --schema=NAME 在这个模式中只恢复对象
-N, --exclude-schema=NAME 不恢复此模式中的对象
-O, --no-owner 不恢复对象所属者
-P, --function=NAME(args) 恢复指定名字的函数
-s, --schema-only 只恢复模式, 不包括数据
-S, --superuser=NAME 使用指定的超级用户来禁用触发器
-t, --table=NAME 恢复命名关系(表、视图等)
-T, --trigger=NAME 恢复指定名字的触发器
-x, --no-privileges 跳过处理权限的恢复 (grant/revoke)
-1, --single-transaction 作为单个事务恢复
--disable-triggers 在只恢复数据的过程中禁用触发器
--enable-row-security 启用行安全性
--if-exists 当删除对象时使用IF EXISTS
--no-comments 不恢复注释
--no-data-for-failed-tables 对那些无法创建的表不进行
数据恢复
--no-publications 不恢复发行
--no-security-labels 不恢复安全标签信息
--no-subscriptions 不恢复订阅
--no-tablespaces 不恢复表空间的分配信息
--section=SECTION 恢复命名节 (数据前、数据及数据后)
--strict-names 要求每个表和(或)schema包括模式以匹配至少一个实体
--use-set-session-authorization
使用 SESSION AUTHORIZATION 命令代替
ALTER OWNER 命令来设置所有权
联接选项:
-h, --host=主机名 数据库服务器的主机名或套接字目录
-p, --port=端口号 数据库服务器的端口号
-U, --username=名字 以指定的数据库用户联接
-w, --no-password 永远不提示输入口令
-W, --password 强制口令提示 (自动)
--role=ROLENAME 在恢复前执行SET ROLE操作
选项 -I, -n, -N, -P, -t, -T, 以及 --section 可以组合使用和指定
多次用于选择多个对象.
如果没有提供输入文件名, 则使用标准输入.
范例
#备份单个数据库test中的所有表到指定目录
pg_dump -Uu postgres -f /backup/test_backup test
#备份test数据库中的t1表和t2表:
pg_dump -U postgres -t t1 -t t2 -f /backup/test backup_tl_t2 test
#备份指定数据库
pg_dump -d testdb > /backup/testdb.sql
#恢复过程
#注意:事先需要存在数据库,且删除所有表后才能恢复
psql -d testdb < /backup/testdb.sql
范例:使用pg_dumpall备份所有的数据库,其操作和pg_dump类似
 #备份全部数据库,每个数据库都需要输入密码,有N个数据库,就需要输入N次密码
 pg_dumpall -U postgres -f full_backup.sql
 #恢复
 pssql < full_backup.sql
范例: 使用pg_dump和pg_restore备份还原
#当连接的是一个本地数据库,并不需要密码时,要对数据库hellodb进行备份,备份文件的格式是脚本文件格式
pg_dump -C hellodb > hellodb.sql
#使用pg_dump也可以备份一个远程的数据库,如下面的命令备份10.0.0.200机器上的hellodb数据库
pg_dump -h 10.0.0.200 -U postgres -C hellodb > hellodb.sql
#如果想生成的备份文件格式为自定义格式,可以使用下面的命令
pg_dump -Fc -h 10.0.0.200 -U postgres hellodb > hellodb.dump
#把上述备份文件恢复到另一个数据库hellodb2中#先创建数据库才能恢复
psql -U postgres -h 10.0.0.200 -c "create database hellodb2"
#还原
pg_restore -h 10.0.0.200 -U postgres hellodb2 hellodb.dump
#只备份数据库he1lodb中的表students
pg_dump -h 10.0.0.200 -U postgres -t students hellodb > students.sql
#备份schemal模式中所有以job开头的表,但是不包括job_log表
pg_dump -t 'schemal.job*'-T schemal.job_log hellodb > schemal.emp.sql
#备份所有数据库对象,但是不包括名字以 _log结尾的表
pg_dump -T'*_log'hellodb >1og.sql
#先从10.0.0.200备份数据库hellodb,然后恢复到10.0.0.100机器上
pg_dump -h 10.0.0.200 -U postgres hellodb -Fc > hellodb.dump
pg_restore -h 10.0.0.100 -U postgres -C -d postgres hellodb.dump
#在pg_restore命令中,-d中指定的数据库可以是10.0.0.200机器上实例中的任意数据库,pg_restore仅用该数据库名称进行连接,-C 表示先执行CREATE DATABASE命令创建hellodb数据库,然后再重新连接到hellodb数据库,最后把备份的表和其他对象建到hellodb数据库中
一般用法
(文本格式) # 备份hellodb数据库 pg_dump -h 10.0.0.200 -U postgres -C -f /backup/hellodb.sql hellodb # 还原hellodb数据库 psql -h 10.0.0.200 -U postgres -f /backup/hellodb.sql (其他格式) # 备份hellodb数据库 root@pg-1:~# pg_dump -Fc -U postgres testdb > testdb.dump # 还原 postgres=# create database testdb; # 需要先创建对应数据库 root@pg-1:~# pg_restore -U postgres -d testdb testdb.dump
1.2)COPY命令实现备份还原
范例: 导出
#示例:
COPY students To '/tmp/students.csv' WITH CSV;
#可以导出指定的属性:
COPY students(stuid,name) To '/tmp/students.csv' WITH CSV;
#可以使用select 语句:
COPY (select * from students) To '/tmp/students.csV' WITH CSV;
#可以指定要导出哪些字段并带有列名:
COPY (select stuid,name,age from students) To '/tmp/students.csv' WITH CSV header;
范例:导入
#导入命令基本与导出一样,只是将TO改为FROM
create table students2 (like students);
COPY students2 FROM '/tmp/students.csv' WITH CSV;
#如果导出的时候,指定了header属性,那么在导入的时候,也需要指定:
COPY students(stuid,name,age,gender) TO '/tmp/students.csv' WITH csv header;
COPY students(stuid,name,age,gender) FROM '/tmp/students.csv' WITH csv header;
2)物理备份
物理备份分为冷备份和热备份
范例:冷备份还原
# 备份
postgres@pg-1:~$ pg_ctl stop
postgres@pg-1:~$ mkdir backup
postgres@pg-1:~$ cp -a /data/pgsql/ backup/pgdata-`date +%F`

# 还原
# 我这里先删除
postgres@pg-1:~$ rm -rf /data/pgsql/*
postgres@pg-1:~$ cp -a backup/pgdata-2025-02-27/* /data/pgsql/
postgres@pg-1:~$ pg_ctl start
....
server started
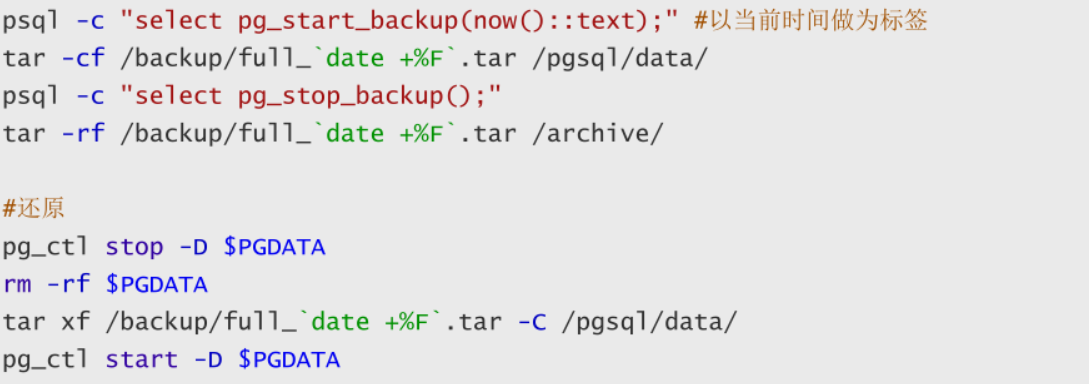
范例: 热备份和还原
3)pg_basebackup 实现完全备份和还原
用法:
  pg_basebackup [选项] ...

控制输出的选项:
  -D, --pgdata=DIRECTORY  接收基本备份到目录
  -F, --format=p|t                     输出格式(plain(默认),tar)
  -r, --max-rate=RATE             传输数据目录的最大传输速率(以 kB/s 为单位,或使用后缀“k”或“M”)
  -R, --write-recovery-conf       用于复制的写入配置
  -T, --tablespace-mapping=OLDDIR=NEWDIR 将 OLDDIR 中的表空间重定位到 NEWDIR
      --waldir=WALDIR             预写日志目录的位置
  -X, --wal-method=none|fetch|stream 包含指定方法所需的 WAL 文件
  -z, --gzip                               压缩 tar 输出
  -Z, --compress=0-9               使用给定的压缩级别压缩 tar 输出

常规选项:
  -c, --checkpoint=fast|spread 设置快速或扩展检查点
  -C, --create-slot 创建复制槽
  -l, --label=LABEL 设置备份标签
  -n, --no-clean 出错后不清理
  -N, --no-sync 不等待更改安全写入磁盘
  -P, --progress 显示进度信息
  -S, --slot=SLOTNAME 要使用的复制槽
  -v, --verbose 输出详细信息
  -V, --version 输出版本信息,然后退出
      --no-slot 防止创建临时复制槽
      --no-verify-checksums 不验证校验和
  -?, --help 显示此帮助,然后退出

连接选项:
  -d, --dbname=CONNSTR 连接字符串
  -h, --host=HOSTNAME 数据库服务器主机或套接字目录
  -p, --port=PORT 数据库服务器端口号
  -s, --status-interval=状态包发送到服务器的间隔时间(以秒为单位)
  -U, --username=NAME 以指定的数据库用户连接
  -w, --no-password 从不提示输入密码
  -W, --password 强制密码提示(应该自动
3.1)完全备份
开启流复制
root@pg-1:~# vim /data/pgsql/pg_hba.conf
...
host    replication     all             0.0.0.0/0               md5
host    replication     all             127.0.0.1/32            trust
...
root@pg-1:~# systemctl restart postgresql.service
## 编写数据#####################
root@pg-1:~# psql
postgres=# \c testdb
testdb=# insert into tb1 (name) values('hao');
INSERT 0 1
testdb=# select * from tb1;
 id | name
----+------
  3 | hao
############################################

# 备份(pg-2主机 备份pg-1主机数据)
root@pg-2:~# mkdir /backup/pgsql -p
root@pg-2:~# pg_basebackup -D /backup/pgsql/ -Ft -Pv -U postgres -h 192.168.139.161 -p 5432 -R
Password:
pg_basebackup: initiating base backup, waiting for checkpoint to complete
pg_basebackup: checkpoint completed
pg_basebackup: write-ahead log start point: 0/16000028 on timeline 1
pg_basebackup: starting background WAL receiver
pg_basebackup: created temporary replication slot "pg_basebackup_1590"
71814/71814 kB (100%), 2/2 tablespaces
pg_basebackup: write-ahead log end point: 0/16000100
pg_basebackup: waiting for background process to finish streaming ...
pg_basebackup: syncing data to disk ...
pg_basebackup: renaming backup_manifest.tmp to backup_manifest
pg_basebackup: base backup completed

root@pg-2:~# ll /backup/pgsql/
total 88440
drwxr-xr-x 2 root root     4096 Feb 27 23:09 ./
drwxr-xr-x 3 root root     4096 Feb 27 23:04 ../
-rw------- 1 root root     1024 Feb 27 23:09 16424.tar
-rw------- 1 root root   225901 Feb 27 23:09 backup_manifest
-rw------- 1 root root 73537024 Feb 27 23:09 base.tar
-rw------- 1 root root 16778752 Feb 27 23:09 pg_wal.tar
3.2)利用完全备份实现恢复
#在备份服务器上执行下面操作进行还原
#源pg-1机器换掉,现在在pg-2机器恢复
root@pg-2:~# mkdir /archive
root@pg-2:~# systemctl stop postgresql.service
root@pg-2:~# rm -rf /data/pgsql/*  # 删除原来的空数据保证恢复
root@pg-2:~# tar xf /backup/pgsql/base.tar -C /data/pgsql/
root@pg-2:~# tar xf /backup/pgsql/pg_wal.tar -C /archive/
root@pg-2:~# vim /data/pgsql/postgresql.conf
...# 添加下面两行
restore_command = 'cp /archive/%f %p'
recovery_end_command = 'immediate'
...
#如果pg_basebackup 执行时添加-R选项,可以不执行下面,否则会无法启动服务,执行下面指令创建文件后 才能启动
touch /pgsql/data/recovery.signal # 备份没有指定 -R 才执行
# 启动数据验证
root@pg-2:~# systemctl start postgresql.service
root@pg-2:~# systemctl is-active postgresql.service
active
postgres=# \c testdb
You are now connected to database "testdb" as user "postgres".
testdb=# select * from tb1;
 id | name
----+------
  3 | hao
(1 row)
4)利用PITR实现误删除的实战案例
场景说明
每天2:00备份,第二天10:00误删除数据库,如何恢复?
故障恢复过程
备份数据和归档
还原流程
-
还原完全备份
-
归档日志恢复:
-
备份中的归档
-
恢复2:00到10:00之间的归档
-
恢复在线redo
-
案例演示
备份
#在PG服务器开启归档
root@pg-1:~# vim /data/pgsql/postgresql.conf
...
archive_mode = on
archive_command = 'test ! -f /archive/%f && cp %p /archive/%f'
...
root@pg-1:~# mkdir /archive/
root@pg-1:~# systemctl restart postgresql.service

# 在数据库服务器上创建测试数据
root@pg-1:~# psql
postgres=# create database testdb1;
postgres=# \c testdb1
testdb1=# create table t1(id int);
testdb1=# insert into t1 values (1);
testdb1=# select * from t1 ;
 id
----
  1
(1 row)

#在备份服务器对PG数据库进行远程完全备份
root@pg-2:~# mkdir /backup/pg-backup-`date +%F` && pg_basebackup -D /backup/pg-backup-`date +%F` -Ft -Pv -U postgres -h 192.168.139.161 -p 5432 -R

root@pg-2:~# ll /backup/pg-backup-2025-02-27/
total 95784
drwxr-xr-x 2 root root     4096 Feb 27 15:40 ./
drwxr-xr-x 4 root root     4096 Feb 27 15:40 ../
-rw------- 1 root root     1024 Feb 27 15:40 16424.tar
-rw------- 1 root root   269524 Feb 27 15:40 backup_manifest
-rw------- 1 root root 81015296 Feb 27 15:40 base.tar
-rw------- 1 root root 16778752 Feb 27 15:40 pg_wal.tar

# # 继续在PG服务器上继续生成测试数据
testdb1=# insert into t1 values (2);
INSERT 0 1
testdb1=# select * from t1 ;
 id
----
  1
  2
(2 rows)

#模拟数据库删除
postgres=# drop database testdb1 ;

#发现故障,停止用户访问
#查看当前日志文件
postgres=# select pg_walfile_name(pg_current_wal_lsn());
     pg_walfile_name
--------------------------
 000000010000000000000004
(1 row)

postgres=# select txid_current();
 txid_current
--------------
          740
(1 row)
故障还原
#在PG服务器上切换归档日志
postgres=# select pg_switch_wal();
 pg_switch_wal
---------------
 0/1C000C50
(1 row)

#在要测试还原的服务器停止服务,准备还原
root@pg-2:~# rm -rf  /archive/*
root@pg-2:~# rm -rf  /data/pgsql/*
root@pg-2:~# tar xf /backup/pg-backup-2025-02-27/base.tar -C /data/pgsql/
root@pg-2:~# tar xf /backup/pg-backup-2025-02-27/pg_wal.tar -C /archive/
# root@pg-1:~# scp /data/pgsql/pg_wal/000000010000000000000004  192.168.139.162:/archive/
root@pg-1:~# scp /data/pgsql/pg_wal/*  192.168.139.162:/archive/
root@pg-2:~# pg_waldump /archive/000000010000000000000004 | grep -B 3 "740"
rmgr: Standby     len (rec/tot):     50/    50, tx:          0, lsn: 0/04000120, prev 0/040000F8, desc: RUNNING_XACTS nextXid 739 latestCompletedXid 738 oldestRunningXid 739
rmgr: Heap        len (rec/tot):     53/   829, tx:          0, lsn: 0/04000158, prev 0/04000120, desc: INPLACE off 4, blkref #0: rel 1664/0/1262 blk 0 FPW
rmgr: Heap        len (rec/tot):     54/    54, tx:        739, lsn: 0/04000498, prev 0/04000158, desc: DELETE off 4 flags 0x00 KEYS_UPDATED , blkref #0: rel 1664/0/1262 blk 0
rmgr: Standby     len (rec/tot):     54/    54, tx:          0, lsn: 0/040004D0, prev 0/04000498, desc: RUNNING_XACTS nextXid 740 latestCompletedXid 738 oldestRunningXid 739; 1 xacts: 739
rmgr: XLOG        len (rec/tot):    114/   114, tx:          0, lsn: 0/04000508, prev 0/040004D0, desc: CHECKPOINT_ONLINE redo 0/40004D0; tli 1; prev tli 1; fpw true; xid 0:740; oid 16392; multi 1; offset 0; oldest xid 716 in DB 1; oldest multi 1 in DB 1; oldest/newest commit timestamp xid: 0/0; oldest running xid 739; online
rmgr: Database    len (rec/tot):     38/    38, tx:        739, lsn: 0/04000580, prev 0/04000508, desc: DROP dir 1663/16388 # 这里一个  DROP dir 操作
rmgr: Transaction len (rec/tot):     98/    98, tx:        739, lsn: 0/040005A8, prev 0/04000580, desc: COMMIT 2025-02-27 16:13:29.208284 UTC; dropped stats: 1/16388/0; inval msgs: catcache 21 catcache 21; sync
rmgr: Standby     len (rec/tot):     50/    50, tx:          0, lsn: 0/04000610, prev 0/040005A8, desc: RUNNING_XACTS nextXid 740 latestCompletedXid 739 oldestRunningXid 740
rmgr: Transaction len (rec/tot):     34/    34, tx:        740, lsn: 0/04000648, prev 0/04000610, desc: COMMIT 2025-02-27 16:13:37.786059 UTC
可以看到删除库发生在 739 所以要恢复到 738
root@pg-2:~# vim /data/pgsql/postgresql.conf
...
restore_command = 'cp /archive/%f %p'
recovery_target_xid = '738'
...
# 启动数据库验证数据恢复
root@pg-2:~# chmod 0750 /data/pgsql
root@pg-2:~# systemctl start postgresql.service
root@pg-2:~# psql
postgres=# \c testdb1
testdb1=# select * from
information_schema.  public.              t1
testdb1=# select * from t1 ;
 id
----
  1
  2
(2 rows) # 数据已经恢复

# 但是插入数据失败
testdb1=# insert into t1 values (3);
ERROR:  cannot execute INSERT in a read-only transaction

# 恢复到正常模式
testdb1=# select pg_wal_replay_resume();

testdb1=# insert into t1 values (3); # 正常插入
testdb1=# select * from t1 ;
 id
----
  1
  2
  3
(3 rows)

文章评论