认识Docker
-
Docker主机(Host):一个物理机或虚拟机,用于运行Docker服务进程和容器。 Docker服务端(Server): Docker守护进程,运行docker容器。 Docker客户端(Client):客户端使用docker命令或其他工具调用dockerAPl。 Docker 仓库(Registry):保存镜像的仓库,类似于git或svn这样的版本控制系 Docker镜像(Images)︰镜像可以理解为创建实例使用的模板。 Docker 容器(Container):容器是从镜像生成对外提供服务的一个或一组服务。
-
官方仓库: https://hub.docker.com/
1)下载源优化及配置
1.1)yum安装
`更新源`
[root@std ~]# yum install -y wget
[root@std ~]# wget -O /etc/yum.repos.d/CentOS-Base.repo https://mirrors.aliyun.com/repo/Centos-7.repo
[root@std ~]# wget -O /etc/yum.repos.d/epel.repo http://mirrors.aliyun.com/repo/epel-7.repo
`查看源的docker`
[root@std ~]# yum list docker --show-duplicates
`安装CE的docker`
[root@std ~]# yum install -y yum-utils
[root@std ~]# yum-config-manager --add-repo https://download.docker.com/linux/centos/docker-ce.repo
[root@std ~]# yum list docker-ce --show-duplicates
[root@std ~]# yum install -y docker-ce
[root@hdss139-21 ~]# mkdir -p /data/docker
`配置docker`
#可以通过这个命令查看编写选项 dockerd --help
[root@std ~]# vim /etc/docker/daemon.json
{
 "registry-mirrors": [
    "https://o4omo0yw.mirror.aliyuncs.com"
  ],
 "exec-opts": ["native.cgroupdriver=systemd"],
 "bip": "172.139.146.1/24",
 "max-concurrent-downloads": 10,
 "max-concurrent-uploads": 5,
 "log-opts": {
   "max-size": "300m",
   "max-file": "2"
 },
 "data-root": "/data/docker",
 "live-restore": true
}
[root@std docker]# systemctl daemon-reload              #重启守护线程
[root@std docker]# systemctl start docker.service
[root@std docker]# systemctl enable docker.service
1.2)二进制安装
1.2.1)下载解压
[root@kvm01 src]# tar xf docker-19.03.15.tgz
[root@kvm01 src]# cp docker/* /usr/bin/
1.2.2)containerd:
`编写service文件`
[root@kvm01 src]# vim /usr/lib/systemd/system/containerd.service
[Unit]
Description=containerd container runtime
Documentation=https://containerd.io
After=network.target local-fs.target
[Service]
ExecStartPre=-/sbin/modprobe overlay
ExecStart=/usr/bin/containerd
Type=notify
Delegate=yes
KillMode=process
Restart=always
RestartSec=5
# Having non-zero Limit*s causes performance problems due to accounting overhead
# in the kernel. We recommend using cgroups to do container-local accounting.
LimitNPROC=infinity
LimitCORE=infinity
LimitNOFILE=infinity
# Comment TasksMax if your systemd version does not supports it.
# Only systemd 226 and above support this version.
TasksMax=infinity
OOMScoreAdjust=-999
[Install]
WantedBy=multi-user.target
`启动服务`
[root@kvm01 src]# systemctl enable --now containerd.service && systemctl status containerd.service
1.2.3)docker.service:
[root@kvm01 src]# groupadd docker
`编写service文件`
[root@kvm01 src]# vim /usr/lib/systemd/system/docker.service
[Unit]
Description=Docker Application Container Engine
Documentation=https://docs.docker.com
After=network-online.target docker.socket firewalld.service containerd.service time-set.target
Wants=network-online.target containerd.service
Requires=docker.socket
[Service]
Type=notify
# the default is not to use systemd for cgroups because the delegate issues still
# exists and systemd currently does not support the cgroup feature set required
# for containers run by docker
ExecStart=/usr/bin/dockerd -H fd:// --containerd=/run/containerd/containerd.sock
ExecReload=/bin/kill -s HUP $MAINPID
TimeoutStartSec=0
RestartSec=2
Restart=always
# Note that StartLimit* options were moved from "Service" to "Unit" in systemd 229.
# Both the old, and new location are accepted by systemd 229 and up, so using the old location
# to make them work for either version of systemd.
StartLimitBurst=3
# Note that StartLimitInterval was renamed to StartLimitIntervalSec in systemd 230.
# Both the old, and new name are accepted by systemd 230 and up, so using the old name to make
# this option work for either version of systemd.
StartLimitInterval=60s
# Having non-zero Limit*s causes performance problems due to accounting overhead
# in the kernel. We recommend using cgroups to do container-local accounting.
LimitNOFILE=infinity
LimitNPROC=infinity
LimitCORE=infinity
# Comment TasksMax if your systemd version does not support it.
# Only systemd 226 and above support this option.
TasksMax=infinity
# set delegate yes so that systemd does not reset the cgroups of docker containers
Delegate=yes
# kill only the docker process, not all processes in the cgroup
KillMode=process
OOMScoreAdjust=-500
[Install]
WantedBy=multi-user.target
1.2.4)docker.socket
`编写service文件`
[root@kvm01 src]# vim /usr/lib/systemd/system/docker.socket
[Unit]
Description=Docker Socket for the API
[Socket]
# If /var/run is not implemented as a symlink to /run, you may need to
# specify ListenStream=/var/run/docker.sock instead.
ListenStream=/run/docker.sock
SocketMode=0660
SocketUser=root
SocketGroup=docker
[Install]
WantedBy=sockets.target
`启动服务`
[root@kvm01 src]# systemctl enable --now docker.service && systemctl status docker.service
[root@kvm01 src]# systemctl enable --now docker.socket && systemctl status docker.socket
1.3)镜像的结构
#镜像的结构: registry_name/repository_name/image_name:tag_name
2)docker的应用
[root@std ~]# docker info
`第一个容器`
[root@std ~]# docker run hello-world
To generate this message, Docker took the following steps:
1. The Docker client contacted the Docker daemon.
2. The Docker daemon pulled the "hello-world" image from the Docker Hub.
(amd64)
3. The Docker daemon created a new container from that image which runs the
executable that produces the output you are currently reading.
4. The Docker daemon streamed that output to the Docker client, which sent it
to your terminal.
`登录自己的账号`
[root@std ~]# docker login docker.io
[root@std ~]# cat /root/.docker/config.json #查看密码
[root@std ~]#echo _"b2xkYm95MTEwM******1zzZo" |base64 -d
https://mirrors.aliyun.com/docker-ce/linux/static/stable/x86_64/
2.1)搜索镜像
[root@std ~]# docker search alpine
2.2)下载镜像
[root@std ~]# docker pull alpine
#下载指定tag
[root@std ~]# docker pull alpine:3.10.3
或者
[root@std ~]#docker pull docker.io/library/alpine:3.10.3
'注:只有dockerhub才可以使用[root@std ~]# docker pull alpine:3.10.3 因为dockerhub仓库是开源的'
2.3)查看本地镜像
[root@std ~]# docker images
或者
[root@std ~]# docker image ls
REPOSITORY TAG IMAGE ID CREATED SIZE
alpine latest c059bfaa849c 19 months ago 5.59MB
hello-world latest feb5d9fea6a5 21 months ago 13.3kB
alpine 3.10.3 965ea09ff2eb 3 years ago 5.55MB
2.4)给镜像打标签
[root@std ~]# docker tag c059bfaa849c docker.io/stangj/alpine:v3.10.1
[root@std ~]# docker image ls
REPOSITORY TAG IMAGE ID CREATED SIZE
alpine latest c059bfaa849c 19 months ago 5.59MB
stangj/alpine v3.10.1 c059bfaa849c 19 months ago 5.59MB
hello-world latest feb5d9fea6a5 21 months ago 13.3kB
alpine 3.10.3 965ea09ff2eb 3 years ago 5.55MB
2.5)推送镜像到仓库
[root@std ~]# docker push docker.io/stangj/alpine:v3.10.1
'注意:docker是增量的'
2.6)删除镜像
`删除标签`
[root@std ~]# docker rmi docker.io/stangj/alpine:v3.10.1
Untagged: stangj/alpine:v3.10.1
或者
[root@std ~]# docker rmi stangj/alpine:v3.10.1
[root@std ~]# docker image ls
REPOSITORY    TAG       IMAGE ID       CREATED         SIZE
alpine        latest    c059bfaa849c   19 months ago   5.59MB
alpine        v3.10.5   c059bfaa849c   19 months ago   5.59MB
hello-world   latest    feb5d9fea6a5   21 months ago   13.3kB
alpine        3.10.3    965ea09ff2eb   3 years ago     5.55MB
'在一个镜像有多个标签的时候,这样只是删除了其中的一个标签'
`彻底删除镜像`
[root@std ~]# docker rmi -f c059bfaa849c
[root@std ~]# docker image ls
REPOSITORY    TAG       IMAGE ID       CREATED         SIZE
hello-world   latest    feb5d9fea6a5   21 months ago   13.3kB
alpine        3.10.3    965ea09ff2eb   3 years ago     5.55MB
3)容器操作
3.1)查看容器进程
`查看所有容器`
[root@std ~]# docker ps -a
`查看只运行的容器`
[root@std ~]# docker ps
3.2)启动容器(运行镜像)
docker run是日常用的最频繁用的命令之一,同样也是较为复杂的命令之一
命令格式:docker run [OPTIONS] IMAGE [COMMAND][ARG...]
OPTIONS:选项
-i:表示启动一个可交互的容器,并持续打开标准输入-t:表示使用终端关联到容器的标准输入输出上
-d:表示将容器放置后台运行
--rm:退出后即删除容器
--name :表示定义容器唯一名称
IMAGE:表示要运行的镜像
COMMAND:表示启动容器时要运行的命令*
`运行一个容器(交互式)`
[root@std ~]# docker tag 965ea09ff2eb stangj:v3.10.3
[root@std ~]# docker run -it stangj/alpine:v3.10.3 /bin/sh
/ # ip a
1: lo: <LOOPBACK,UP,LOWER_UP> mtu 65536 qdisc noqueue state UNKNOWN qlen 1000
link/loopback 00:00:00:00:00:00 brd 00:00:00:00:00:00
inet 127.0.0.1/8 scope host lo
valid_lft forever preferred_lft forever
12: eth0@if13: <BROADCAST,MULTICAST,UP,LOWER_UP,M-DOWN> mtu 1500 qdisc noqueue state UP
link/ether 02:42:ac:8b:92:02 brd ff:ff:ff:ff:ff:ff
inet 172.139.146.2/24 brd 172.139.146.255 scope global eth0
valid_lft forever preferred_lft forever
/ # exit
[root@std ~]# docker run --rm stangj/alpine:v3.10.3 /bin/echo hello
hello
`运行一个容器(非交互式)`
[root@std ~]# docker run -d --name myalpine stangj/alpine:v3.10.3 /bin/sleep 300 #睡300s关闭容器
2f37efc9ca954bc0dc6bd55b4d950dcd3e1c9b140077d7df50f3154e4d069bdf
[root@std ~]# docker ps
CONTAINER ID IMAGE COMMAND CREATED STATUS PORTS NAMES
2f37efc9ca95 stangj/alpine:v3.10.3 "/bin/sleep 300" 17 seconds ago Up 16 seconds myalpine
3.3)进入容器
[root@std ~]# docker exec -it myalpine /bin/sh
/ # ip a
1: lo: <LOOPBACK,UP,LOWER_UP> mtu 65536 qdisc noqueue state UNKNOWN qlen 1000
    link/loopback 00:00:00:00:00:00 brd 00:00:00:00:00:00
    inet 127.0.0.1/8 scope host lo
       valid_lft forever preferred_lft forever
16: eth0@if17: <BROADCAST,MULTICAST,UP,LOWER_UP,M-DOWN> mtu 1500 qdisc noqueue state UP
    link/ether 02:42:ac:8b:92:02 brd ff:ff:ff:ff:ff:ff
    inet 172.139.146.2/24 brd 172.139.146.255 scope global eth0
       valid_lft forever preferred_lft forever
/ #
'注:只能进入一个Up的容器'
3.4)启动·停止·重启·删除一个容器
[root@std ~]# docker start myalpine
[root@std ~]# docker stop myalpine
[root@std ~]# docker restart myalpine
[root@std ~]# docker rm myalpine
[root@std ~]# docker rm -f myalpine
#容器自启
docker update --restart=always 容器id 或 容器名称
`将挂掉的容器全部删除`
[root@std ~]# for i in `docker ps -a |grep -i exit |awk '{print $1}'`;do docker rm $i ;done
3.5)容器的提交
`后台启动一个非交互式300秒的容器`
[root@std ~]# docker run -d --name myalpine stangj/alpine:v3.10.3 /bin/sleep 300
`进入容器`
[root@std ~]# docker exec -it myalpine /bin/sh
/ # ls
bin dev etc home lib media mnt opt proc root run sbin srv sys tmp usr var
/ # echo 123 >/1.text
/ # ls
1.text dev home media opt root sbin sys usr
bin etc lib mnt proc run srv tmp var
/ # cat 1.text
123
/ # exit
`给容器提交成新的镜像`
[root@std ~]# docker commit -p myalpine stangj/alpine:v3.10.3_1.text
3.6)镜像保存到本地
[root@std ~]# docker save stangj/alpine:v3.10.3_1.text > alpine:v3.10.3_1.text.tar
或者
[root@std ~]# docker save b05c16efc003 > alpine:v3.10.3_1.text.tar
3.7)本地镜像导入到docker中
`删除该镜像`
[root@std ~]# docker rmi -f b05c16efc003
`本地镜像导入到docker中`
[root@std ~]# docker load < alpine\:v3.10.3_1.text.tar
`查看docker镜像列表`
[root@std ~]# docker images
REPOSITORY TAG IMAGE ID CREATED SIZE
stangj/alpine v3.10.3_1.text b05c16efc003 18 minutes ago 5.55MB
hello-world latest feb5d9fea6a5 21 months ago 13.3kB
alpine 3.10.3 965ea09ff2eb 3 years ago 5.55MB
stangj/alpine v3.10.3 965ea09ff2eb 3 years ago 5.55MB
3.8)查看容器日志
`启动一个容器`
[root@std ~]# docker run hello-world &>/dev/null
`查看容器`
[root@std ~]# docker ps -a
CONTAINER ID IMAGE COMMAND CREATED STATUS PORTS NAMES
dd64d9b44573 hello-world "/hello" 24 seconds ago Exited (0) 22 seconds ago objective_satoshi
`查看容器日志`
[root@std ~]# docker logs dd64d9b44573
或者
[root@std ~]# docker logs -f dd64d9b44573
Hello from Docker!
This message shows that your installation appears to be working correctly.
To generate this message, Docker took the following steps:
1. The Docker client contacted the Docker daemon.
2. The Docker daemon pulled the "hello-world" image from the Docker Hub.
(amd64)
3. The Docker daemon created a new container from that image which runs the
executable that produces the output you are currently reading.
4. The Docker daemon streamed that output to the Docker client, which sent it
to your terminal.
To try something more ambitious, you can run an Ubuntu container with:
$ docker run -it ubuntu bash
Share images, automate workflows, and more with a free Docker ID:
https://hub.docker.com/
For more examples and ideas, visit:
https://docs.docker.com/get-started/
`查看最后两个行日志并实时输出`
[root@std ~]# docker logs --tail 2 -f dd64d9b44573
For more examples and ideas, visit:
https://docs.docker.com/get-started/
3.9)查看镜像详细信息
[root@std ~]# docker inspect dd64d9b44573
`通过json查看指定内容,一般先使用上面的命令获取信息json数据`
[root@std ~]# docker inspect -f {{.State.Status}} dd64d9b44573
running
3.10)批量删除退出的容器
[root@kvm02 ~]# docker rm -f $(docker ps -aq -f status=exited)
3.11)指定容器DNS
[root@kvm02 ~]# docker run -it --dns 233.6.6.6 nginx:latest bash
root@8fea54f04a0c:/# cat /etc/resolv.conf
nameserver 233.6.6.6
3.12)其他命令:
# docker update 容器--cpus 2 #更新容器配置信息
# docker events             #获取dockerd的实时事件
# docker cp 容器名:容器内文件绝对路径 宿主机      #将容器里面的文件拷贝到宿主机
# docker cp 宿主机 容器名:容器内文件绝对路径       #将宿主机的文件拷贝到容器里面
4)Docker介绍
4.1)Docker对比虚拟机:
-
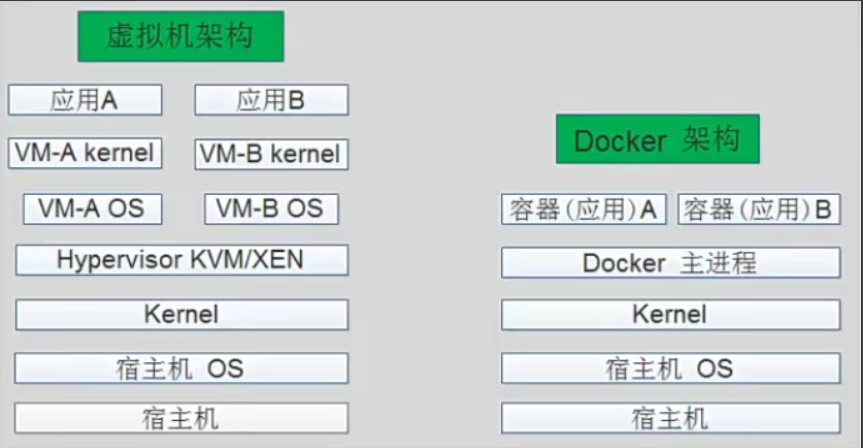
资源利用率更高:一台物理机可以运行数百个容器,但是一般只能运行数十个虚拟机。
-
开销更小:不需要启动单独的虚拟机占用硬件资源。
-
启动速度更快:可以在数秒内完成启动。
-
使用虚拟机是为了更好的实现服务运行环境隔离,每个虚拟机都有独立的内核,虚拟化可以实现不同操作系统的虚拟机,但是通常一个虚拟机只运行一个服务,很明显资源利用率比较低且造成不必要的性能损耗,我们创建虚拟机的目的是为了运行应用程序,比如Nginx、PHP、Tomcat 等 web程序,使用虚拟机无疑带来了一些不必要的资源开销,但是容器技术则基于减少中间运行环节带来较大的性能提升。
4.2)Linux Namespace技术:
-
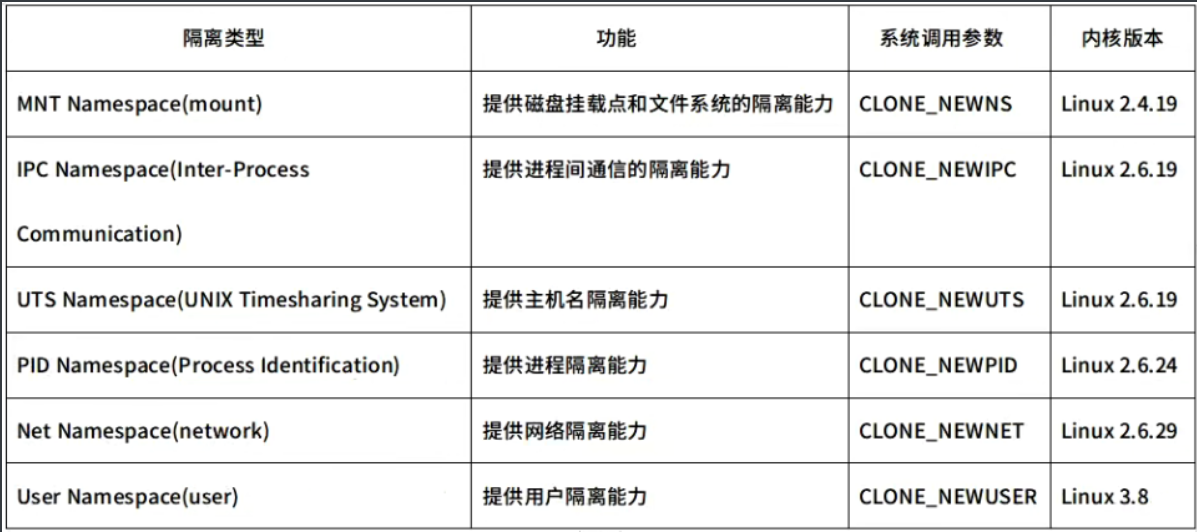
namespace是Linux系统的底层概念,在内核层实现,即有一些不同类型的命名空间被部署在核内,各个docker容器运行在同一个docker主进程并且共用同一个宿主机系统内核,各docker容器运行在宿主机的用户空间,每个容器都要有类似于虚拟机一样的相互隔离的运行空间,但是容器技术是在一个进程内实现运行指定服务的运行环境,并且还可以保护宿主机内核不受其他进程的和影响,如文件系统空间、网络空间、进程空间等,目前主要通过以下技术实现容器运行空间的相互隔离:
4.2.1)MNT Namespace:
-
每个容器都要有独立的根文件系统有独立的用户空间,以实现在容器里面启动服务并且使用容器的运行环境,即一个宿主机是ubuntu的服务器,可以在里面启动一个centos运行环境的容器并且在容器里面启动一个Nginx服务,此Nginx运行时使用的运行环境就是centos系统目录的运行环境,但是在容器里面是不能访问宿主机的资源,宿主机是使用了chroot技术把容器锁定到一个指定的运行目录里面。
-
Debian系统安装基础命令:
# apt update
# apt install procps       (top命令)
# apt install iputls-ping  (ping命令)
# apt install net-tools    (网络工具)
4.2.2)IPC Namespace:
-
一个容器内的进程间通信,允许一个容器内的不同进程的(内存、缓存等)数据访问,但是不能夸容器访问其他容器的数据。
4.2.3)UTS Namespace:
-
UTS namespace (UNIX Timesharing System包含了运行内核的名称、版本、底层体系结构类型等信息)用于系统标识,其中包含了hostname和域名domainname ,它使得一个容器拥有属于自己hostname标识,这个主机名标识独立于宿主机系统和其上的其他容器。
4.2.4)PID Namespace:
-
Linux系统中,有一个PID为1的进程(init/systemd)是其他所有进程的父进程,那么在每个容器内也要有一个父进程来管理其下属的子进程,那么多个容器的进程通PID namespace进程隔离(比如PID编号重复、器内的主进程生成与回收子进程等)。
4.2.5)Net Namespace:
-
每一个容器都类似于虚拟机一样有自己的网卡、监听端口、TCP/IP协议栈等,Docker使用network namespace启动一个vethX接口,这样你的容器将拥有它自己的桥接ip地址,通常是docker0,而docker0实质就是Linux的虚拟网桥,网桥是在OSI七层模型的数据链路层的网络设备,通过mac地址对网络进行划分,并且在不同网络直接传递数据。
4.2.6)User Namespace:
-
各个容器内可能会出现重名的用户和用户组名称,或重复的用户UID或者GID,那么怎么隔离各个容器内的用户空间呢?
-
User Namespace允许在各个宿主机的各个容器空间内创建相同的用户名以及相同的用户UID和GID,只是会把用户的作用范围限制在每个容器内,即A容器和B容器可以有相同的用户名称和ID的账户,但是此用户的有效范围仅是当前容器内,不能访问另外一个容器内的文件系统,即相互隔离、互补影响、永不相见。
4.3)Linux control groups:
-
在一个容器,如果不对其做任何资源限制,则宿主机会允许其占用无限大的内存空间,有时候会因为代码 bug程序会一直申请内存,直到把宿主机内存占完,为了避免此类的问题出现,宿主机有必要对容器进行资源分配限制,比如CPU.内存等,Linux Cgroups的全称是Linux Control Groups,它最主要的作用,就是限制一个进程组能够使用的资源上限,包括CPU、内存、磁盘、网络带宽等等。此外,还能够对进程进行优先级设置,以及将进程挂起和恢复等操作。
4.4)Docker的优势:
-
快速部署:短时间内可以部署成百上千个应用,更快速交付到线上。
-
高效虚拟化:不需要额外的hypervisor支持,直接基于linux实现应用虚拟化I相比虚拟机大幅提高性能和效率。
-
节省开支:提高服务器利用率,降低IT支出。
-
简化配置:将运行环境打包保存至容器,使用时直接启动即可。
-
快速迁移和扩展:可夸平台运行在物理机、虚拟机、公有云等环境,良好的兼容性可以方便将应用从A宿主机迁移到B宿主机,甚至是A平台迁移到B平台。
4.5)docker存储引擎:
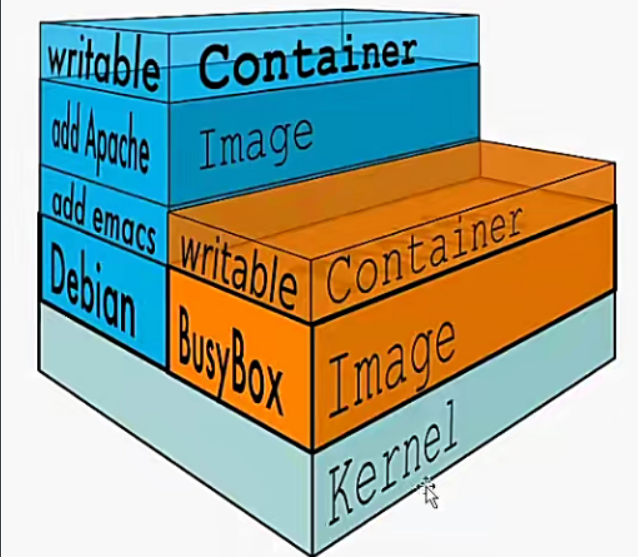
AUFS (Another UnionFS):是一种 Union FS,是文件级的存储驱动。所谓UnionFS 就是把不同物理位置的目录合并mount到同一个目录中。简单来说就是支持将不同目录挂载到同一个虚拟文件系统下的文件系统。这种文件系统可以一层一层地叠加修改文件。无论底下有多少层都是只读的,只有最上层的文件系统是可写的。当需要修改一个文件时,AUFS创建该文件的一个副本,使用CoW将文件从只读层复制到可写层进行修改,结果也保存在可写层。在Docker中,底下的只读层就是image,可写层就是Container,是 Docker 18.06及更早版本的首选存储驱动程序,在内核3.13上运行Ubuntu 14.04时不支持overlay2。
Overlay:一种Union FS文件系统,Linux内核3.18后支持。
overlay2: Overlay 的升级版,到目前为止,所有Linux发行版推荐使用的存储类型。
devicemapper:是CentOS和RHEL的推荐存储驱动程序,因为之前的内核版本不支持overlay2,但是当前较新版本的CentOS和 RHEL现在已经支持overlay2,因此推荐使用overlay2。
devicemapper:是CentOS和 RHELT的推荐存储驱动程序,因为之前的内核版本不支持overlay2,但是当前较新版本的CentOS和 RHEL现在已经支持overlay2,因此推荐使用overlay2。
ZFS(Sun-2005)/btrfs(Oracle-2007):目前没有广泛使用。
vfs:用于测试环境,适用于无法使用copy-on-write 文件系统的情况。此存储驱动程序的性能很差,通常不建议用于生产。
-
Docker官方推荐首选存储引擎为overlay2, devicemapper存在使用空间方面的一些限制,虽然可以通过后期配置解决,但是官方依然推荐使用overlay2
4.6)查看containerd进程关系:
-
dockerd:被client直接访问,其父进程为宿主机的systemd守护进程。
-
docker-proxy︰实现容器通信,其父进程为dockerd
-
containerd:被dockerd进程调用以实现与runc交互。
-
containerd-shim:真正运行容器的载体,其父进程为containerd。
4.7)容器的创建与管理过程:
"通信流程:"
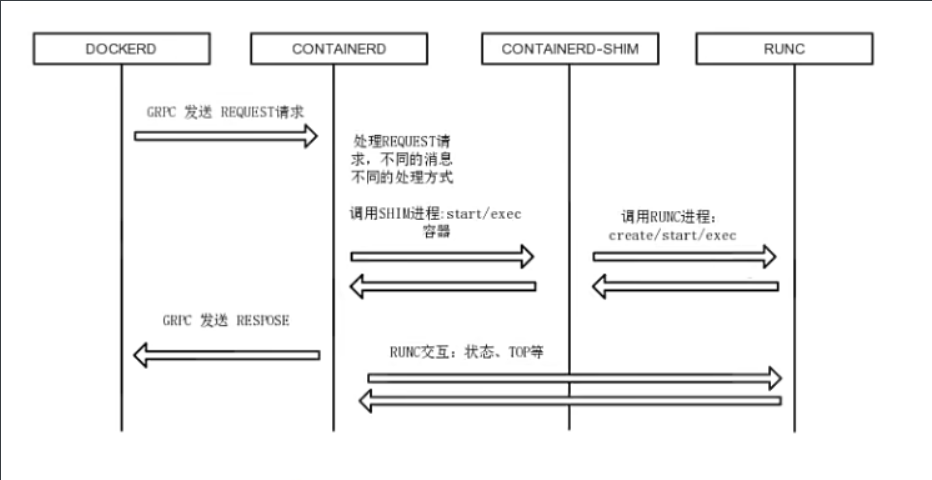
1.dockerd通过grpc和containerd模块通信(runC)交换,dockerd和containerd通信的socket 文件:/run/containerd/containerd.socko
2. containerd在 dockerd启动时被启动,然后containerd启动grpc请求监听,containerd处理grpc请求,根据请求做相应动作。/usr/bin/dockerd -H fd://--containerd=/run/containerd/containerd.sock
3.若是创建容器,containerd拉起一个container-shim 容器进程,并进行相应的创建操作。
4.container-shim被拉起后,start/exec/create拉起runC进程,通过exit、control文件和containerd通信,通过父子进程关系和SIGCHLD(信号)监控容器中进程状态。
5.在整个容器生命周期中,containerd通过epoll监控容器文件,监控容器事件。
4.8)docker镜像加速配置:
-
国内下载国外的镜像有时候会很慢,因此可以更改docker 配置文件添加一个加速器,可以通过加速器达到加速下载镜像的目的。
4.8.1)获取加速地址:
-
浏览器打开http://cr.console.aliyun.com,注册或登录阿里云账号,点击左侧的镜像加速器,将会得到一个专属的加速地址,而且下面有使用配置说明:
sudo mkdir -p /etc/docker
sudo tee /etc/docker/daemon.json <<-'EOF'
{
  "registry-mirrors": ["https://b73cdez5.mirror.aliyuncs.com"]
}
EOF
sudo systemctl daemon-reload
sudo systemctl restart docker
5)Docker镜像管理:
-
Docker镜像含有启动容器所需要的文件系统及所需要的内容,因此镜像主要用于创建并启动docker容器。
-
Docker镜像含里面是一层层文件系统,叫做Union File System (Union FS联合文件系统),2004年由纽约州立大学石溪分校开发,联合文件系统可以将多个目录挂载到一起从而形成一整个虚拟文件系统,该虚拟文件系统的目录结构就像普通linux的目录结构一样,docker通过这些文件再加上宿主机的内核提供了一个linux的虚拟环境,每一层文件系统我们叫做一层layer,联合文件系统可以对每一层文件系统设置三种权限,只读(readonly)、读写(readwrite)和写出(whiteout-able),但是docker 镜像中每一层文件系统都是只读的,构建镜像的时候,从一个最基本的操作系统开始,每个构建的操作都相当于做一层的修改,增加了一层文件系统,一层层往上叠加,上层的修改会覆盖底层该位置的可见性,这也很容易理解,就像上层把底层遮住了一样,当使用镜像的时候,我们只会看到一个完全的整体,不知道里面有几层也不需要知道里面有几层