kubeasz部署k8s集群
kubeasz自动化部署k8s集群
架构
| 主机名 | IP | 类型 | CPU/内存 | VIP | 备注 |
|---|---|---|---|---|---|
| k8s-master01 | 192.168.139.231 | ansible/etcdHaproxy/keepalived/k8s管理节点 | 4核心/5G | 192.168.139.188 | 部署k8s服务 k8s控制端通过VIP做主备高可用 保存K8s数据 |
| k8s-master02 | 192.168.139.232 | etcd/k8s管理节点 | 2核心/2.5G | 192.168.139.188 | k8s控制端通过VIP做主备高可用 保存K8s数据 |
| k8s-master03 | 192.168.139.233 | etcd/k8s管理节点 | 2核心/2.5G | 192.168.139.188 | k8s控制端通过VIP做主备高可用 保存K8s数据 |
| harbor | 192.168.139.234 | Harbor/Haproxy/keepalived | 2核心/2G | 镜像服务器 代理服务器 | |
| k8s-node01 | 192.168.139.235 | k8s的node节点 | 2核心/2G | 真正运行容器的服务器 | |
| k8s-node02 | 192.168.139.236 | k8s的node节点 | 2核心/2G | 真正运行容器的服务器 | |
| k8s-node02 | 192.168.139.237 | k8s的node节点 | 2核心/2G | 真正运行容器的服务器 |
k8s软件清单
端口: 192.168.139.188  #在负载均衡配置反向代理
操作系统: Ubuntu server 20.04
k8s版本 1.19.x
calico 3.15.3
1)部署haproxy
1.1)下载haproxy/Keepalived
root@harbor:~# apt install -y  haproxy keepalived
root@k8s-master01:~#  apt install -y  haproxy keepalived
1.2)配置Haproxy/Keepalived
1.2.1)配置keepalived
`配置keepalived`
root@k8s-master01:~# cp /usr/share/doc/keepalived/samples/keepalived.conf.vrrp /etc/keepalived/keepalived.conf
root@k8s-master01:~# vim /etc/keepalived/keepalived.conf
global_defs {
notification_email {
acassen
}
notification_email_from Alexandre.Cassen@firewall.loc
smtp_server 192.168.200.1
smtp_connect_timeout 30
router_id LVS_DEVEL
}
vrrp_instance VI_1 {
state MASTER
interface eth0
garp_master_delay 10
smtp_alert
virtual_router_id 50
priority 100
advert_int 1
authentication {
auth_type PASS
auth_pass 1111
}
virtual_ipaddress {
192.168.139.188 dev eth0 label eth0:0
192.168.139.189 dev eth0 label eth0:1
192.168.139.190 dev eth0 label eth0:2
}
}
root@k8s-master01:~# systemctl restart keepalived.service
root@k8s-master01:~# systemctl enable keepalived.service
root@k8s-master01:~# ifconfig
.......................
eth0:0: flags=4163<UP,BROADCAST,RUNNING,MULTICAST> mtu 1500
inet 192.168.139.188 netmask 255.255.255.255 broadcast 0.0.0.0
ether 00:0c:29:b8:15:ee txqueuelen 1000 (Ethernet)
eth0:1: flags=4163<UP,BROADCAST,RUNNING,MULTICAST> mtu 1500
inet 192.168.139.189 netmask 255.255.255.255 broadcast 0.0.0.0
ether 00:0c:29:b8:15:ee txqueuelen 1000 (Ethernet)
eth0:2: flags=4163<UP,BROADCAST,RUNNING,MULTICAST> mtu 1500
inet 192.168.139.190 netmask 255.255.255.255 broadcast 0.0.0.0
ether 00:0c:29:b8:15:ee txqueuelen 1000 (Ethernet)
.......................
root@k8s-master01:~# scp /etc/keepalived/keepalived.conf 192.168.139.234:/etc/keepalived/keepalived.conf
root@harbor:~# vim /etc/keepalived/keepalived.conf
.............
state BACKUP
...............
priority 90
.............
root@harbor:~# systemctl restart keepalived.service
root@harbor:~# systemctl enable keepalived.service
1.2.2)配置Haproxy
root@k8s-master01:~# cat /etc/haproxy/haproxy.cfg
# 最后一行添加下面内容
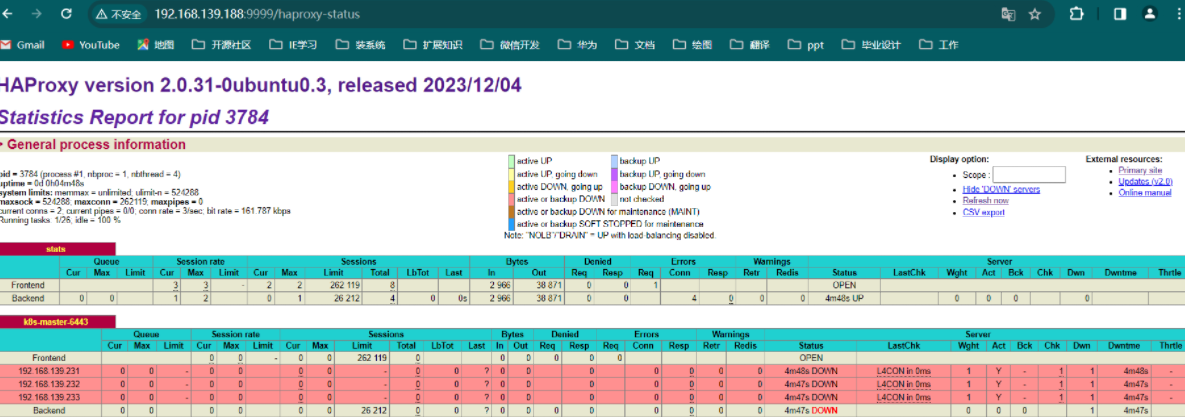
listen stats
mode http
bind 0.0.0.0:9999
stats enable
log global
stats uri /haproxy-status
stats auth haadmin:123456
listen k8s-master-6443
bind 192.168.139.188:6443
mode tcp
server 192.168.139.231 192.168.139.231:6443 check inter 2s fall 3s rise 5
server 192.168.139.232 192.168.139.232:6443 check inter 2s fall 3s rise 5
server 192.168.139.233 192.168.139.233:6443 check inter 2s fall 3s rise 5
root@k8s-master01:~# systemctl restart haproxy.service
root@k8s-master01:~# ss -tnl
State Recv-Q Send-Q Local Address:Port Peer Address:Port
LISTEN 0 4096 127.0.0.53%lo:53 0.0.0.0:*
LISTEN 0 128 0.0.0.0:22 0.0.0.0:*
LISTEN 0 128 127.0.0.1:6010 0.0.0.0:*
LISTEN 0 4096 192.168.139.188:6443 0.0.0.0:*
LISTEN 0 4096 0.0.0.0:9999 0.0.0.0:*
LISTEN 0 128 [::]:22 [::]:*
LISTEN 0 128 [::1]:6010 [::]:*
root@k8s-master01:~# systemctl enable haproxy.service
root@k8s-master01:~# scp /etc/haproxy/haproxy.cfg 192.168.139.234:/etc/haproxy/haproxy.cfg
root@harbor:~# echo 'net.ipv4.ip_nonlocal_bind = 1' >> /etc/sysctl.conf
root@harbor:~# sysctl -p
root@harbor:~# systemctl restart haproxy.service
root@harbor:~# systemctl enable haproxy.service
root@harbor:~# ss -tnl
State Recv-Q Send-Q Local Address:Port Peer Address:Port
LISTEN 0 4096 192.168.139.188:6443 0.0.0.0:*
LISTEN 0 4096 0.0.0.0:9999 0.0.0.0:*
LISTEN 0 4096 127.0.0.53%lo:53 0.0.0.0:*
LISTEN 0 128 0.0.0.0:22 0.0.0.0:*
LISTEN 0 128 127.0.0.1:6010 0.0.0.0:*
LISTEN 0 128 [::]:22 [::]:*
LISTEN 0 128 [::1]:6010 [::]:*
2)部署habor(之https)
2.1)下载docker/harbor
root@harbor:~# mkdir /apps
`安装docker`
root@harbor:~# ls
docker-19.03.15-binary-install.tar.gz
root@harbor:~# tar xf docker-19.03.15-binary-install.tar.gz
root@harbor:~# bash docker-install.sh
# 注意这个安装的docker是我提取写的一键化安装脚本
`上传harbor安装包`
root@harbor:/apps# ls
harbor-offline-installer-v2.5.4.tgz
root@harbor:/apps# tar xf harbor-offline-installer-v2.5.4.tgz
root@harbor:/apps/harbor# cp harbor.yml.tmpl harbor.yml
2.2)自签名证书
`创建用于habor的证书`
root@harbor:/apps/harbor# mkdir certs
root@harbor:/apps/harbor# openssl genrsa -out /apps/harbor/certs/harbor-ca.key
root@harbor:/apps/harbor# touch /root/.rnd
root@harbor:/apps/harbor# openssl req -x509 -new -nodes -key /apps/harbor/certs/harbor-ca.key -subj "/CN=harbor.stangj.net" -days 7120 -out /apps/harbor/certs/harbor-ca.crt
`查看证书`
root@harbor:/apps/harbor# ls certs/
harbor-ca.crt  harbor-ca.key
2.3)配置harbor
root@harbor:/apps/harbor# vim /apps/harbor/harbor.yml
# 主要修改了一下信息
....
hostname: harbor.stangj.net
....
port: 443
certificate: /apps/harbor/certs/harbor-ca.crt
private_key: /apps/harbor/certs/harbor-ca.key
...
harbor_admin_password: 123456
`启动harbor并开启扫描器`
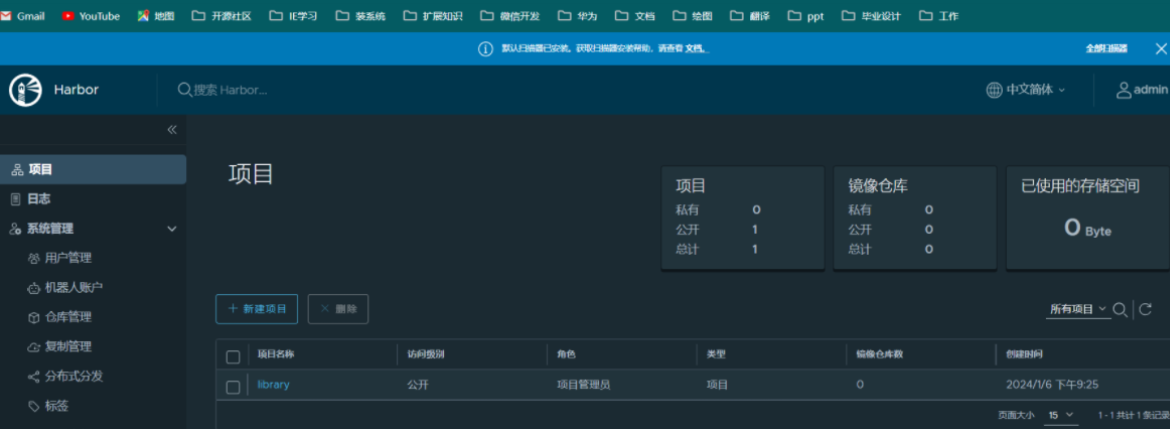
root@harbor:/apps/harbor# ./install.sh --with-trivy
-
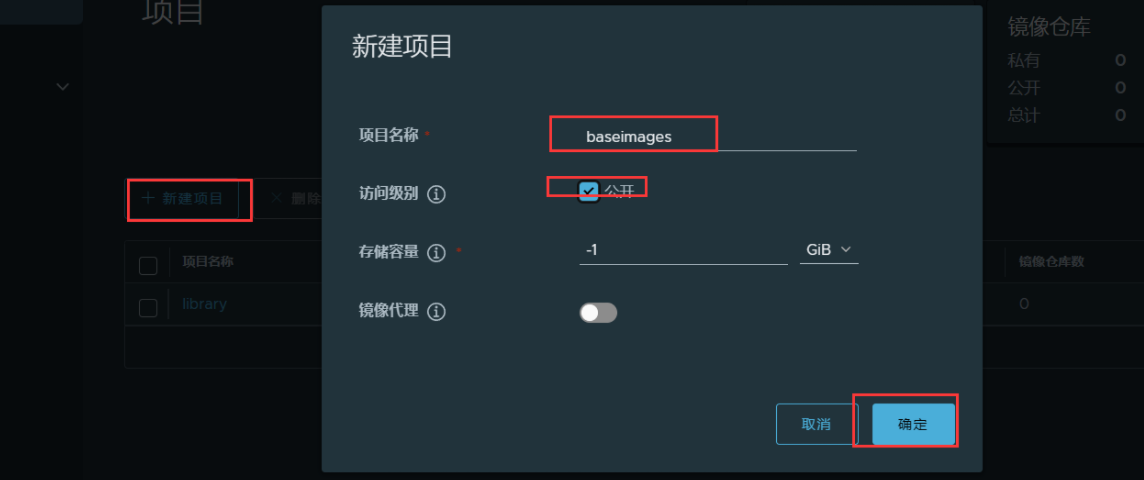
创建一个项目
2.4)验证harbor是否可以上传镜像
2.4.1)k8s-master01安装好docker
`在k8s-master01安装好docker`
root@k8s-master01:~# docker -v
Docker version 19.03.15, build 99e3ed8
2.4.2)将harbor的公钥拷贝到k8s-master01节点
root@k8s-master01:~# echo '192.168.139.234 harbor.stangj.net' >> /etc/hosts
root@k8s-master01:~# mkdir /etc/docker/certs.d/harbor.stangj.net -p
root@k8s-master01:/etc/docker/certs.d/harbor.stangj.net# scp 192.168.139.234:/apps/harbor/certs/harbor-ca.crt .
2.4.3)k8s-master01节点登录harbor
root@k8s-master01:~# docker login harbor.stangj.net
Username: admin
Password: # 123456
WARNING! Your password will be stored unencrypted in /root/.docker/config.json.
Configure a credential helper to remove this warning. See
https://docs.docker.com/engine/reference/commandline/login/#credentials-store
Login Succeeded
`配置镜像加速`
root@k8s-master01:~# tee /etc/docker/daemon.json <<-'EOF'
{
"registry-mirrors": ["https://b73cdez5.mirror.aliyuncs.com"]
}
EOF
root@k8s-master01:~# docker pull centos:7.9.2009
root@k8s-master01:~# docker pull alpine
root@k8s-master01:~# docker tag centos:7.9.2009 harbor.stangj.net/baseimages/centos:7.9.2009
root@k8s-master01:~# docker tag alpine:latest harbor.stangj.net/baseimages/alpine:stangj
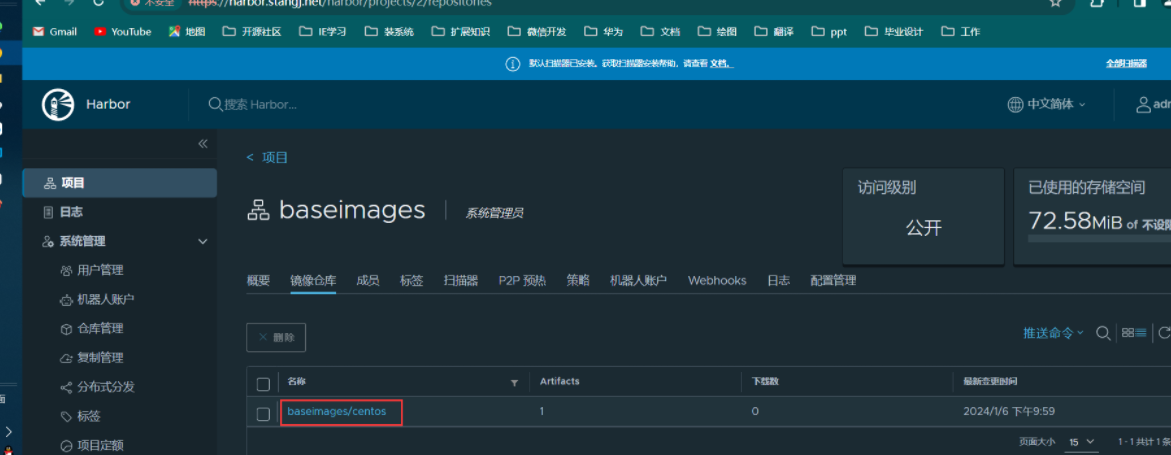
root@k8s-master01:~# docker push harbor.stangj.net/baseimages/centos:7.9.2009
root@k8s-master01:~# docker push harbor.stangj.net/baseimages/alpine:stangj
3)Ansible部署k8s集群
3.1)基础环境准备
`所有关于k8s节点都要安装(master;node;etcd)`
root@k8s-master01:~# apt-get install python2.7 -y
root@k8s-master01:~# ln -s /usr/bin/python2.7 /usr/bin/python
root@k8s-master02:~# apt-get install python2.7 -y
root@k8s-master02:~# ln -s /usr/bin/python2.7 /usr/bin/python
root@k8s-master03:~# apt-get install python2.7 -y
root@k8s-master03:~# ln -s /usr/bin/python2.7 /usr/bin/python
root@k8s-node01:~# apt-get install python2.7 -y
root@k8s-node01:~# ln -s /usr/bin/python2.7 /usr/bin/python
root@k8s-node02:~# apt-get install python2.7 -y
root@k8s-node02:~# ln -s /usr/bin/python2.7 /usr/bin/python
`安装ansible;我这里用的php安装`
root@k8s-master01:~# apt install python3-pip git
root@k8s-master01:~# pip3 install ansible -i https://mirrors.aliyun.com/pypi/simple
root@k8s-master01:~# ansible --version
ansible [core 2.13.13]
config file = None
configured module search path = ['/root/.ansible/plugins/modules', '/usr/share/ansible/plugins/modules']
ansible python module location = /usr/local/lib/python3.8/dist-packages/ansible
ansible collection location = /root/.ansible/collections:/usr/share/ansible/collections
executable location = /usr/local/bin/ansible
python version = 3.8.10 (default, Nov 22 2023, 10:22:35) [GCC 9.4.0]
jinja version = 3.1.2
libyaml = True
`生成公钥并分发公钥`
root@k8s-master01:~# ssh-keygen
root@k8s-master01:~# apt install -y sshpass
root@k8s-master01:~# vim ssh-add.sh
#!/bin/bash
#auther tanghao
IP='
192.168.139.231
192.168.139.232
192.168.139.233
192.168.139.234
192.168.139.235
192.168.139.236
192.168.139.237
'
PWD=root
for k in $IP ;do
sshpass -p${PWD} ssh-copy-id -i /root/.ssh/id_rsa.pub $k -o StrictHostKeyChecking=no &>/dev/null
if [ $? -eq 0 ]; then
echo "主机${ip}分发成功!!"
else
echo "主机${ip}分发失败@@@"
fi
done
root@k8s-master01:~# bash ssh-add.sh
root@k8s-master01:~# cat certs.sh
#!/bin/bash
#auther tanghao
IP='
192.168.139.232
192.168.139.233
192.168.139.235
192.168.139.236
192.168.139.237
'
for k in $IP ;do
echo "${K}开始拷贝公钥"
ssh $k "mkdir /etc/docker/certs.d/harbor.stangj.net -p"
ssh $k "echo '192.168.139.234 harbor.stangj.net' >> /etc/hosts"
scp /etc/docker/certs.d/harbor.stangj.net/harbor-ca.crt ${k}:/etc/docker/certs.d/harbor.stangj.net/
echo "${K}拷贝认证文件"
scp -r /root/.docker $k:/root/
done
root@k8s-master01:~# bash certs.sh
3.2)下载项目及组件
root@k8s-master01:~# export release=3.1.1
root@k8s-master01:~# curl -C- -fLO --retry 3 https://github.com/easzlab/kubeasz/releases/download/${release}/ezdown
注意如果下载不了可以到github上面直接下载:https://github.com/easzlab/kubeasz/releases/tag/3.1.1
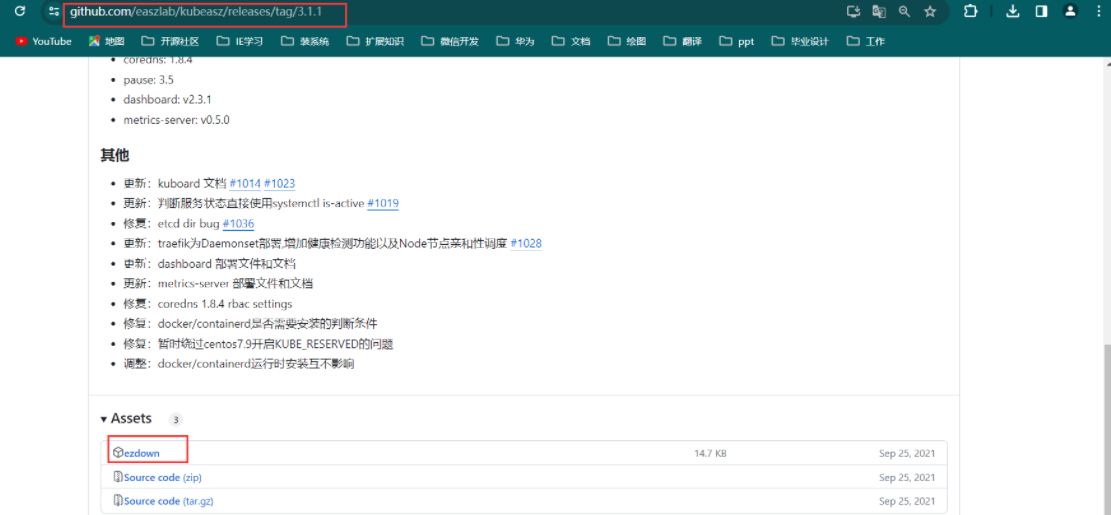
root@k8s-master01:~# ll ezdown
-rw-r--r-- 1 root root 15031 Jan  6 23:12 ezdown
root@k8s-master01:~# vim ezdown
# 修改下面的两个内容
........
DOCKER_VER=19.03.15
K8S_BIN_VER=v1.19.5
........
root@k8s-master01:~# chmod +x ezdown
root@k8s-master01:~# ./ezdown -D
3.3)生成hosts文件
root@k8s-master01:~# cd /etc/kubeasz/
root@k8s-master01:/etc/kubeasz# ./ezctl new k8s-01
root@k8s-master01:/etc/kubeasz# cd clusters/k8s-01/
root@k8s-master01:/etc/kubeasz/clusters/k8s-01# pwd
/etc/kubeasz/clusters/k8s-01
root@k8s-master01:/etc/kubeasz/clusters/k8s-01# grep '^[^#]' hosts
[etcd] # 部署etcd的IP
192.168.139.231
192.168.139.232
192.168.139.233
[kube_master] # 部署master的IP,我这里先写两个后期在扩容一个
192.168.139.231
192.168.139.232
[kube_node] # 部署node的IP,我这里先写两个后期在扩容一个
192.168.139.235
192.168.139.236
[harbor]
[ex_lb] # 对应的Haproxy地址
192.168.139.234 LB_ROLE=backup EX_APISERVER_VIP=192.168.139.188 EX_APISERVER_PORT=6443
192.168.139.231 LB_ROLE=master EX_APISERVER_VIP=192.168.139.188 EX_APISERVER_PORT=6443
[chrony]
[all:vars]
SECURE_PORT="6443"
CONTAINER_RUNTIME="docker"
CLUSTER_NETWORK="calico"
PROXY_MODE="ipvs"
SERVICE_CIDR="10.200.0.0/16" # k8s的service的IP段
CLUSTER_CIDR="172.100.0.0/16" # k8s的POD的IP段
NODE_PORT_RANGE="30000-62767"
CLUSTER_DNS_DOMAIN="stangj.local"
bin_dir="/usr/bin"
base_dir="/etc/kubeasz"
cluster_dir="{{ base_dir }}/clusters/k8s-01"
ca_dir="/etc/kubernetes/ssl"
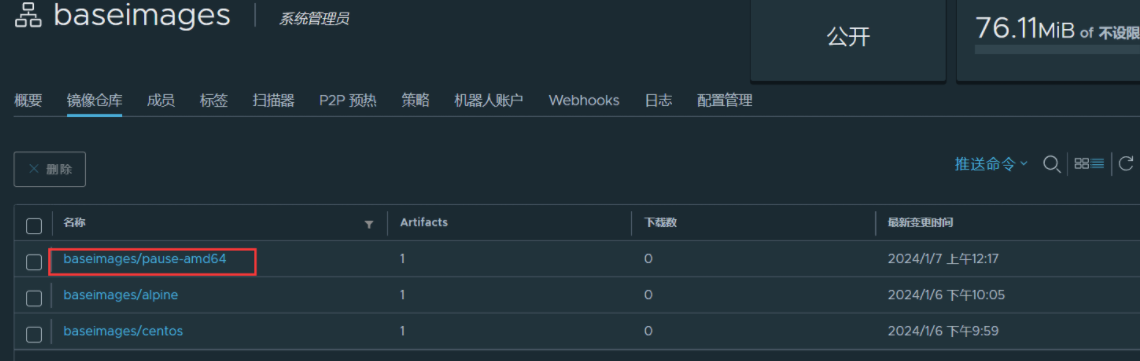
`为了保证k8s容器可以顺利启动所以先把pause-amd64容器下载保存到本地harbor;注意这个pause-amd64版本是根据/etc/kubeasz/clusters/k8s-01/config.yml文件里面指定的`
root@k8s-master01:~# docker pull easzlab/pause-amd64:3.5
root@k8s-master01:~# docker tag easzlab/pause-amd64:3.5 harbor.stangj.net/baseimages/pause-amd64:3.5
root@k8s-master01:~# docker push harbor.stangj.net/baseimages/pause-amd64:3.5
oot@k8s-master01:/etc/kubeasz/clusters/k8s-01# grep '^[^#]' config.yml
# 重点开我打# 号的
INSTALL_SOURCE: "online"
OS_HARDEN: false
ntp_servers:
- "ntp1.aliyun.com"
- "time1.cloud.tencent.com"
- "0.cn.pool.ntp.org"
local_network: "0.0.0.0/0"
CA_EXPIRY: "876000h"
CERT_EXPIRY: "438000h"
CLUSTER_NAME: "cluster1"
CONTEXT_NAME: "context-{{ CLUSTER_NAME }}"
ETCD_DATA_DIR: "/var/lib/etcd"
ETCD_WAL_DIR: ""
ENABLE_MIRROR_REGISTRY: true
SANDBOX_IMAGE: "harbor.stangj.net/baseimages/pause-amd64:3.5" # 这里修改为刚刚下载的本地镜像
CONTAINERD_STORAGE_DIR: "/var/lib/containerd"
DOCKER_STORAGE_DIR: "/var/lib/docker"
ENABLE_REMOTE_API: false
INSECURE_REG: '["127.0.0.1/8"]'
MASTER_CERT_HOSTS:
- "10.1.1.1"
- "k8s.test.io"
NODE_CIDR_LEN: 24
KUBELET_ROOT_DIR: "/var/lib/kubelet"
MAX_PODS: 200 # 尽量调大
KUBE_RESERVED_ENABLED: "no"
SYS_RESERVED_ENABLED: "no"
BALANCE_ALG: "roundrobin"
FLANNEL_BACKEND: "vxlan"
DIRECT_ROUTING: false
flannelVer: "v0.13.0-amd64"
flanneld_image: "easzlab/flannel:{{ flannelVer }}"
flannel_offline: "flannel_{{ flannelVer }}.tar"
CALICO_IPV4POOL_IPIP: "Always" # 这里的 Always 会形象性能,但是开启可以跨网段,提供性能可以改为 off ,但是不能跨网段
IP_AUTODETECTION_METHOD: "can-reach={{ groups['kube_master'][0] }}"
CALICO_NETWORKING_BACKEND: "brid"
calico_ver: "v3.19.2"
calico_ver_main: "{{ calico_ver.split('.')[0] }}.{{ calico_ver.split('.')[1] }}"
calico_offline: "calico_{{ calico_ver }}.tar"
ETCD_CLUSTER_SIZE: 1
cilium_ver: "v1.4.1"
cilium_offline: "cilium_{{ cilium_ver }}.tar"
OVN_DB_NODE: "{{ groups['kube_master'][0] }}"
kube_ovn_ver: "v1.5.3"
kube_ovn_offline: "kube_ovn_{{ kube_ovn_ver }}.tar"
OVERLAY_TYPE: "full"
FIREWALL_ENABLE: "true"
kube_router_ver: "v0.3.1"
busybox_ver: "1.28.4"
kuberouter_offline: "kube-router_{{ kube_router_ver }}.tar"
busybox_offline: "busybox_{{ busybox_ver }}.tar"
dns_install: "no" # no 后面自己安装
corednsVer: "1.8.4"
ENABLE_LOCAL_DNS_CACHE: false # false 关闭dns缓存
dnsNodeCacheVer: "1.17.0"
LOCAL_DNS_CACHE: "169.254.20.10"
metricsserver_install: "no" # no 后面自己安装
metricsVer: "v0.5.0"
dashboard_install: "no" # no 后面自己安装
dashboardVer: "v2.3.1"
dashboardMetricsScraperVer: "v1.0.6"
ingress_install: "no" # no 后面自己安装
ingress_backend: "traefik"
traefik_chart_ver: "9.12.3"
prom_install: "no" # no 后面自己安装
prom_namespace: "monitor"
prom_chart_ver: "12.10.6"
nfs_provisioner_install: "no" # no 后面自己安装
nfs_provisioner_namespace: "kube-system"
nfs_provisioner_ver: "v4.0.1"
nfs_storage_class: "managed-nfs-storage"
nfs_server: "192.168.1.10"
nfs_path: "/data/nfs"
HARBOR_VER: "v2.1.3"
HARBOR_DOMAIN: "harbor.yourdomain.com"
HARBOR_TLS_PORT: 8443
HARBOR_SELF_SIGNED_CERT: true
HARBOR_WITH_NOTARY: false
HARBOR_WITH_TRIVY: false
HARBOR_WITH_CLAIR: false
HARBOR_WITH_CHARTMUSEUM: true
注意上面的具体配置详解可查看官方:https://github.com/easzlab/kubeasz/tree/master/docs/setup
3.4)部署k8s集群
通过ansible脚本初始化环境及部署k8s
3.4.1)环境初始化
root@k8s-master01:~# cd /etc/kubeasz/
`查看初始化帮助`
root@k8s-master01:/etc/kubeasz# ./ezctl help setup
Usage: ezctl setup <cluster> <step>
available steps:
01 prepare to prepare CA/certs & kubeconfig & other system settings
02 etcd to setup the etcd cluster
03 container-runtime to setup the container runtime(docker or containerd)
04 kube-master to setup the master nodes
05 kube-node to setup the worker nodes
06 network to setup the network plugin
07 cluster-addon to setup other useful plugins
90 all to run 01~07 all at once
10 ex-lb to install external loadbalance for accessing k8s from outside
11 harbor to install a new harbor server or to integrate with an existed one
examples: ./ezctl setup test-k8s 01 (or ./ezctl setup test-k8s prepare)
./ezctl setup test-k8s 02 (or ./ezctl setup test-k8s etcd)
./ezctl setup test-k8s all
./ezctl setup test-k8s 04 -t restart_master
`开始初始化;这里的k8s-01是先前3.3)new时候取的名`
root@k8s-master01:/etc/kubeasz# ./ezctl setup k8s-01 01
3.4.2)部署etcd集群
`开始部署etcd;这里的k8s-01是先前3.3)new时候取的名`
root@k8s-master01:/etc/kubeasz# ./ezctl setup k8s-01 02
验证etcd服务
`设置etcd的IP变量`
root@k8s-master01:/etc/kubeasz# export NODE_IPS="192.168.139.231 192.168.139.232 192.168.139.233"
root@k8s-master01:/etc/kubeasz# echo $NODE_IPS
192.168.139.231 192.168.139.232 192.168.139.233
root@k8s-master01:/etc/kubeasz# for ip in ${NODE_IPS}; do ETCDCTL_API=3 /usr/bin/etcdctl --endpoints=https://${ip}:2379 --cacert=/etc/kubernetes/ssl/ca.pem --cert=/etc/kubernetes/ssl/etcd.pem --key=/etc/kubernetes/ssl/etcd-key.pem endpoint health; done
https://192.168.139.231:2379 is healthy: successfully committed proposal: took = 9.096826ms
https://192.168.139.232:2379 is healthy: successfully committed proposal: took = 9.170509ms
https://192.168.139.233:2379 is healthy: successfully committed proposal: took = 12.350401ms
3.4.3)部署docker
master与node节点必须安装docker,docker可以自行使用yum或者安装安装也可以使用二进制安装
`注意如果用ansible来安装必须修改下面内容`
root@k8s-master01:/etc/kubeasz# grep 'SANDBOX_IMAGE' /etc/kubeasz/clusters/k8s-01/config.yml
SANDBOX_IMAGE: "harbor.stangj.net/baseimages/pause-amd64:3.5" #指向harbor的镜像,这个镜像在3.3)已经下载保存到本地仓库
`安装docker`
root@k8s-master01:/etc/kubeasz# ./ezctl setup k8s-01 03
3.4.4)部署master
root@k8s-master01:/etc/kubeasz# ./ezctl setup k8s-01 04
验证master服务
root@k8s-master01:/etc/kubeasz# kubectl get node
NAME              STATUS                     ROLES    AGE     VERSION
192.168.139.231   Ready,SchedulingDisabled   master   2m25s   v1.19.5
192.168.139.232   Ready,SchedulingDisabled   master   2m24s   v1.19.5
3.4.5)部署node
root@k8s-master01:/etc/kubeasz# ./ezctl setup k8s-01 05
验证node服务
root@k8s-master01:/etc/kubeasz# kubectl get node
NAME              STATUS                     ROLES    AGE     VERSION
192.168.139.231   Ready,SchedulingDisabled   master   7m47s   v1.19.5
192.168.139.232   Ready,SchedulingDisabled   master   7m46s   v1.19.5
192.168.139.235   Ready                      node     3m16s   v1.19.5
192.168.139.236   Ready                      node     3m26s   v1.19.5
3.4.6)部署网络服务calico
root@k8s-master01:/etc/kubeasz# vim roles/calico/templates/calico-v3.15.yaml.j2
# 找到这个四个镜像并下载上传到本地harbor
...............
          image: calico/cni:v3.15.3
..............
          image: calico/pod2daemon-flexvol:v3.15.3
..............
          image: calico/node:v3.15.3
..............
          image: calico/kube-controllers:v3.15.3
..............
`第一个镜像`
root@k8s-master01:~# docker pull calico/cni:v3.15.3
root@k8s-master01:~# docker tag calico/cni:v3.15.3 harbor.stangj.net/baseimages/calico-cni:v3.15.3
root@k8s-master01:~# docker push harbor.stangj.net/baseimages/calico-cni:v3.15.3
`第二个镜像`
root@k8s-master01:~# docker pull calico/pod2daemon-flexvol:v3.15.3
root@k8s-master01:~# docker tag calico/pod2daemon-flexvol:v3.15.3 harbor.stangj.net/baseimages/calico-pod2daemon-flexvol:v3.15.3
root@k8s-master01:~# docker push harbor.stangj.net/baseimages/calico-pod2daemon-flexvol:v3.15.3
`第三个镜像`
root@k8s-master01:~# docker pull calico/node:v3.15.3
root@k8s-master01:~# docker tag calico/node:v3.15.3 harbor.stangj.net/baseimages/calico-node:v3.15.3
root@k8s-master01:~# docker push harbor.stangj.net/baseimages/calico-node:v3.15.3
`第四个镜像`
root@k8s-master01:~# docker pull calico/kube-controllers:v3.15.3
root@k8s-master01:~# docker tag calico/kube-controllers:v3.15.3 harbor.stangj.net/baseimages/calico-kube-controllers:v3.15.3
root@k8s-master01:~# docker push harbor.stangj.net/baseimages/calico-kube-controllers:v3.15.3
`修改yaml文件指向本地镜像`
root@k8s-master01:/etc/kubeasz# vim roles/calico/templates/calico-v3.15.yaml.j2
# 找到这个四个镜像并下载上传到本地harbor
...............
          image: harbor.stangj.net/baseimages/calico-cni:v3.15.3
..............
          image: harbor.stangj.net/baseimages/calico-pod2daemon-flexvol:v3.15.3
..............
          image: harbor.stangj.net/baseimages/calico-node:v3.15.3
..............
          image: harbor.stangj.net/baseimages/calico-kube-controllers:v3.15.3
..............
"安装网络服务calico"
root@k8s-master01:/etc/kubeasz# ./ezctl setup k8s-01 06
验证网络服务calico是否运行
root@k8s-master01:/etc/kubeasz# calicoctl node status
Calico process is running.
IPv4 BGP status
+-----------------+-------------------+-------+----------+-------------+
| PEER ADDRESS | PEER TYPE | STATE | SINCE | INFO |
+-----------------+-------------------+-------+----------+-------------+
| 192.168.139.232 | node-to-node mesh | up | 04:22:01 | Established |
| 192.168.139.235 | node-to-node mesh | up | 04:22:01 | Established |
| 192.168.139.236 | node-to-node mesh | up | 04:22:01 | Established |
+-----------------+-------------------+-------+----------+-------------+
IPv6 BGP status
No IPv6 peers found.
root@k8s-master01:/etc/kubeasz# route -n
Kernel IP routing table
Destination Gateway Genmask Flags Metric Ref Use Iface
0.0.0.0 192.168.139.2 0.0.0.0 UG 0 0 0 eth0
172.17.0.0 0.0.0.0 255.255.0.0 U 0 0 0 docker0
172.100.32.128 0.0.0.0 255.255.255.192 U 0 0 0 *
172.100.58.192 192.168.139.236 255.255.255.192 UG 0 0 0 tunl0
172.100.85.192 192.168.139.235 255.255.255.192 UG 0 0 0 tunl0
172.100.122.128 192.168.139.232 255.255.255.192 UG 0 0 0 tunl0
192.168.139.0 0.0.0.0 255.255.255.0 U 0 0 0 eth0
3.4.7)验证网络是否正常
`创建两个容器`
root@k8s-master01:/etc/kubeasz# kubectl run net-test1 --image=alpine --command sleep 50000
root@k8s-master01:/etc/kubeasz# kubectl run net-test2 --image=alpine --command sleep 50000
root@k8s-master01:/etc/kubeasz# kubectl get pod -o wide
NAME        READY   STATUS    RESTARTS   AGE   IP               NODE              NOMINATED NODE   READINESS GATES
net-test1   1/1     Running   0          43s   172.100.85.193   192.168.139.235   <none>           <none>
net-test2   1/1     Running   0          35s   172.100.58.193   192.168.139.236   <none>           <none>
# 由上可见两个容器跑在不同的node节点
`进入容器`
root@k8s-master01:/etc/kubeasz# kubectl exec -it net-test1 sh
`验证宿主机网关`
/ # ping 192.168.139.2
PING 192.168.139.2 (192.168.139.2): 56 data bytes
64 bytes from 192.168.139.2: seq=0 ttl=127 time=0.241 ms
`验证外网DNS`
/ # ping 114.114.114.114
PING 114.114.114.114 (114.114.114.114): 56 data bytes
64 bytes from 114.114.114.114: seq=0 ttl=127 time=22.072 ms
`验证到容器net-test2网络`
/ # ping 172.100.58.193
PING 172.100.58.193 (172.100.58.193): 56 data bytes
64 bytes from 172.100.58.193: seq=0 ttl=62 time=0.561 ms
看到上面结果表示网络已经没有问题了,但是现在还解析不了域名,后续步骤会完成相应配置
3.4.8)添加master节点
`获取相应命令`
root@k8s-master01:/etc/kubeasz# ./ezctl --help
Usage: ezctl COMMAND [args]
-------------------------------------------------------------------------------------
Cluster setups:
list to list all of the managed clusters
checkout <cluster> to switch default kubeconfig of the cluster
new <cluster> to start a new k8s deploy with name 'cluster'
setup <cluster> <step> to setup a cluster, also supporting a step-by-step way
start <cluster> to start all of the k8s services stopped by 'ezctl stop'
stop <cluster> to stop all of the k8s services temporarily
upgrade <cluster> to upgrade the k8s cluster
destroy <cluster> to destroy the k8s cluster
backup <cluster> to backup the cluster state (etcd snapshot)
restore <cluster> to restore the cluster state from backups
start-aio to quickly setup an all-in-one cluster with 'default' settings
Cluster ops:
add-etcd <cluster> <ip> to add a etcd-node to the etcd cluster
add-master <cluster> <ip> to add a master node to the k8s cluster
add-node <cluster> <ip> to add a work node to the k8s cluster
del-etcd <cluster> <ip> to delete a etcd-node from the etcd cluster
del-master <cluster> <ip> to delete a master node from the k8s cluster
del-node <cluster> <ip> to delete a work node from the k8s cluster
Extra operation:
kcfg-adm <cluster> <args> to manage client kubeconfig of the k8s cluster
Use "ezctl help <command>" for more information about a given command.
`添加master节点`
root@k8s-master01:/etc/kubeasz# ./ezctl add-master k8s-01 192.168.139.233
`验证节点`
root@k8s-master01:/etc/kubeasz# kubectl get node
NAME STATUS ROLES AGE VERSION
192.168.139.231 Ready,SchedulingDisabled master 65m v1.19.5
192.168.139.232 Ready,SchedulingDisabled master 65m v1.19.5
192.168.139.233 Ready,SchedulingDisabled master 3m6s v1.19.5
192.168.139.235 Ready node 60m v1.19.5
192.168.139.236 Ready node 60m v1.19.5
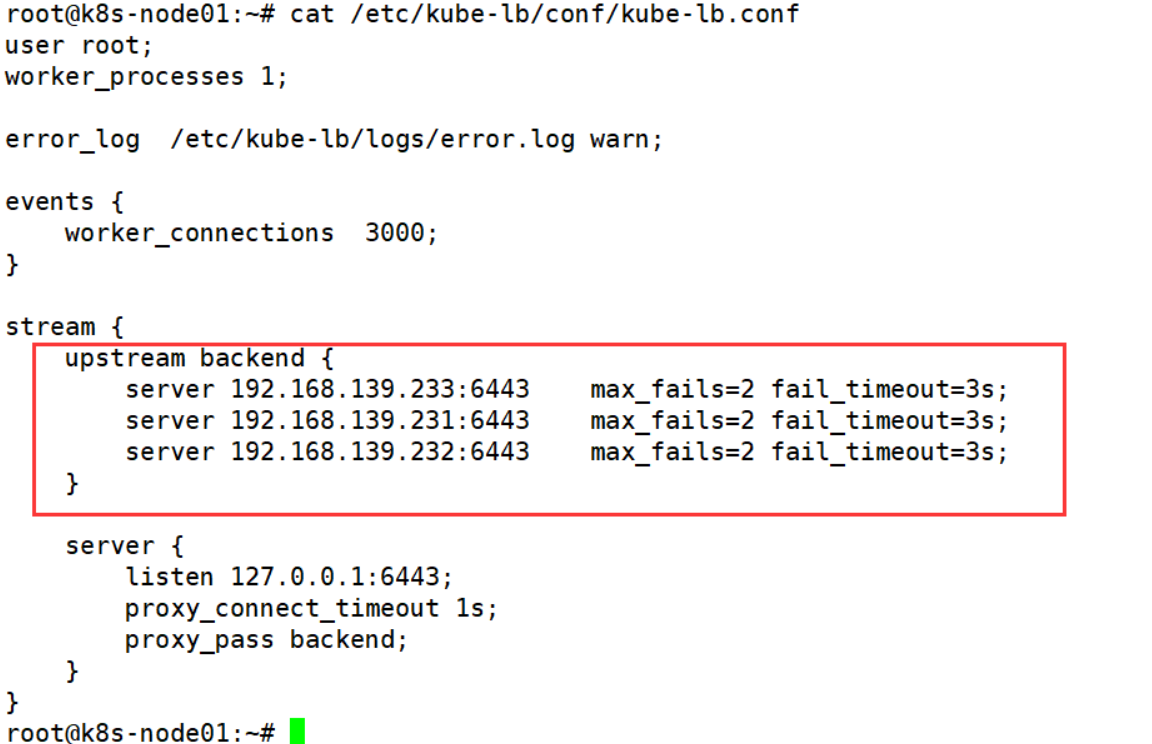
如果因为网络原因master添加失败需要删除
root@k8s-master01:/etc/kubeasz/clusters/k8s-01# grep '^[^#]' hosts
............
[kube_master]   # 部署master的IP,我这里先写两个后期在扩容一个
192.168.139.233 # 删除新加的服务器,因为当执行添加命令,ezctl会自动添加新的master IP在这里,我们将其删除重新执行即可
192.168.139.231
192.168.139.232
............
`再次添加master节点`
root@k8s-master01:/etc/kubeasz# ./ezctl add-master k8s-01 192.168.139.233
2.4.9)添加node节点
`获取相应命令`
root@k8s-master01:/etc/kubeasz# ./ezctl --help
Usage: ezctl COMMAND [args]
-------------------------------------------------------------------------------------
Cluster setups:
list to list all of the managed clusters
checkout <cluster> to switch default kubeconfig of the cluster
new <cluster> to start a new k8s deploy with name 'cluster'
setup <cluster> <step> to setup a cluster, also supporting a step-by-step way
start <cluster> to start all of the k8s services stopped by 'ezctl stop'
stop <cluster> to stop all of the k8s services temporarily
upgrade <cluster> to upgrade the k8s cluster
destroy <cluster> to destroy the k8s cluster
backup <cluster> to backup the cluster state (etcd snapshot)
restore <cluster> to restore the cluster state from backups
start-aio to quickly setup an all-in-one cluster with 'default' settings
Cluster ops:
add-etcd <cluster> <ip> to add a etcd-node to the etcd cluster
add-master <cluster> <ip> to add a master node to the k8s cluster
add-node <cluster> <ip> to add a work node to the k8s cluster
del-etcd <cluster> <ip> to delete a etcd-node from the etcd cluster
del-master <cluster> <ip> to delete a master node from the k8s cluster
del-node <cluster> <ip> to delete a work node from the k8s cluster
Extra operation:
kcfg-adm <cluster> <args> to manage client kubeconfig of the k8s cluster
Use "ezctl help <command>" for more information about a given command.
`添加node节点`
root@k8s-master01:/etc/kubeasz# ./ezctl add-node k8s-01 192.168.139.237
`验证节点`
root@k8s-master01:/etc/kubeasz# kubectl get nodes
NAME STATUS ROLES AGE VERSION
192.168.139.231 Ready,SchedulingDisabled master 4h31m v1.19.5
192.168.139.232 Ready,SchedulingDisabled master 4h31m v1.19.5
192.168.139.233 Ready,SchedulingDisabled master 3h29m v1.19.5
192.168.139.235 Ready node 4h26m v1.19.5
192.168.139.236 Ready node 4h26m v1.19.5
192.168.139.237 Ready node 3m59s v1.19.5