集群配置
 K8S 版本 1.29.4
 istio 1.22.2
# 需要安装一个 MetalLB
| 集群一 (cluster-01) | |||
|---|---|---|---|
| IP | 角色 | 主机名 | |
| 192.168.139.241 | master | k8s-master01 | |
| 192.168.139.244 | node | k8s-node1 | |
| 集群二 (cluster-02) | |||
| 192.168.139.245 | master | k8s-master02 | |
| 192.168.139.246 | node | k8s-node2 |
纳管 kubectl 两个集群
 root@k8s-master01:~# ll $HOME/.kube
 total 36
 drwxr-xr-x  3 root root 4096 Apr 20 16:08 ./
 drwx------ 18 root root 4096 Apr 20 16:08 ../
 drwxr-x---  4 root root 4096 Dec 23 14:55 cache/
 -rw-------  1 root root 5625 Apr 20 16:00 cluster-01
 -rw-------  1 root root 5659 Apr 20 16:08 cluster-02
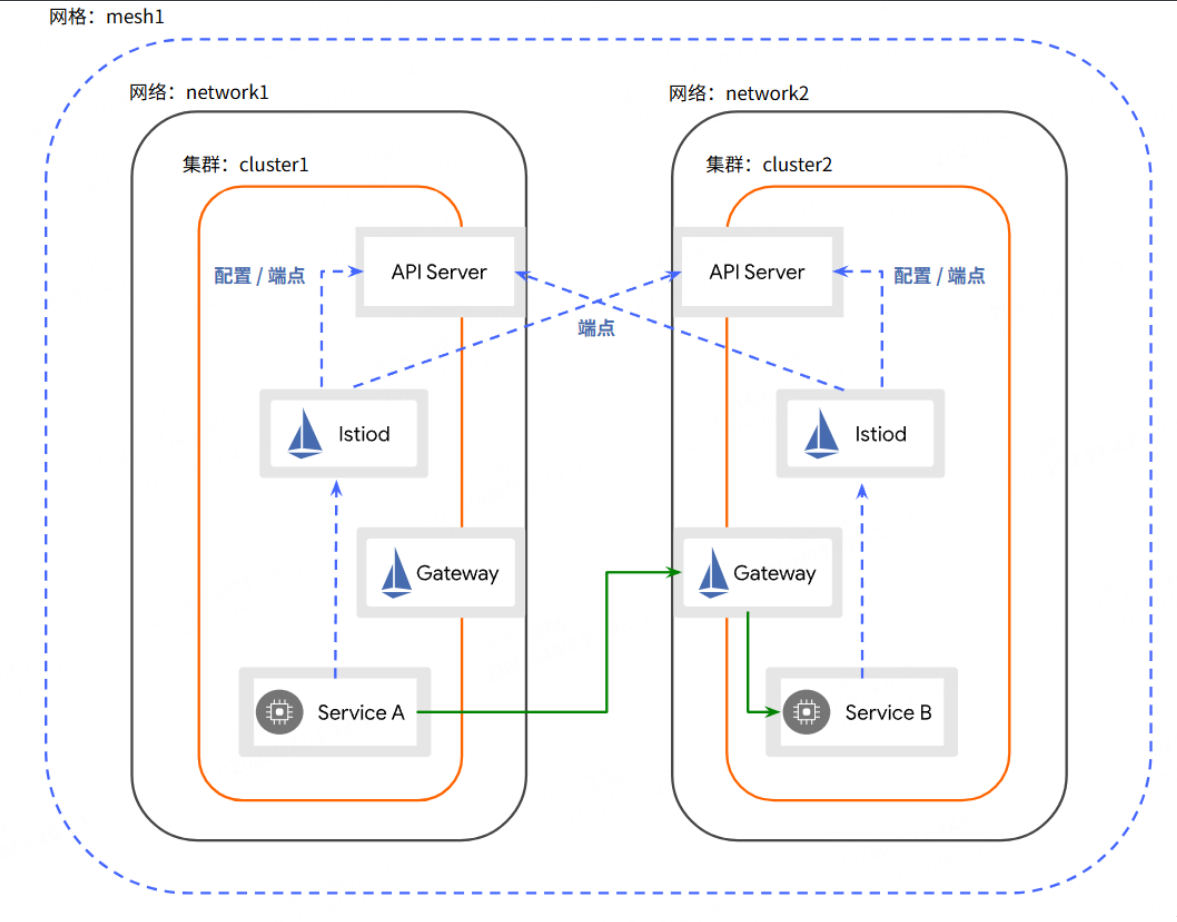
架构图(跨网络多主架构)
下载istio
 root@k8s-master01:~# curl -LO https://github.com/istio/istio/releases/download/1.22.2/istio-1.22.2-linux-amd64.tar.gz
 root@k8s-master01:~# tar xf https://github.com/istio/istio/releases/download/1.22.2/istio-1.22.2-linux-amd64.tar.gz
证书安装
 root@k8s-master01:~# mkdir -p istio-1.22.2/certs
 root@k8s-master01:~# pushd istio-1.22.2/certs
 # 根证书两个集群认证通用
 root@k8s-master01:~/istio-1.22.2/certs# make -f ../tools/certs/Makefile.selfsigned.mk root-ca
 # cluster-01 创建集群证书
 root@k8s-master01:~/istio-1.22.2/certs# make -f ../tools/certs/Makefile.selfsigned.mk "cluster-01-cacerts"
 root@k8s-master01:~/istio-1.22.2/certs# KUBECONFIG=$HOME/.kube/cluster-01 kubectl create namespace istio-system
 root@k8s-master01:~/istio-1.22.2/certs# KUBECONFIG=$HOME/.kube/cluster-01 kubectl create secret generic cacerts -n istio-system \
     --from-file=cluster-01/ca-cert.pem \
     --from-file=cluster-01/ca-key.pem \
     --from-file=cluster-01/root-cert.pem \
     --from-file=cluster-01/cert-chain.pem
 # cluster-02 创建集群证书
 root@k8s-master01:~/istio-1.22.2/certs# make -f ../tools/certs/Makefile.selfsigned.mk "cluster-02-cacerts"
 root@k8s-master01:~/istio-1.22.2/certs# KUBECONFIG=$HOME/.kube/cluster-02 kubectl create namespace istio-system
 root@k8s-master01:~/istio-1.22.2/certs# KUBECONFIG=$HOME/.kube/cluster-02 kubectl create secret generic cacerts -n istio-system \
     --from-file=cluster-02/ca-cert.pem \
     --from-file=cluster-02/ca-key.pem \
     --from-file=cluster-02/root-cert.pem \
     --from-file=cluster-02/cert-chain.pem

 ###  查看两个集群的
 root@k8s-master01:~/istio-1.22.2/certs# KUBECONFIG=$HOME/.kube/cluster-01 kubectl get secrets -n istio-system
 NAME      TYPE     DATA   AGE
 cacerts   Opaque   4      32m
 root@k8s-master01:~/istio-1.22.2/certs# KUBECONFIG=$HOME/.kube/cluster-02 kubectl get secrets -n istio-system
 NAME      TYPE     DATA   AGE
 cacerts   Opaque   4      46s
多集群部署
集群一(cluster-01)
### 集群一
root@k8s-master01:~/istio-1.22.2/certs# KUBECONFIG=$HOME/.kube/cluster-01 kubectl label namespace istio-system topology.istio.io/network=network1
root@k8s-master01:~/istio-1.22.2/certs# cat > cluster-01.yaml <<EOF
apiVersion: install.istio.io/v1alpha1
kind: IstioOperator
spec:
values:
global:
meshID: mesh1
multiCluster:
clusterName: cluster-01
network: network1
EOF
root@k8s-master01:~/istio-1.22.2/certs# KUBECONFIG=$HOME/.kube/cluster-01 istioctl install -f cluster-01.yaml && cd ..
## 在 cluster-01 安装东西向网关
root@k8s-master01:~/istio-1.22.2# samples/multicluster/gen-eastwest-gateway.sh \
--network network1 | \
KUBECONFIG=$HOME/.kube/cluster-01 istioctl install -y -f -
root@k8s-master01:~/istio-1.22.2# KUBECONFIG=$HOME/.kube/cluster-01 kubectl get svc istio-eastwestgateway -n istio-system
NAME TYPE CLUSTER-IP EXTERNAL-IP PORT(S) AGE
istio-eastwestgateway LoadBalancer 10.105.138.60 192.168.139.42 15021:31843/TCP,15443:31695/TCP,15012:30840/TCP,15017:31005/TCP 68s
# 开放 在 cluster-01 中的服务
root@k8s-master01:~/istio-1.22.2# KUBECONFIG=$HOME/.kube/cluster-01 kubectl apply -n istio-system -f samples/multicluster/expose-services.yaml
集群二(cluster-02)
### 集群二
root@k8s-master01:~/istio-1.22.2# KUBECONFIG=$HOME/.kube/cluster-02 kubectl label namespace istio-system topology.istio.io/network=network2
root@k8s-master01:~/istio-1.22.2/certs# cat > cluster-02.yaml <<EOF
apiVersion: install.istio.io/v1alpha1
kind: IstioOperator
spec:
values:
global:
meshID: mesh1
multiCluster:
clusterName: cluster-02
network: network2
EOF
# 集群安装istio
root@k8s-master01:~/istio-1.22.2/certs# KUBECONFIG=$HOME/.kube/cluster-02 istioctl install -f cluster-02.yaml && cd ..
# 在 cluster-02 安装东西向网关
root@k8s-master01:~/istio-1.22.2# samples/multicluster/gen-eastwest-gateway.sh \
--network network2 | \
KUBECONFIG=$HOME/.kube/cluster-02 istioctl install -y -f -
root@k8s-master01:~/istio-1.22.2# KUBECONFIG=$HOME/.kube/cluster-02 kubectl get svc istio-eastwestgateway -n istio-system
NAME TYPE CLUSTER-IP EXTERNAL-IP PORT(S) AGE
istio-eastwestgateway LoadBalancer 10.100.149.134 192.168.139.82 15021:30526/TCP,15443:30991/TCP,15012:30361/TCP,15017:31162/TCP 52s
# 开放 cluster-02 中的服务
root@k8s-master01:~/istio-1.22.2# KUBECONFIG=$HOME/.kube/cluster-02 kubectl apply -n istio-system -f samples/multicluster/expose-services.yaml
启用端点发现
 # 在 cluster-02 中安装一个提供 cluster-01 API Server 访问权限的远程 Secret。
 root@k8s-master01:~/istio-1.22.2# KUBECONFIG=$HOME/.kube/cluster-02  istioctl create-remote-secret \
   --name=cluster-02 | \
   KUBECONFIG=$HOME/.kube/cluster-01  kubectl apply -f -

 # 在 cluster-01 中安装一个提供 cluster-02 API Server 访问权限的远程 Secret。
 root@k8s-master01:~/istio-1.22.2# KUBECONFIG=$HOME/.kube/cluster-01 istioctl create-remote-secret \
   --name=cluster-01 | \
   KUBECONFIG=$HOME/.kube/cluster-02  kubectl apply -f -

 # 查看日志
 root@k8s-master01:~/istio-1.22.2# kubectl logs -n istio-system istiod-77d7cbcfdb-v7c62  | grep cluster
 2025-04-21T14:33:12.213304Z info    processing secret event for secret istio-system/istio-remote-secret-cluster-02
 2025-04-21T14:33:12.213403Z info    Update cluster  cluster=cluster-02 secret=istio-system/istio-remote-secret-cluster-02
 2025-04-21T14:33:12.213752Z info    kube    Initializing Kubernetes service registry "cluster-02"
 2025-04-21T14:33:12.213878Z info    kube    Creating WorkloadEntry only config store for cluster-02
 2025-04-21T14:33:12.213936Z info    Kubernetes registry for the cluster cluster-02 has been deleted.
 2025-04-21T14:33:12.213942Z info    External registry for the cluster cluster-02 has been deleted.
 2025-04-21T14:33:12.214042Z info    kube    should join leader-election for cluster cluster-02: false
 2025-04-21T14:33:12.214058Z info    kube    kube controller for cluster-02 synced after 2m21.040585357s
 2025-04-21T14:33:12.214321Z info    cluster "cluster-02" kube client started
 2025-04-21T14:33:12.214343Z warn    remote cluster cluster-02 failed to sync
 2025-04-21T14:33:12.214488Z info    Number of remote clusters: 1
 2025-04-21T14:33:12.230584Z info    kube    Initializing Kubernetes service registry "cluster-02"
 2025-04-21T14:33:12.230696Z info    kube    Creating WorkloadEntry only config store for cluster-02
 2025-04-21T14:33:12.230726Z info    Kubernetes registry for the cluster cluster-02 has been deleted.
 2025-04-21T14:33:12.230728Z info    External registry for the cluster cluster-02 has been deleted.
 2025-04-21T14:33:12.230827Z info    kube    should join leader-election for cluster cluster-02: false
 2025-04-21T14:33:12.230861Z info    kube    kube controller for cluster-02 synced after 16.839766ms
 2025-04-21T14:33:12.230962Z info    cluster "cluster-02" kube client started
 2025-04-21T14:33:12.246232Z info    kube    kube controller for cluster-02 synced after 15.412642ms
 2025-04-21T14:33:16.257279Z info    ads Push debounce stable[11] 1 for config Secret/istio-system/istio-remote-secret-cluster-01: 100.603017ms since last change,
清理(不清理可忽略)
使用与安装 Istio 相同的机制(istioctl 或 Helm)从 cluster1 和 cluster2 中卸载 Istio。
在 cluster-01 中卸载 Istio:
 root@k8s-master01:~/istio-1.22.2# KUBECONFIG=$HOME/.kube/cluster-01 istioctl uninstall -y --purge
 root@k8s-master01:~/istio-1.22.2# KUBECONFIG=$HOME/.kube/cluster-01 kubectl delete ns istio-system
在 cluster-02 中卸载 Istio:
 root@k8s-master01:~/istio-1.22.2# KUBECONFIG=$HOME/.kube/cluster-02 istioctl uninstall -y --purge
 root@k8s-master01:~/istio-1.22.2# KUBECONFIG=$HOME/.kube/cluster-02 kubectl delete ns istio-system
验证安装结果
 root@k8s-master01:~/istio-1.22.2# KUBECONFIG=$HOME/.kube/cluster-01 istioctl remote-clusters
 NAME           SECRET                                          STATUS     ISTIOD
 cluster-01                                                     synced     istiod-5d67dfddf6-4cmd2
 cluster-02     istio-system/istio-remote-secret-cluster-02     synced     istiod-5d67dfddf6-4cmd2
 root@k8s-master01:~/istio-1.22.2# KUBECONFIG=$HOME/.kube/cluster-02 istioctl remote-clusters
 NAME           SECRET                                          STATUS     ISTIOD
 cluster-02                                                     synced     istiod-794c74fc85-2rhv7
 cluster-01     istio-system/istio-remote-secret-cluster-01     synced     istiod-794c74fc85-2rhv7
所有集群都应将其状态指示为
synced。如果集群的STATUS为timeout, 则表示主集群中的 Istiod 无法与远程集群通信。请参阅 Istiod 日志以获取详细的错误消息。注意:如果您确实看到了
timeout问题, 并且主集群中的 Istiod 和远程集群中的 Kubernetes 控制平面之间存在中间主机(例如 ), 则可能需要更新istioctl create-remote-secret生成的 kubeconfig 中的certificate-authority-data字段,以匹配中间主机正在使用的证书。
部署服务 HelloWorld
首先,在每个集群中创建命名空间 sample:
 root@k8s-master01:~/istio-1.22.2# KUBECONFIG=$HOME/.kube/cluster-01 kubectl create namespace sample
 root@k8s-master01:~/istio-1.22.2# KUBECONFIG=$HOME/.kube/cluster-02 kubectl create namespace sample
为命名空间 sample 开启 sidecar 自动注入:
 root@k8s-master01:~/istio-1.22.2# KUBECONFIG=$HOME/.kube/cluster-01 kubectl label namespace sample istio-injection=enabled
 root@k8s-master01:~/istio-1.22.2# KUBECONFIG=$HOME/.kube/cluster-02 kubectl label namespace sample istio-injection=enabled
在每个集群中创建 HelloWorld 服务:
 root@k8s-master01:~/istio-1.22.2# KUBECONFIG=$HOME/.kube/cluster-01 kubectl apply \
     -f samples/helloworld/helloworld.yaml \
     -l service=helloworld -n sampleKUBECONFIG=$HOME/.kube/cluster-01 kubectl apply \
     -f samples/helloworld/helloworld.yaml \
     -l service=helloworld -n sample

 root@k8s-master01:~/istio-1.22.2# KUBECONFIG=$HOME/.kube/cluster-02 kubectl apply \
     -f samples/helloworld/helloworld.yaml \
     -l service=helloworld -n sample
部署 V1 版的 HelloWorld
把应用 helloworld-v1 部署到 cluster1:
 root@k8s-master01:~/istio-1.22.2# KUBECONFIG=$HOME/.kube/cluster-01 kubectl apply \
     -f samples/helloworld/helloworld.yaml \
     -l version=v1 -n sample
 root@k8s-master01:~/istio-1.22.2# KUBECONFIG=$HOME/.kube/cluster-01 kubectl get pod  -n sample -l app=helloworld
 NAME                             READY   STATUS    RESTARTS   AGE
 helloworld-v1-7459d7b54b-sjhgc   2/2     Running   0          2m31s
部署 V2 版的 HelloWorld
 root@k8s-master01:~/istio-1.22.2# KUBECONFIG=$HOME/.kube/cluster-02 kubectl apply \
     -f samples/helloworld/helloworld.yaml \
     -l version=v2 -n sample
 root@k8s-master01:~/istio-1.22.2# KUBECONFIG=$HOME/.kube/cluster-02 kubectl get pod  -n sample -l app=helloworld
 NAME                            READY   STATUS    RESTARTS   AGE
 helloworld-v2-654d97458-8jd9f   2/2     Running   0          11m
把应用 curl 部署到每个集群:
 root@k8s-master01:~/istio-1.22.2# KUBECONFIG=$HOME/.kube/cluster-01 kubectl apply -f samples/sleep/sleep.yaml -n sample
 root@k8s-master01:~/istio-1.22.2# KUBECONFIG=$HOME/.kube/cluster-02 kubectl apply -f samples/sleep/sleep.yaml -n sample
 root@k8s-master01:~/istio-1.22.2# KUBECONFIG=$HOME/.kube/cluster-01 kubectl get pod  -n sample -l app=sleep
 NAME                     READY   STATUS    RESTARTS   AGE
 sleep-7656cf8794-2lchz   2/2     Running   0          90s
 root@k8s-master01:~/istio-1.22.2# KUBECONFIG=$HOME/.kube/cluster-02 kubectl get pod  -n sample -l app=sleep
 NAME                     READY   STATUS    RESTARTS   AGE
 sleep-7656cf8794-r586r   2/2     Running   0          66s
验证跨集群流量
从 cluster-01 中的 curl pod 发送请求给服务 HelloWorld:
 root@k8s-master01:~/istio-1.22.2# KUBECONFIG=$HOME/.kube/cluster-02 kubectl exec -it -n sample -c sleep "$(KUBECONFIG=$HOME/.kube/cluster-02 kubectl get pod -n sample -l app=sleep -o jsonpath='{.items[0].metadata.name}')" -- sh
 ~ $ while true;do curl -s helloworld.sample:5000/hello ;sleep 1 ;done
 ~ $ while true;do curl -s helloworld.sample:5000/hello ;sleep 1 ;done
 Hello version: v1, instance: helloworld-v1-7459d7b54b-mbwsw
 Hello version: v2, instance: helloworld-v2-654d97458-nx5ns
 Hello version: v1, instance: helloworld-v1-7459d7b54b-mbwsw
 Hello version: v1, instance: helloworld-v1-7459d7b54b-mbwsw
 Hello version: v2, instance: helloworld-v2-654d97458-nx5ns
 Hello version: v2, instance: helloworld-v2-654d97458-nx5ns
 Hello version: v1, instance: helloworld-v1-7459d7b54b-mbwsw
 已成功的在多集群环境中安装、并验证了 Istio!

文章评论