 三个组件:
     Serving: BaaS
         编排无状态、基于HTTP或gRPC协议的服务器(daemon)应用
         这类应用本身也可以由Kubernetes直接编排运行(Deployment, HPA, Service, Ingress)
     Eventing: 事件驱动架构的基础设施
         无状态、基于HTTP或gRPC协议的服务器(daemon)应用,采用了EDA架构
             编排:仍由Serving负责
             Eventing仅负责提供消息消息设施
     Build:CI/CD Pipeline,Tekton
Knative Serving 架构
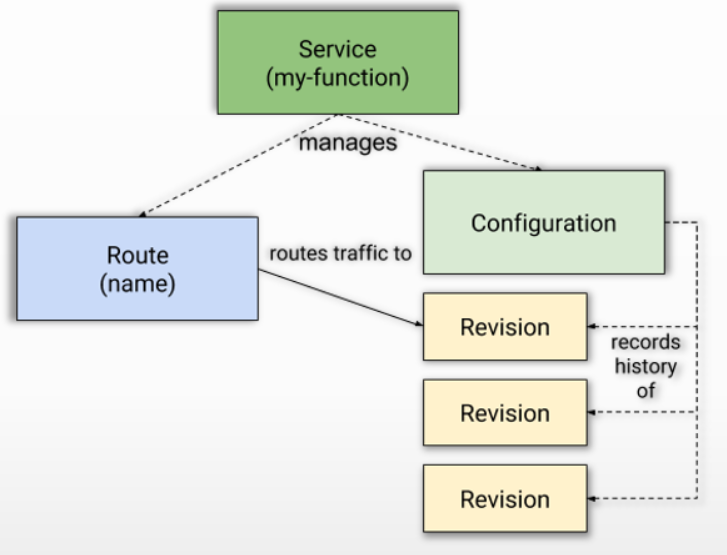
 主要包括四个CRD
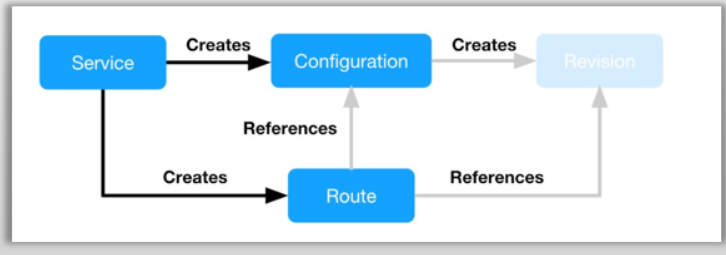
     Service
         对自动编排Serverless类型应用的功能的抽象,负责自动管理工作负载的整个生命周期
         它能自动控制下面三个类型的资源对象的管理
     Configuration
         反映了Service当前期望状态(Spec)的配置
         Service对象的更新,也将导致Configuration的更新
 Revision
         Service的每次代码或配置变更都会生成一个Revision
         快照型数据,不可变
 Route
         将请求流量路由到目标Revision
         支持将流量按比例切分并路由到多个Revision
部署环境
 k8s version
     1.29.4
 knative version
     1.16
1)部署 knative Serving
安装 Knative Serving 组件
-
通过运行以下命令安装所需的自定义资源:
root@k8s-master01:~# kubectl apply -f https://github.com/knative/serving/releases/download/knative-v1.16.0/serving-crds.yaml root@k8s-master01:~# kubectl api-versions | grep knative autoscaling.internal.knative.dev/v1alpha1 caching.internal.knative.dev/v1alpha1 networking.internal.knative.dev/v1alpha1 serving.knative.dev/v1 serving.knative.dev/v1beta1 root@k8s-master01:~# kubectl api-resources --api-group=serving.knative.dev NAME SHORTNAMES APIVERSION NAMESPACED KIND configurations config,cfg serving.knative.dev/v1 true Configuration domainmappings dm serving.knative.dev/v1beta1 true DomainMapping revisions rev serving.knative.dev/v1 true Revision routes rt serving.knative.dev/v1 true Route services kservice,ksvc serving.knative.dev/v1 true Service
-
通过运行以下命令安装 Knative Serving 的核心组件:
root@k8s-master01:~# kubectl apply -f https://github.com/knative/serving/releases/download/knative-v1.16.0/serving-core.yaml root@k8s-master01:~# kubectl get pod -n knative-serving NAME READY STATUS RESTARTS AGE activator-86df87955f-6tk5d 1/1 Running 0 40s autoscaler-7f84f7c888-h6hfg 1/1 Running 0 40s controller-8566b8848b-27pzz 1/1 Running 0 40s webhook-7f6b6fbd87-fmnpz 1/1 Running 0 40s
安装网络层以下命令安装 Istio 并启用其 Knative 集成。
-
按照 说明或运行以下命令安装正确配置的 Istio:
root@k8s-master01:~# kubectl apply -l knative.dev/crd-install=true -f https://github.com/knative/net-istio/releases/download/knative-v1.16.0/istio.yaml root@k8s-master01:~# kubectl apply -f https://github.com/knative/net-istio/releases/download/knative-v1.16.0/istio.yaml oot@k8s-master01:~# kubectl get pod -n istio-system NAME READY STATUS RESTARTS AGE istio-ingressgateway-865d75bb99-5s6lq 1/1 Running 0 43s istio-ingressgateway-865d75bb99-gtvxc 1/1 Running 0 43s istio-ingressgateway-865d75bb99-lzfxr 1/1 Running 0 43s istiod-77d7cbcfdb-8ffdj 1/1 Running 0 43s istiod-77d7cbcfdb-9wbzg 1/1 Running 0 28s istiod-77d7cbcfdb-srxn2 1/1 Running 0 28s
-
通过运行以下命令安装 Knative Istio 控制器:
root@k8s-master01:~# kubectl apply -f https://github.com/knative/net-istio/releases/download/knative-v1.16.0/net-istio.yaml root@k8s-master01:~# kubectl get po -n knative-serving NAME READY STATUS RESTARTS AGE activator-86df87955f-6tk5d 1/1 Running 0 30m autoscaler-7f84f7c888-h6hfg 1/1 Running 0 30m controller-8566b8848b-27pzz 1/1 Running 0 30m net-istio-controller-c9444c8ff-wwz6v 1/1 Running 0 28s net-istio-webhook-66b6b6444c-ljppf 1/1 Running 0 28s webhook-7f6b6fbd87-fmnpz 1/1 Running 0 30m
-
通过运行以下命令获取外部 IP 地址或 CNAME:
root@k8s-master01:~# ip addr add 192.168.139.200/24 dev eth0 root@k8s-master01:~# kubectl --namespace istio-system edit service istio-ingressgateway ... # 给 istio-ingress 添加一个外部 IP 如果按照了 LB 可以不做此步骤 spec: allocateLoadBalancerNodePorts: true clusterIP: 10.96.69.213 clusterIPs: - 10.96.69.213 externalTrafficPolicy: Cluster externalIPs: - 192.168.139.200 ... root@k8s-master01:~# kubectl --namespace istio-system get service istio-ingressgateway NAME TYPE CLUSTER-IP EXTERNAL-IP PORT(S) AGE istio-ingressgateway LoadBalancer 10.96.69.213 192.168.139.200 15021:30250/TCP,80:30535/TCP,443:31532/TCP 6m15s
配置 DNS
您可以配置 DNS 以避免需要使用主机头运行 curl 命令。
以下选项卡将展开以显示配置 DNS 的说明。请按照您选择的 DNS 的步骤进行操作:
如果您正在使用curl访问或您自己的 Knative 应用程序,并且无法使用“Magic DNS (sslip.io)”或“Real DNS”方法,则可以使用一种临时方法。这对于那些希望在不更改其 DNS 配置的情况下评估 Knative 的人(按照“Real DNS”方法)或由于使用本地 minikube 或 IPv6 集群等而无法使用“Magic DNS”方法的人来说很有用。
要使用此方法访问您的应用程序curl:
-
配置 Knative 以使用可从集群外部访问的域:
root@k8s-master01:~# kubectl patch configmap/config-domain \ --namespace knative-serving \ --type merge \ --patch '{"data":{"example.com":""}}' -
启动你的应用程序后,获取应用程序的 URL:
root@k8s-master01:~# kubectl get ksvc
输出应类似于:
NAME            URL                                        LATESTCREATED         LATESTREADY           READY   REASON
helloworld-go   http://helloworld-go.default.example.com   helloworld-go-vqjlf   helloworld-go-vqjlf   True
-
指示
curl连接到第 3 节中提到的网络层定义的外部 IP 或 CNAME,并使用-H "Host:"命令行选项指定 Knative 应用程序的主机名。例如,如果网络层将您的外部 IP 和端口定义为http://192.168.39.228:32198,并且您希望访问helloworld-go前面提到的应用程序,请使用:curl -H "Host: helloworld-go.default.example.com" http://192.168.39.228:32198
对于提供的
helloworld-go示例应用程序,使用默认配置,输出为:Hello Go Sample v1!
请参阅“真实 DNS”方法以获得永久解决方案。
安装可选的服务扩展
Knative 还支持使用 Kubernetes Horizontal Pod Autoscaler (HPA) 来推动自动缩放决策。
-
通过运行以下命令安装支持 HPA 类自动缩放所需的组件:
root@k8s-master01:~# kubectl apply -f https://github.com/knative/serving/releases/download/knative-v1.16.0/serving-hpa.yaml
下载客户端CLI文件
root@k8s-master01:~# wget https://knative.dev/docs/client/install-kn/#install-kn-using-the-nightly-built-binary
root@k8s-master01:~# chmod +x kn-linux-amd64 && mv kn-linux-amd64 /usr/local/bin/kn
root@k8s-master01:~# kn --help
kn is the command line interface for managing Knative Serving and Eventing resources

Find more information about Knative at: https://knative.dev

Serving Commands:
  service      Manage Knative services
  revision     Manage service revisions
  route        List and describe service routes
  domain       Manage domain mappings
  container    Manage service's containers (experimental)

Eventing Commands:
  source       Manage event sources
  broker       Manage message brokers
  trigger      Manage event triggers
  channel      Manage event channels
  subscription Manage event subscriptions
  eventtype    Manage eventtypes

Other Commands:
  plugin       Manage kn plugins
  secret       Manage secrets
  completion   Output shell completion code
  version      Show the version of this client
创建测试案例
root@k8s-master01:~# kn service create demoapp --image=registry.cn-zhangjiakou.aliyuncs.com/tanghao429/tanghao:demoapp.v1.0
Warning: Kubernetes default value is insecure, Knative may default this to secure in a future release: spec.template.spec.containers[0].securityContext.allowPrivilegeEscalation, spec.template.spec.containers[0].securityContext.capabilities, spec.template.spec.containers[0].securityContext.runAsNonRoot, spec.template.spec.containers[0].securityContext.seccompProfile
Creating service 'demoapp' in namespace 'default':

  0.060s The Route is still working to reflect the latest desired specification.
  0.078s ...
  0.102s Configuration "demoapp" is waiting for a Revision to become ready.
  513.199s ...
  513.258s Ingress has not yet been reconciled.
  513.396s Ready to serve.
Service 'demoapp' created to latest revision 'demoapp-00001' is available at URL:
http://demoapp.default.example.com

`访问服务`
root@k8s-master01:~# kubectl get pod
NAME                                        READY   STATUS    RESTARTS       AGE
demoapp-00001-deployment-679977fc9b-vhxwn   3/3     Running   0              2m57s

root@k8s-master01:~# kubectl get ksvc
NAME      URL                                  LATESTCREATED   LATESTREADY     READY   REASON
demoapp   http://demoapp.default.example.com   demoapp-00001   demoapp-00001   True

root@k8s-master01:~# kubectl get route
NAME      URL                                  READY   REASON
demoapp   http://demoapp.default.example.com   True
`集群外部访问`
root@k8s-master01:~# curl -H "Host: demoapp.default.example.com" 192.168.139.200
iKubernetes demoapp v1.0 !! ClientIP: 127.0.0.1, ServerName: demoapp-00001-deployment-679977fc9b-cf7xs, ServerIP: 10.244.3.34!
`集群内部访问`
~ $ curl demoapp.default.svc.cluster.local
iKubernetes demoapp v1.0 !! ClientIP: 127.0.0.1, ServerName: demoapp-00001-deployment-679977fc9b-h9r2d, ServerIP: 10.244.3.36!
注意 该创建会拉取 gcr.io/knative-releases/knative.dev/serving/cmd/queue 镜像 如果想拉起自己私有仓库镜像可以修改 configmap
# kubectl get  -n knative-serving -o yaml cm config-deployment| grep gcr.io/knative-releases/knative.dev/serving/cmd/queue
....
queue-sidecar-image: gcr.io/knative-releases/knative.dev/serving/cmd/queue@sha256:c61042001b1f21c5d06bdee9b42b5e4524e4370e09d4f46347226f06db29ba0f
...
\"\"","queue-sidecar-image":"gcr.io/knative-releases/knative.dev/serving/cmd/queue@sha256:c61042001b1f21c5d06bdee9b42b5e4524e4370e09d4f46347226f06db29ba0f"},"kind":"ConfigMa
....
# 修改上面的 镜像地址即可
Knative Serving工作模式

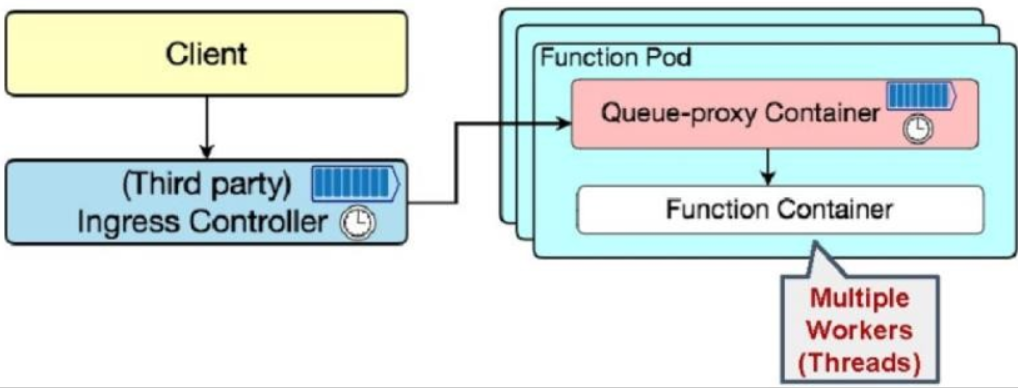
Queue Proxy
Knative Serving会为每个Pod注入一个称为Queue Proxy的容器
	为业务代码提供代理功能
		Ingress GW接收到请求后,将其发往目标Pod实例上由Queue Proxy监听的8012端口
		而后,Queue Proxy再将请求转发给业务代码容器监听的端口
	报告实例上的多个有关客户端请求的关键指标为给Autoscaler
	Pod健康状态检测(Kubernetes探针)
	为超出实例最大并发量的请求提供缓冲队列
Queue Proxy预留使用了如下几个端口
8012:HTTP协议的代理端口
8013:HTTP/2端口,用于代理gRPC
8022:管理端口,如健康状态检测等
9090:暴露给Autoscaler进行指标采集的端口
9091:暴露给Prometheus进行监控指标采集的端口
创建pod流程
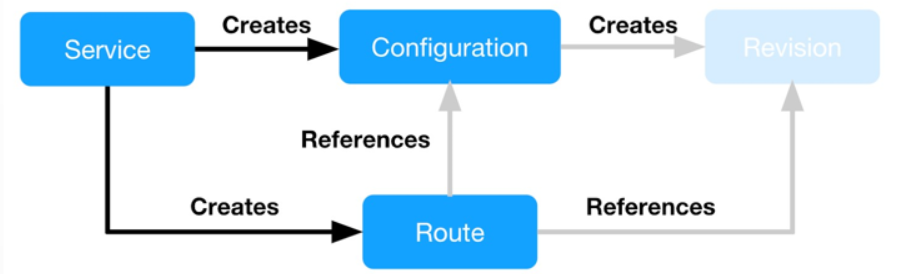
# 在Serving上,可通过创建Knative Service对象来运行应用;该Service资源会自动创建
	Configuration对象,它会创建一个 Revision并由该Revision自动创建如下两个对象
	 	一个Deployment对象
    	一个PodAutoscaler对象

	Route对象,它会创建
	    	一个Kubernetes Service对象
	    	一组Istio VirtualService对象
        		{kservice-name}-ingress
            	{kservice-name}-mesh

## Knative  Service资源(简称kservice或ksvc)的资
源规范主要有两个字段
	template:用于创建或更新Configuration,任何更新,都将创建新的Revision对象
	traffic:用于创建或更新Route对象
2)部署简单案例
前置条件
root@k8s-master01:~# git clone https://github.com/iKubernetes/knative-in-practise.git
部署hello-world
# cat hello-stangj.yaml
apiVersion: serving.knative.dev/v1
kind: Service
metadata:
  name: hello
spec:
  template:
    metadata:
      # This is the name of our new "Revision," it must follow the convention {service-name}-{revision-name}
      name: hello-world
    spec:
      containers:
        - image: ghcr.io/knative/helloworld-go:latest
          ports:
            - containerPort: 8080
          env:
            - name: TARGET
              value: "Stangj"

# kubectl apply -f hello-stangj.yaml
# kubectl get ksvc
NAME      URL                                  LATESTCREATED   LATESTREADY     READY   REASON
demoapp   http://demoapp.default.example.com   demoapp-00001   demoapp-00001   True
hello     http://hello.default.example.com     hello-world     hello-world     True
测试
# curl -H "Host: hello.default.example.com" 192.168.139.200
Hello Stangj!
部署hello-world--002
# cat hello-stangj-002.yaml
apiVersion: serving.knative.dev/v1
kind: Service
metadata:
  name: hello
spec:
  template:
    metadata:
      # This is the name of our new "Revision," it must follow the convention {service-name}-{revision-name}
      name: hello-world-002
    spec:
      containers:
        - image: ghcr.io/knative/helloworld-go:latest
          ports:
            - containerPort: 8080
          env:
            - name: TARGET
              value: "Stangj-002"

# kubectl apply -f hello-stangj-002.yaml
测试
# kn service  list
NAME      URL                                  LATEST            AGE   CONDITIONS   READY   REASON
demoapp   http://demoapp.default.example.com   demoapp-00001     22h   3 OK / 3     True
hello     http://hello.default.example.com     hello-world-002   11m   3 OK / 3     True

# kn service describe hello
Name:       hello
Namespace:  default
Age:        11m
URL:        http://hello.default.example.com

Revisions:
  100%  @latest (hello-world-002) [2] (2m)  # 已经变为 002
        Image:     ghcr.io/knative/helloworld-go:latest (at a57265)
        Replicas:  0/0

Conditions:
  OK TYPE                   AGE REASON
  ++ Ready                   2m
  ++ ConfigurationsReady     2m
  ++ RoutesReady             2m

`查看 revision`
# kn revision list
NAME              SERVICE   TRAFFIC   TAGS   GENERATION   AGE     CONDITIONS   READY   REASON
demoapp-00001     demoapp   100%             1            22h     3 OK / 4     True
hello-world-002   hello     100%             2            2m51s   3 OK / 4     True
hello-world       hello                      1            12m     3 OK / 4     True

`访问测试`
# curl -H "Host: hello.default.example.com" 192.168.139.200
Hello Stangj-002!
3)命令式资源管理
常用命令
Knative CLI与Serving相关的子命令
	service:管理Knative services
		apply
		create、delete、update
		list, describe
		export, import
	revision:管理Knative revisions
		delete
		list、describe
	route:管理Knative routes
		delete
		list 、 describe
	domain:管理域名映射
		create、delete、update
		list、describe
	container:管理KService的容器
		add
命令示例
`Knative Service`
  # 创建(二选一)
	~$ kn service create hello --image ghcr.io/knative/helloworld-go:latest --port 8080 --env TARGET=World --revision-name hello-world-003
	~$ kn service apply hello --image ghcr.io/knative/helloworld-go:latest --port 8080 --env TARGET=World --revision-name hello-world-004
##############################################################################################################
	还可指定参数: --max-scale=10 # 最大扩容 10
	              --min-scale=1  # 最小缩容 1 默认 0
##############################################################################################################
 # 获取资源信息
	~$ kn service list
	~$ kn service describe hello

 # 删除
   ~$  kn service delete demoapp # 这里的 demoapp 是通过 kn service list 列出来了

 # 更新资源配置
	~$ kn service update hello --env TARGET=Knative --revision-name hello-Knative

`Knative Revision`
  # 获取Revision信息
	~$ kn revision list
	~$ kn revision describe hello-Knative
	Knative Route
  # 获取Route信息
	~$ kn route list
	~$ kn route describe hello
4)域名映射配置
全局配置
root@k8s-master01:~# kubectl patch configmap/config-domain \
      --namespace knative-serving \
      --type merge \
      --patch '{"data":{"stj.com":""}}'
Domainapping资源
# kubectl api-resources --api-group=serving.knative.dev
NAME             SHORTNAMES      APIVERSION                    NAMESPACED   KIND
configurations   config,cfg      serving.knative.dev/v1        true         Configuration
domainmappings   dm              serving.knative.dev/v1beta1   true         DomainMapping
revisions        rev             serving.knative.dev/v1        true         Revision
routes           rt              serving.knative.dev/v1        true         Route
services         kservice,ksvc   serving.knative.dev/v1        true         Service
创建测试用例
`配置域名映射到名称空间`
# vim  cdc-hello.stj.com.yaml
apiVersion: networking.internal.knative.dev/v1alpha1
kind: ClusterDomainClaim
metadata:
  name: hello.stj.io
spec:
  namespace: default

# kubectl apply -f cdc-hello.stj.com.yaml
# kn domain create hello.stj.io --ref ksvc:hello:default
# kn domain list
NAME           URL                   READY   KSVC
hello.stj.io   http://hello.stj.io   True    hello

# kubectl get dm
NAME           URL                   READY   REASON
hello.stj.io   http://hello.stj.io   True
测试访问
# curl -H "Host: hello.stj.io" 192.168.139.200
Hello Stangj-002!
自动创建ClusterDomainClaim
# kubectl get  -n knative-serving cm config-network -o yaml | grep autocreate-cluster-domain-claims
...
    autocreate-cluster-domain-claims: "false" # 将其改为 true
...

# kubectl edit  -n knative-serving cm config-network
...
apiVersion: v1
data:
  autocreate-cluster-domain-claims: "true" # 添加这一行
  _example: |
...
`创建域名测试`
# kn domain create hello.stj.com --ref ksvc:hello:default
# kn  domain list
NAME            URL                    READY   KSVC
hello.stj.com   http://hello.stj.com   True    hello
hello.stj.io    http://hello.stj.io    True    hello

# curl -H "Host: hello.stj.com" 192.168.139.200
Hello Stangj-002!
5)Revision 流量管理
Revision的使用场景
-
将流量切分至不同版本的应用程序间(Canary Deployment、Blue/Green Deployment)
-
版本回滚
Route
配置Private KService
默认情况下,KService会由Knative同时配置内部(私有)或公共服务
仅创建私有服务的方法
全局配置:修改configmap/config-domain,将默认域设置为svc.cluster.local
单KService配置:使用“networking.knative.dev/visibility”标签,并设定其值为cluster-local
	设定于KService对象之上
	无KService时,设定于相关的Route和Kubernetes Service之上
	示例:~$ kubectl label ksvc hello networking.knative.dev/visibility=cluster-local
	# curl -H "Host: hello.default.example.com" 192.168.139.200  # 访问失效
	# curl -H "Host: hello.stj.com" 192.168.139.200
	Hello Stangj-002!
    `删除标签`
    # kubectl label ksvc hello networking.knative.dev/visibility-
    # curl -H "Host: hello.default.example.com" 192.168.139.200
	Hello Stangj-002!
自定义流量策略
命令式
修改KService流量策略的途径
	将流量完全发送至指定的某个Revision(回滚)
	~$ kn service update hello --traffic hello-world=100
	将流量切分至不同的Revision
	~$ kn service update hello --traffic hello-world=90 --traffic hello-world-002=10
	将流量完全发送至最新就绪版本的Revision
	~$ kn service update hello --traffic '@latest'=100
声明式
# cat hello-CloudNative.yaml
apiVersion: serving.knative.dev/v1
kind: Service
metadata:
  name: hello
spec:
  template:
    spec:
      containers:
        - image: ghcr.io/knative/helloworld-go:latest
          ports:
            - containerPort: 8080
          env:
            - name: TARGET
              value: "Cloud-Native"
  traffic:
  - latestRevision: true
    percent: 0
    tag: staging  # 可以给予 tag 指定访问
  - revisionName: hello-00002
    percent: 90
  - revisionName: hello-00001
    percent: 10
6)自动(Autoscaling)
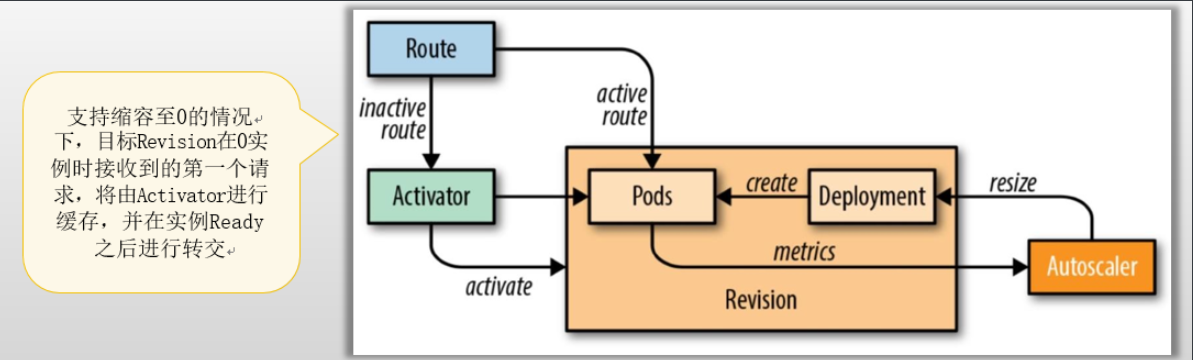
AutoScaler的基本缩放逻辑
AutoScaler基于过去一段时间内(由stable window指定)统计的指标(metric)数据和单个实例的目标并发数(target)来计算目标实例数
计算出的目标实例数将发送给相应Revision的Deployment执行缩放操作
Autoscaler的全局配置
全局配置参数定义在knative-serving名称空间中的configmap/auto-scaler之中
	相关的参数:
        	container-concurrency-target-default:实例的目标并发数,即最大并发数,默认值为100;
        	container-concurrency-target-percentage:实例的目标利用率,默认为“0.7”;
			enable-scale-to-zero:是否支持缩容至0,默认为true;仅KPA支持;
			max-scale-up-rate:最大扩容速率,默认为1000;
				当前可最大扩容数 = 最大扩容速率 * Ready状态的Pod数量
			max-scale-down-rate:最大缩容速率,默认为2;
				当前可最大缩容数 = Ready状态的Pod数量 / 最大缩容速率
			panic-window-percentage:Panic窗口期时长相当于Stable窗口期时长的百分比,默认为10,即百分之十;
			panic-threshold-percentage:因Pod数量偏差而触发Panic阈值百分比,默认为200,即2倍;
			scale-to-zero-grace-period:缩容至0的宽限期,即等待最后一个Pod删除的最大时长,默认为30s;
			scale-to-zero-pod-retention-period:决定缩容至0后,允许最后一个Pod处于活动状态的最小时长,默认为0s;
			stable-window:稳定窗口期的时长,默认为60s;
			target-burst-capacity:突发请求容量,默认为200;
			requests-per-second-target-default:每秒并发(RPS)的默认值,默认为200;使用rps指标时生效;
部署案例
实例并发数扩缩容案例
部署配置
# cat autoscaling-concurrency.yaml
apiVersion: serving.knative.dev/v1
kind: Service
metadata:
  name: hello
  namespace: default
spec:
  template:
    metadata:
      annotations:
        autoscaling.knative.dev/target-utilization-percentage: "60" # 达到 60% 进行扩容
        autoscaling.knative.dev/target: "10"                        # 最大并发数为 10
    spec:
      containers:
        - image: ghcr.io/knative/helloworld-go:latest
          ports:
            - containerPort: 8080
          env:
            - name: TARGET
              value: "Knative Autoscaling Concurrency"

# kubectl apply -f autoscaling-concurrency.yaml
# kn service list
NAME    URL                                LATEST        AGE   CONDITIONS   READY   REASON
hello   http://hello.default.example.com   hello-00001   45s   3 OK / 3     True
测试验证
# curl -H "Host: hello.default.example.com" 192.168.139.200
Hello Knative Autoscaling Concurrency!
`监控pod`
# kubectl get pod -l serving.knative.dev/service=hello -w
NAME                                      READY   STATUS        RESTARTS   AGE
hello-00001-deployment-6567c699f7-qmm5h   3/3     Terminating   0          75s
`访问客户端主机安装压测软件`
~# apt install hey
~# hey -z 60s -c 20 -host "hello.default.example.com" "http://192.168.139.200?sleep=100&prime=10000&bloat=5"
`可以看到 pod 进行了扩容 到了 3 个`
# kubectl get pod -l serving.knative.dev/service=hello -w
NAME                                      READY   STATUS    RESTARTS   AGE
hello-00001-deployment-6567c699f7-jfm4k   3/3     Running   0          8s
hello-00001-deployment-6567c699f7-lz98b   3/3     Running   0          10s
hello-00001-deployment-6567c699f7-qz2hn   3/3     Running   0          32s
Revision的扩缩容边界案例
部署配置
# cat autoscaling-scale-bounds.yaml
apiVersion: serving.knative.dev/v1
kind: Service
metadata:
  name: hello
  namespace: default
spec:
  template:
    metadata:
      annotations:
        autoscaling.knative.dev/target-utilization-percentage: "60" # 达到 60% 进行扩容
        autoscaling.knative.dev/target: "10"          # 最大并发数为 10
        autoscaling.knative.dev/max-scale: "2"        # 最大扩容边界 2 个 pod
        autoscaling.knative.dev/initial-scale: "1"    # 初始创建 1 个 pod
        autoscaling.knative.dev/scale-down-delay: "1m"  # 缩容延迟 1m 钟
        autoscaling.knative.dev/stable-window: "30s"  # 稳定窗口期 30s
    spec:
      containers:
        - image: ghcr.io/knative/helloworld-go:latest
          ports:
            - containerPort: 8080
          env:
            - name: TARGET
              value: "Knative Autoscaling Scale Bounds"

# kubectl apply -f autoscaling-scale-bounds.yaml
测试验证
`监控pod`
# kubectl get pod -l serving.knative.dev/service=hello -w
NAME                                      READY   STATUS    RESTARTS   AGE
hello-00001-deployment-54cf879f57-j2j6t   3/3     Running   0          54s

`访问客户端主机安装压测软件`
~# hey -z 60s -c 30 -host "hello.default.example.com" "http://192.168.139.200?sleep=100&prime=10000&bloat=5"
# kubectl get pod -l serving.knative.dev/service=hello -w
NAME                                      READY   STATUS    RESTARTS   AGE
hello-00001-deployment-54fb4bd6fb-56j6k   3/3     Running   0          8s
hello-00001-deployment-54fb4bd6fb-wtwjw   3/3     Running   0          36s

# 最多只能有两个 pod
使用rps指标
部署配置
# cat autoscaling-metrics-and-targets.yaml
apiVersion: serving.knative.dev/v1
kind: Service
metadata:
  name: hello
  namespace: default
spec:
  template:
    metadata:
      annotations:
        autoscaling.knative.dev/target-utilization-percentage: "60"  # 达到 60% 进行扩容
        autoscaling.knative.dev/metric: "rps"      # 指标为 rps 相当于每秒请求(扩容更ming)
        autoscaling.knative.dev/target: "100"      # 最大并发数为 100
        autoscaling.knative.dev/max-scale: "10"    # 最大扩容边界 10 个 pod
        autoscaling.knative.dev/initial-scale: "1" # 初始创建 1 个 pod
        autoscaling.knative.dev/stable-window: "2m" # 稳定窗口期 2m
    spec:
      containers:
        - image: ghcr.io/knative/helloworld-go:latest
          ports:
            - containerPort: 8080
          env:
            - name: TARGET
              value: "Knative Autoscaling Metrics and Targets"

文章评论