本节实战
| 实战名称 |
|---|
🚩 实战:istioctl 方式安装istio-2024.7.14(测试成功) |
| 🚩 实战:手动注入 Envoy Sidecar-2024.7.14(测试成功) |
| 🚩 实战:自动注入 Envoy Sidecar-2024.7.14(测试成功) |
| 🚩 实战:BookInfo 示例应用-2024.7.14(测试成功) |
前面在服务网格基础章节我们和大家已经了解了 Istio 的基本概念以及架构,本章节我们将来快速了解 Istio 的基本使用方法,对 Istio 有一个最基本的认识。
1、安装
安装 Istio 之前,需要准备一个 Kubernetes 集群,我们可以使用任何支持的平台,例如 Minikube、Kind、Kubeadm 等,但是需要注意的是目前的 Istio 最新版本为 v1.22.2 版本,不同的版本支持的 Kubernetes 版本不同,可以参考下表进行对照:
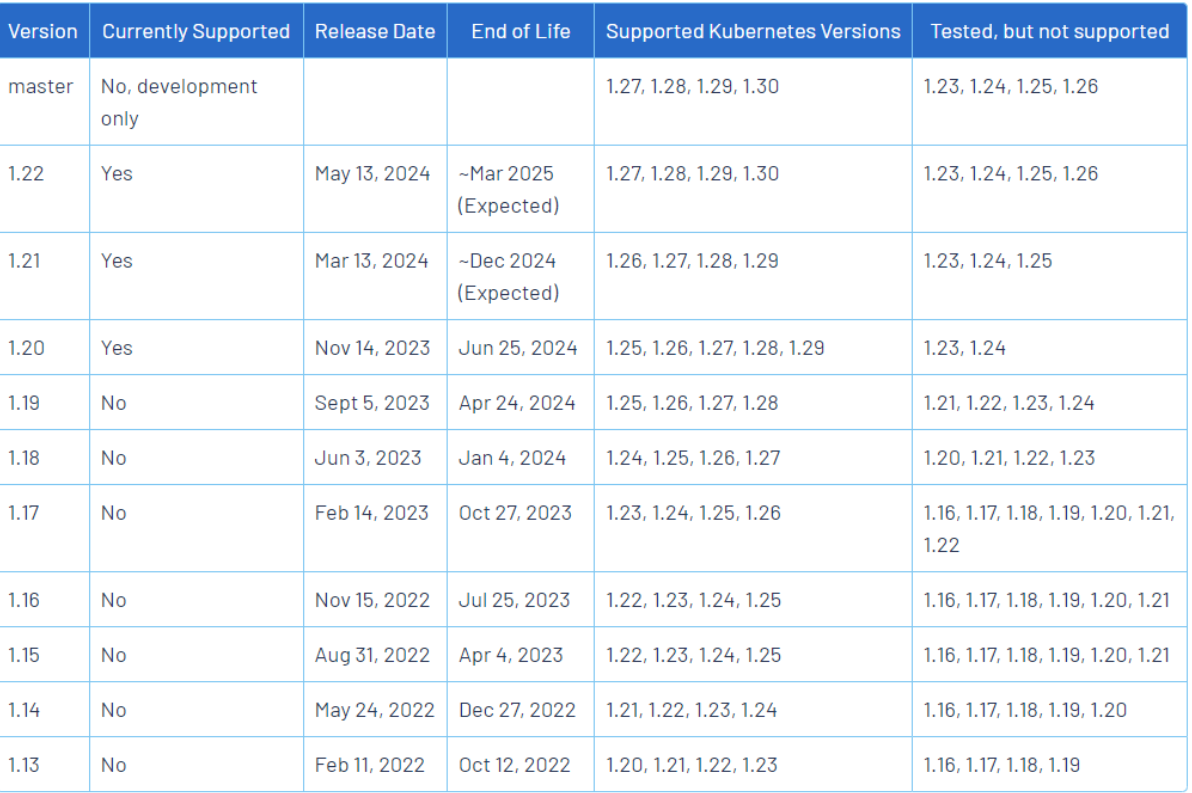
我们这里选择的版本为 v1.22.2,Kubernetes 版本为 v1.29.4:
 root@k8s-master01:~# kubectl get node
 NAME           STATUS   ROLES           AGE   VERSION
 k8s-master01   Ready    control-plane   48d   v1.29.4
 k8s-master02   Ready    control-plane   12d   v1.29.4
 k8s-node01     Ready    <none>          48d   v1.29.4
 k8s-node03     Ready    <none>          12d   v1.29.4
安装方式
在 Kubernetes 集群上安装 Istio 的方法有很多方式,可以根据自己的需求选择不同的安装方式,我们可以先对比下每种方式的优缺点。
1.使用 istioctl install
具有高安全性、简单的安装和管理方法,这也是社区推荐的安装方法。
-
优点:
-
完整的配置和运行状态的验证。
-
使用提供了扩展的配置、自定义选项的
IstioOperatorAPI。
-
不需要集群内的高权限 Pod,通过执行
istioctl命令修改。
-
缺点:
-
需要维护多个 Istio 版本的二进制文件。
-
istioctl命令可能根据你的运行环境设置诸如JWT_POLICY之类的值,从而在不同的 Kubernetes 环境中产生不同的安装结果。
整体来说,这里的缺点对我们可能影响不大。
2.使用 istioctl manifest generate 安装
生成 Kubernetes 的配置清单,并通过 kubectl apply --prune 命令应用到集群中。该方法适用于需要严格审查或者增加配置清单的情况。
-
优点:
-
Chart 是由与
istioctl install和 Operator 里使用的相同的IstioOperatorAPI 生成的。
-
使用提供了扩展的配置、自定义选项的
IstioOperatorAPI。
-
缺点:
-
一些在
istioctl install和 Operator 中会进行的检查将不会执行。
-
与
istioctl install相比,UX 不够简洁。
-
错误反馈没有
istioctl install的详细、全面。
3.使用 Helm 安装
使用 Helm 的 Chart 可以通过 Helm 的工作流轻松的完成,并在升级的过程中自动清理资源。
-
优点:
-
使用熟悉、常用的行业标准工具。
-
Helm 原生的版本、升级管理。
-
缺点:
-
相比于
istioctl install和 Operator 相比,检查较少。
-
一些管理任务需要更多步骤,具有更高的复杂性。
4.使用 Istio Operator 安装
不建议在新安装时使用 Operator,虽然 Operator 将继续得到支持,但新的功能特性不会被优先考虑。
Istio Operator 提供了一种安装路径,无需使用 istioctl 二进制文件。这可以用于简化升级工作流程,不必担心在集群中运行特权控制器的问题。此方法适用于不需要严格审计或增加输出清单的情况。
-
优点:
-
与
istioctl install相同的 API,但通过集群中的控制器 Pod 进行操作,实现了完全声明式操作。
-
IstioOperator API提供了广泛的配置/定制选项。
-
不需要管理多个
istioctl二进制文件。
-
缺点:
-
集群中运行的高权限控制器存在安全风险。
安装 Istio
🚩 实战:istioctl 方式安装istio-2024.7.14(测试成功)
实验环境:
 root@k8s-master01:~/istio#  istioctl version
 no ready Istio pods in "istio-system"
 1.20.8
上面我们对几种方式做了简单的对比,具体选择哪种方式安装需要结合自己的情况来决定。我们这里就选择社区推荐的 istioctl 方式进行安装。
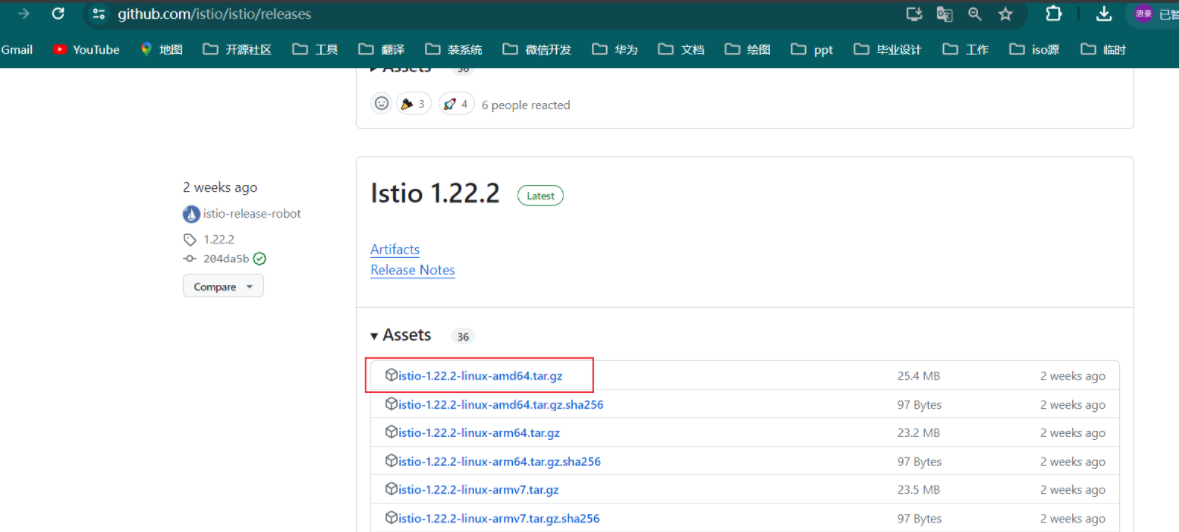
首先前往 页面下载适合你操作系统的安装文件,或使用下面的命令自动下载并解压最新版本(Linux 或 macOS):
curl -L https://istio.io/downloadIstio | sh -
# Copyright Istio Authors
#
# Licensed under the Apache License, Version 2.0 (the "License");
# you may not use this file except in compliance with the License.
# You may obtain a copy of the License at
#
# http://www.apache.org/licenses/LICENSE-2.0
#
# Unless required by applicable law or agreed to in writing, software
# distributed under the License is distributed on an "AS IS" BASIS,
# WITHOUT WARRANTIES OR CONDITIONS OF ANY KIND, either express or implied.
# See the License for the specific language governing permissions and
# limitations under the License.
#
# This file will be fetched as: curl -L https://git.io/getLatestIstio | sh -
# so it should be pure bourne shell, not bash (and not reference other scripts)
#
# The script fetches the latest Istio release candidate and untars it.
# You can pass variables on the command line to download a specific version
# or to override the processor architecture. For example, to download
# Istio 1.6.8 for the x86_64 architecture and linux OS,
# run curl -L https://istio.io/downloadIstio | ISTIO_VERSION=1.6.8 TARGET_ARCH=x86_64 TARGET_OS=Linux sh -.
set -e
# Determines the operating system.
OS="${TARGET_OS:-$(uname)}"
if [ "${OS}" = "Darwin" ] ; then
OSEXT="osx"
else
OSEXT="linux"
fi
# Determine the latest Istio version by version number ignoring alpha, beta, and rc versions.
if [ "${ISTIO_VERSION}" = "" ] ; then
ISTIO_VERSION="$(curl -sL https://github.com/istio/istio/releases | \
grep -o 'releases/[0-9]*.[0-9]*.[0-9]*/' | sort -V | \
tail -1 | awk -F'/' '{ print $2}')"
ISTIO_VERSION="${ISTIO_VERSION##*/}"
fi
LOCAL_ARCH=$(uname -m)
if [ "${TARGET_ARCH}" ]; then
LOCAL_ARCH=${TARGET_ARCH}
fi
case "${LOCAL_ARCH}" in
x86_64|amd64)
ISTIO_ARCH=amd64
;;
armv8*|aarch64*|arm64)
ISTIO_ARCH=arm64
;;
armv*)
ISTIO_ARCH=armv7
;;
*)
echo "This system's architecture, ${LOCAL_ARCH}, isn't supported"
exit 1
;;
esac
if [ "${ISTIO_VERSION}" = "" ] ; then
printf "Unable to get latest Istio version. Set ISTIO_VERSION env var and re-run. For example: export ISTIO_VERSION=1.0.4"
exit 1;
fi
NAME="istio-$ISTIO_VERSION"
URL="https://github.com/istio/istio/releases/download/${ISTIO_VERSION}/istio-${ISTIO_VERSION}-${OSEXT}.tar.gz"
ARCH_URL="https://github.com/istio/istio/releases/download/${ISTIO_VERSION}/istio-${ISTIO_VERSION}-${OSEXT}-${ISTIO_ARCH}.tar.gz"
with_arch() {
printf "\nDownloading %s from %s ...\n" "$NAME" "$ARCH_URL"
if ! curl -o /dev/null -sIf "$ARCH_URL"; then
printf "\n%s is not found, please specify a valid ISTIO_VERSION and TARGET_ARCH\n" "$ARCH_URL"
exit 1
fi
curl -fsLO "$ARCH_URL"
filename="istio-${ISTIO_VERSION}-${OSEXT}-${ISTIO_ARCH}.tar.gz"
tar -xzf "${filename}"
rm "${filename}"
}
without_arch() {
printf "\nDownloading %s from %s ..." "$NAME" "$URL"
if ! curl -o /dev/null -sIf "$URL"; then
printf "\n%s is not found, please specify a valid ISTIO_VERSION\n" "$URL"
exit 1
fi
curl -fsLO "$URL"
filename="istio-${ISTIO_VERSION}-${OSEXT}.tar.gz"
tar -xzf "${filename}"
rm "${filename}"
}
# Istio 1.6 and above support arch
# Istio 1.5 and below do not have arch support
ARCH_SUPPORTED="1.6"
# Istio 1.10 and above support arch for osx arm64
ARCH_SUPPORTED_OSX="1.10"
if [ "${OS}" = "Linux" ] ; then
# This checks if ISTIO_VERSION is less than ARCH_SUPPORTED (version-sort's before it)
if [ "$(printf '%s\n%s' "${ARCH_SUPPORTED}" "${ISTIO_VERSION}" | sort -V | head -n 1)" = "${ISTIO_VERSION}" ]; then
without_arch
else
with_arch
fi
elif [ "${OS}" = "Darwin" ] ; then
# This checks if ISTIO_VERSION is less than ARCH_SUPPORTED_OSX (version-sort's before it) or ISTIO_ARCH not equal to arm64
if [ "$(printf '%s\n%s' "${ARCH_SUPPORTED_OSX}" "${ISTIO_VERSION}" | sort -V | head -n 1)" = "${ISTIO_VERSION}" ] || [ "${ISTIO_ARCH}" != "arm64" ]; then
without_arch
else
with_arch
fi
else
printf "\n\n"
printf "Unable to download Istio %s at this moment!\n" "$ISTIO_VERSION"
printf "Please verify the version you are trying to download.\n\n"
exit 1
fi
printf ""
printf "\nIstio %s Download Complete!\n" "$ISTIO_VERSION"
printf "\n"
printf "Istio has been successfully downloaded into the %s folder on your system.\n" "$NAME"
printf "\n"
BINDIR="$(cd "$NAME/bin" && pwd)"
printf "Next Steps:\n"
printf "See https://istio.io/latest/docs/setup/install/ to add Istio to your Kubernetes cluster.\n"
printf "\n"
printf "To configure the istioctl client tool for your workstation,\n"
printf "add the %s directory to your environment path variable with:\n" "$BINDIR"
printf "\t export PATH=\"\$PATH:%s\"\n" "$BINDIR"
printf "\n"
printf "Begin the Istio pre-installation check by running:\n"
printf "\t istioctl x precheck \n"
printf "\n"
printf "Need more information? Visit https://istio.io/latest/docs/setup/install/ \n"

但是上面方式默认也是走 github 下载,国内访问 github 速度比较慢(也可能根本下载不了),所有我们可以自己去下载安装文件包,下载完成后解压,将解压后的 istioctl 文件移动到 /usr/local/bin 目录下:
 ~/istio# curl -LO https://github.com/istio/istio/releases/download/1.22.2/istio-1.22.2-linux-amd64.tar.gz
 ~/istio# tar -xvf istio-1.22.2-linux-amd64.tar.gz
 ~/istio# mv istio-1.22.2/bin/istioctl /usr/local/bin/
 ~/istio# istioctl version
 no ready Istio pods in "istio-system"
 1.22.2
能执行 istioctl 命令说明安装成功,但是提示 no ready Istio pods in "istio-system",这是因为我们还没有安装 Istio,接下来我们就来安装 Istio。
istioctl 工具中内置了一些安装配置文件,这些配置文件提供了对 Istio 控制平面和 Istio 数据平面 Sidecar 的定制内容。我们可以通过 istioctl profile list 命令查看:
 $ istioctl profile list
 Istio configuration profiles:
     ambient
     default
     demo
     empty
     minimal
     openshift
     openshift-ambient
     preview
     remote
     stable
我们可以从其中一个 Istio 内置配置文件开始入手, 然后根据特定需求进一步自定义配置文件。
-
default:根据IstioOperator API的默认配置启动组件。建议将此配置文件用于生产部署和多集群网格中的主集群,我们可以运行istioctl profile dump命令来查看默认设置,如下所示其实就是一个IstioOperator的配置文件:
注意:这里的IstioOperator和我们之前k8s里Operator不一样,这里没有直接的控制器,它是通过istioctl命令来做的一些解析。
istioctl 能够识别的一个安装配置文件,只是这个配置文件采用了类似于K8s CRD的方式来声明而已,并没有对应的控制器Pod。
# istioctl profile dump default
apiVersioninstall.istio.io/v1alpha1
kindIstioOperator
spec
components
base
enabledtrue
egressGateways
enabledfalse
nameistio-egressgateway
ingressGateways
enabledtrue
nameistio-ingressgateway
pilot
enabledtrue
hubdocker.io/istio
profiledefault
tag1.22.2
values
defaultRevision""
gateways
istio-egressgateway
istio-ingressgateway
global
configValidationtrue
istioNamespaceistio-system
-
demo:这个配置旨在展示 Istio 功能,具有适度的资源要求。它适合运行官方的 Bookinfo 示例应用和相关任务,比较适合用于快速入门的安装配置,比如我们这里就可以使用该配置。此配置文件启用了高级别的追踪和访问日志,因此不适合进行性能测试。我们也可以使用istioctl profile dump demo命令来查看该配置文件的具体配置资源对象。
-
minimal:与默认配置文件相同,但只安装了控制平面组件。这样我们就可以使用单独的配置文件来配置控制平面和数据平面组件(例如网关)。
-
remote:用于配置一个远程集群, 这个从集群由外部控制平面管理, 或者由多集群网格的主集群中的控制平面管理。
-
empty:不部署任何内容,可以作为自定义配置的基本配置文件。
-
preview:预览文件包含的功能都属于实验性阶段。该配置文件是为了探索 Istio 的新功能。确保稳定性、安全性和性能(使用风险需自负)。
-
ambient:Ambient 配置文件用于帮助开始使用Ambient Mesh。需要注意的是 Ambient 目前处于 Alpha 状态。请勿在生产环境中使用 Ambient 模式。
-
openshift:用于在 OpenShift 上安装 Istio。
标注 ✔ 的组件安装在每个配置文件中:
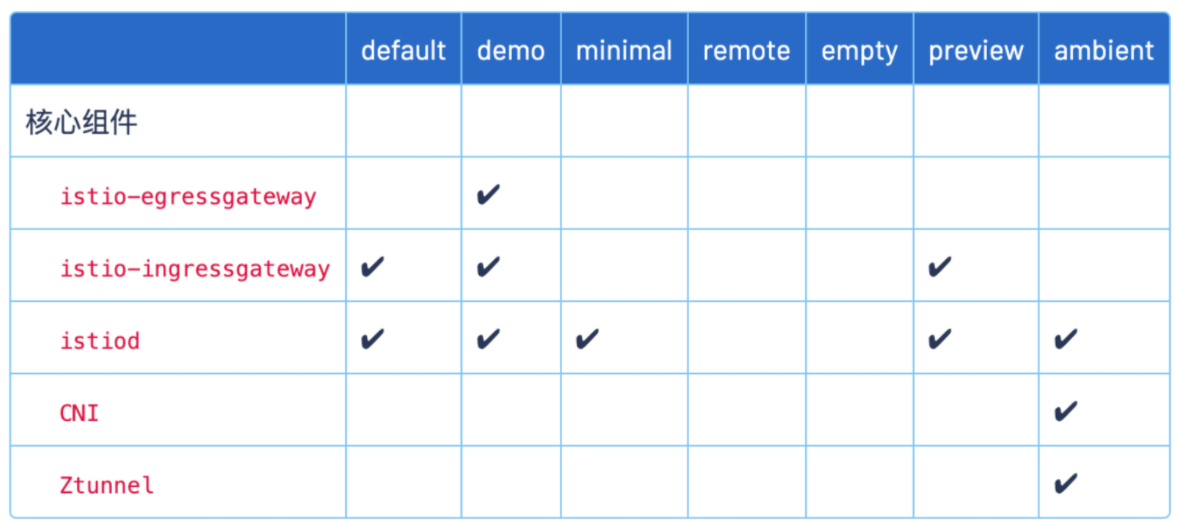
除了安装 Istio 内置的配置之外,istioctl install 还提供了一套完整的用于定制配置的 API - 。
此 API 中的配置参数可以使用命令行选项 --set 进行独立设置,比如要在 default 配置中启动 debug 的日志特性,我们可以使用下面的命令:
$ istioctl install --set values.global.logging.level=debug
或者,可以在 YAML 文件中指定 IstioOperator 的配置,然后用 -f 选项传递给 istioctl 即可:
$ istioctl install -f samples/operator/pilot-k8s.yaml
IstioOperator API 定义主要包括如下几个组件:
-
base
-
pilot
-
ingressGateways
-
egressGateways
-
cni
-
istiodRemote
针对每一个组件的配置内容通过 components.<component name> 下的 API 中提供。例如,要用 API 更改 pilot 组件的 enabled 设置, 可以使用 --set components.pilot.enabled=false 命令,或在 IstioOperator 资源中设置:
apiVersion: install.istio.io/v1alpha1
kind: IstioOperator
spec:
  components:
    pilot:
      enabled: false
这样安装后就不会启动 pilot 组件了。
所有的组件共享一个通用 API,用来修改 Kubernetes 特定的设置,它在 components.<component name>.k8s 路径下,它允许修改如下设置:
-
Resources
-
Readiness probes
-
Replica count
-
HorizontalPodAutoscaler
-
PodDisruptionBudget
-
Pod annotations
-
Service annotations
-
ImagePullPolicy
-
Priority class name
-
Node selector
-
Affinity and anti-affinity
-
Service
-
Toleration
-
Strategy
-
Env
-
Pod security context
所有这些 Kubernetes 设置也就是平时我们使用的 Kubernetes API 定义,配置方式完全一样。比如我们要调整 Pilot 组件的资源限制和 Pod 水平伸缩,可以用如下所示的配置:
apiVersion: install.istio.io/v1alpha1
kind: IstioOperator
spec:
  components:
    pilot:
      k8s:
        resources:
          requests:
            cpu: 1000m     # 覆盖默认的 500m
            memory: 4096Mi # ... 默认 2048Mi
        hpaSpec:
          maxReplicas: 10  # ... 默认 5
          minReplicas: 2   # ... 默认 1
然后我们就可以直接使用 istioctl install 把改变的设置应用到集群:
$ istioctl install -f samples/operator/pilot-k8s.yaml
安装istio
了解了 Istio 安装的基本概念之后,我们就可以开始安装 Istio 了,我们这里选择 demo 配置文件进行安装,选择它是因为它包含了一组专为测试准备的功能集合,另外还有用于生产或性能测试的配置组合。
执行下面的命令即可:
 $ istioctl install --set profile=demo -y
 ✔ Istio core installed
 ✔ Istiod installed
 ✔ Egress gateways installed
 ✔ Ingress gateways installed
 ✔ Installation complete
 Made this installation the default for injection and validation.
可以看到上面的 demo 配置应用后,启用了 Istio core、Istiod、Egress gateways、Ingress gateways 几个组件,这些组件都是通过 IstioOperator API 进行配置的。
🍀
安装完成后会自动创建一个 istio-system 命名空间,包含如下几个 Pod,分别对应上面的几个组件:
 root@k8s-master01:~/istio# kubectl get pod -n istio-system
 NAME                                   READY   STATUS    RESTARTS   AGE
 istio-egressgateway-cd779987c-2trkl    1/1     Running   0          3m15s
 istio-ingressgateway-9fc98cc99-kw6n2   1/1     Running   0          3m15s
 istiod-d799c6b59-tdcbj                 1/1     Running   0          3m38s
这其实也和 Istio 架构中的组件是一一对应的,我们可以再看下 Istio 架构图:

-
istio-egressgateway:出口网关,用于处理出站流量。
-
istio-ingressgateway:入口网关,用于处理入站流量,接收传入的 HTTP/TCP 连接。
-
istiod:Istio 控制平面,用于管理和配置数据平面,提供服务网格的核心功能。
当然安装后并没有出现架构图上面的数据平面相关组件,这是因为数据平面的 Envoy Sidecar 代理是伴随应用 Pod 一起的,所以需要部署应用后才会出现。
安装成功。😘
2、注入 Envoy Sidecar
要为应用注入 Envoy Sidecar 代理有几种方法:
1.手动注入 Sidecar
🚩 实战:手动注入 Envoy Sidecar-2024.7.14(测试成功)
实验环境:
 root@k8s-master01:~/istio# istioctl version
 client version: 1.22.2
 control plane version: 1.22.2
 data plane version: 1.22.2 (2 proxies)
默认的测试demo如下位置:
root@k8s-master01:~/istio# cat istio-1.22.2/samples/s
security/ sleep/
root@k8s-master01:~/istio# cat istio-1.22.2/samples/sleep/sleep.yaml
# Copyright Istio Authors
#
# Licensed under the Apache License, Version 2.0 (the "License");
# you may not use this file except in compliance with the License.
# You may obtain a copy of the License at
#
# http://www.apache.org/licenses/LICENSE-2.0
#
# Unless required by applicable law or agreed to in writing, software
# distributed under the License is distributed on an "AS IS" BASIS,
# WITHOUT WARRANTIES OR CONDITIONS OF ANY KIND, either express or implied.
# See the License for the specific language governing permissions and
# limitations under the License.
##################################################################################################
# Sleep service
##################################################################################################
apiVersionv1
kindServiceAccount
metadata
namesleep
---
apiVersionv1
kindService
metadata
namesleep
labels
appsleep
servicesleep
spec
ports
port80
namehttp
selector
appsleep
---
apiVersionapps/v1
kindDeployment
metadata
namesleep
spec
replicas1
selector
matchLabels
appsleep
template
metadata
labels
appsleep
spec
terminationGracePeriodSeconds0
serviceAccountNamesleep
containers
namesleep
imagecurlimages/curl
command"/bin/sleep" "infinity"
imagePullPolicyIfNotPresent
volumeMounts
mountPath/etc/sleep/tls
namesecret-volume
volumes
namesecret-volume
secret
secretNamesleep-secret
optionaltrue
---
🍀
先来部署这个应用
root@k8s-master01:~/istio# kubectl apply -f  istio-1.22.2/samples/sleep/sleep.yaml
root@k8s-master01:~/istio# kubectl get pod -l app=sleep
NAME                     READY   STATUS    RESTARTS   AGE
sleep-7656cf8794-dgbjc   1/1     Running   0          33s
这是一个正常应用的状态。
🍀
比如我们为一个 Deployment 手动注入 Sidecar,可以使用下面的方法:
root@k8s-master01:~/istio# istioctl kube-inject -f istio-1.22.2/samples/sleep/sleep.yaml | kubectl apply -f -
serviceaccount/sleep created
service/sleep created
deployment.apps/sleep created
root@k8s-master01:~/istio# kubectl get pod -l app=sleep
NAME                     READY   STATUS    RESTARTS   AGE
sleep-85b57bd4b6-p2f22   2/2     Running   0          20s

默认情况下 Pod 的注入是基于 Sidecar 注入模板,在 istio-sidecar-injector Configmap 中配置,我们可以将配置导出到本地,然后手动指定注入也可以:
$ kubectl -n istio-system get configmap istio-sidecar-injector -o=jsonpath='{.data.config}' > inject-config.yaml
$ kubectl -n istio-system get configmap istio-sidecar-injector -o=jsonpath='{.data.values}' > inject-values.yaml
$ kubectl -n istio-system get configmap istio -o=jsonpath='{.data.mesh}' > mesh-config.yaml
然后指定输入文件,运行 kube-inject 并部署应用即可:
$ istioctl kube-inject \
    --injectConfigFile inject-config.yaml \
    --meshConfigFile mesh-config.yaml \
    --valuesFile inject-values.yaml \
    --filename samples/sleep/sleep.yaml \
    | kubectl apply -f -
🍀
正常部署后我们的应用 Pod 中会多出一个 Sidecar 容器:
# kubectl get po -l app=sleep
NAME                     READY   STATUS    RESTARTS   AGE
sleep-7cbcd885cf-6j4bt   2/2     Running   0          2m8s
这个容器就是 Envoy Sidecar 代理。
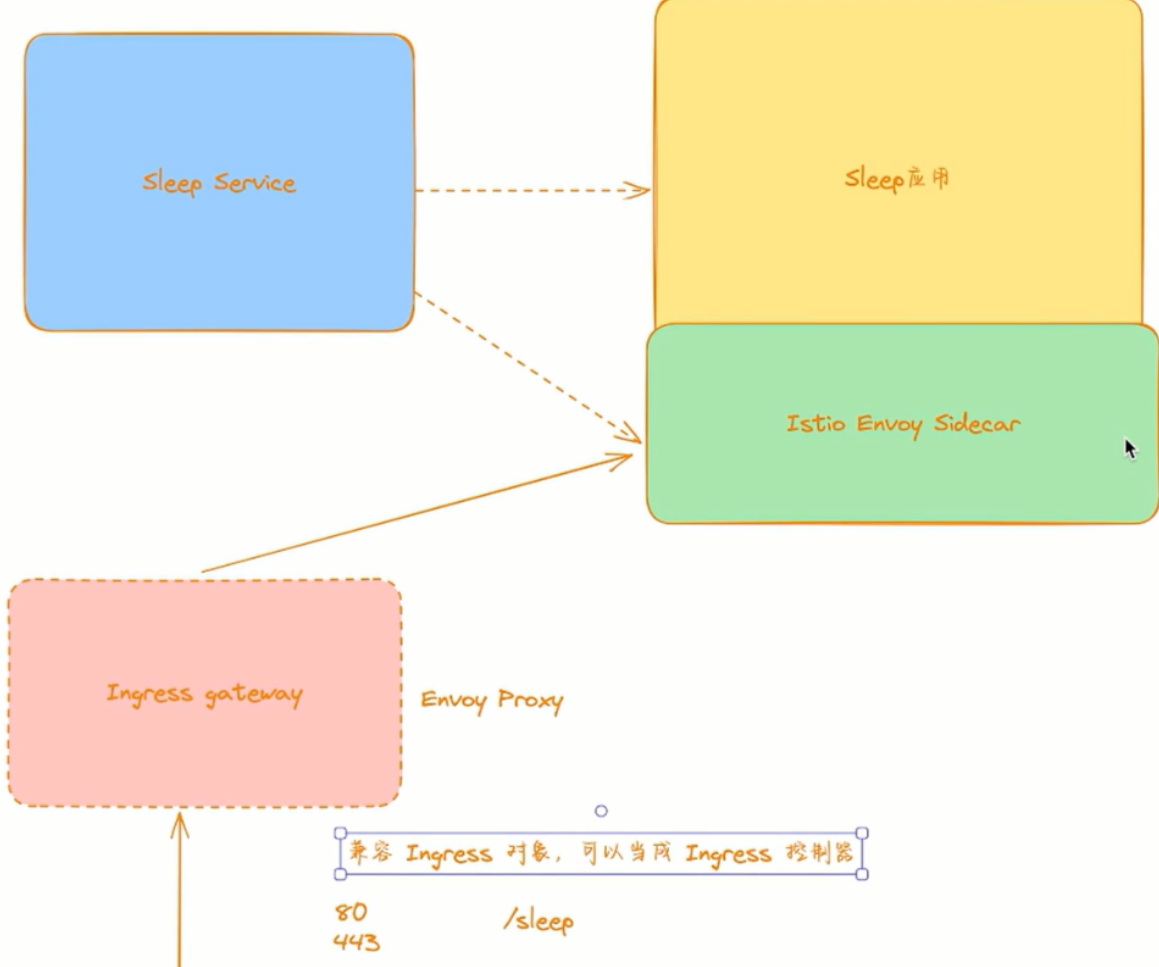
这个 Envoy Sidecar 代理,它会和应用 Pod 一起运行,用来代理整个应用的流量,当然整体控制都是由 Istio 控制平面来决定的。而 Istio 控制平面实现了 Envoy 的控制平面接口,可以动态下发修改 Envoy 的配置,这样我们就可以去操控这些 Envoy Sidecar 了,这是不是和我们前面讲解的 Envoy 基于 API 的动态配置部分就关联起来了,所以我们说需要先熟悉 Envoy,然后再来学习 Istio 效果会更好。
测试完成。😘
2.自定义注入
上面我们了解到 Pod 的注入是基于 istio-sidecar-injector 这个 Configmap 模板的,同样的我们也可以自行定义注入 Sidecar 代理。我们可以通过在 Pod 中手动添加一个 istio-proxy 容器来完成,Sidecar 注入将会把自定义的任何配置视为默认注入模板的覆盖。
自定义这些设置时,需格外小心,因为允许完全自定义生成的 Pod,包括进行一些更改而导致 Sidecar 容器无法正常运行。
例如,以下配置可自定义各种设置,包括降低 CPU 请求,添加 Volume 挂载,和添加 preStop Hook:
apiVersion: v1
kind: Pod
metadata:
  name: example
spec:
  containers:
    - name: hello
      image: alpine
    - name: istio-proxy # 这个容器名需要叫 istio-proxy
      image: auto # 设置为 auto,自动选择要使用的 Image
      resources:
        requests:
          cpu: "100m"
      volumeMounts:
        - mountPath: /etc/certs
          name: certs
      lifecycle:
        preStop:
          exec:
            command: ["sleep", "10"]
  volumes:
    - name: certs
      secret:
        secretName: istio-certs
一般来说 Pod 中的任何字段我们都可以配置,但是必须注意某些字段:
-
Kubernetes 要求在注入运行之前配置 image,虽然可以可以设置一个指定的 Image 来覆盖默认的 image 配置,但建议将 image 设置为
auto,可使 Sidecar 注入自动选择要使用的 Image。
-
Pod 中一些字段取决于相关设置。例如,CPU 请求必须小于 CPU 限制。
3.自动注入 Sidecar
🚩 实战:自动注入 Envoy Sidecar-2024.7.14(测试成功)
自己在测试时,出现了问题,这里后续搭建v1.27.6k8s集群来测试。
上面我们介绍了手动注入和自定义注入两种方式,这些都是需要我们手动去操作的,此外我们也可以通过配置实现自动注入,这样我们就不需要手动去注入了,Istio 提供了一个 Kubernetes 准入控制器,它可以自动注入 Sidecar 代理,我们只需要为命名空间设置 istio-injection=enabled 标签即可启用自动注入。
🍀
比如我们先在集群中部署 sleep 应用:(测试之前记得先删除先前的测试demo)
~/istio# kubectl apply -f  istio-1.22.2/samples/sleep/sleep.yaml
serviceaccount/sleep created
service/sleep created
deployment.apps/sleep created

~/istio# kubectl get pod -l app=sleep
NAME                     READY   STATUS    RESTARTS   AGE
sleep-7656cf8794-tpsgg   1/1     Running   0          3s

~/istio# kubectl get deploy
NAME    READY   UP-TO-DATE   AVAILABLE   AGE
sleep   1/1     1            1           45s
目前我们的 sleep 应用是没有注入 Sidecar 的,只有 1 个容器。
🍀
现在我们可以为 default 命名空间打上 istio-injection=enabled 标签:
root@k8s-master01:~/istio# kubectl label ns default istio-injection=enabled --overwrite
namespace/default labeled

root@k8s-master01:~/istio# kubectl get ns -L istio-injection
NAME              STATUS   AGE   ISTIO-INJECTION
default           Active   48d   enabled
dev               Active   48d
ingress-nginx     Active   48d
istio-system      Active   22m
kube-flannel      Active   48d
kube-node-lease   Active   48d
kube-public       Active   48d
kube-system       Active   48d
metallb-system    Active   48d
velero            Active   48d

root@k8s-master01:~/istio# kubectl get pod -l app=sleep
NAME                     READY   STATUS    RESTARTS   AGE
sleep-7656cf8794-tpsgg   1/1     Running   0          2m24s
🍀
现在我们为命名空间打上了自动注入标签,但是已经部署了的应用并不会主动注入,这是因为注入的动作发生着 Pod 创建时。我们可以杀掉正在运行的 Pod 来验证新创建的 Pod 是否注入 Sidecar。
root@k8s-master01:~/istio# kubectl delete pod -l app=sleep
root@k8s-master01:~/istio# kubectl get pod -l app=sleep
NAME                     READY   STATUS    RESTARTS   AGE
sleep-7656cf8794-ctsw5   2/2     Running   0          32s
`测试创建一个新的pod`
root@k8s-master01:~/istio# kubectl create deployment demoapp --image=ikubernetes/demoapp:v1.0 --replicas=1
deployment.apps/demoapp created
root@k8s-master01:~/istio# kubectl get pod -l app=demoapp
NAME                      READY   STATUS    RESTARTS   AGE
demoapp-7c58cd6bb-d6bgr   2/2     Running   0          16s
可以看到现在我们的应用有 2 个容器了。查看已注入 Pod 的详细状态,应该可以看到被注入的 istio-proxy 容器:
 root@k8s-master01:~/istio# kubectl describe pod -l app=sleep
 ...
 Events:
   Type    Reason     Age   From               Message
   ----    ------     ----  ----               -------
   Normal  Scheduled  82s   default-scheduler  Successfully assigned default/sleep-7656cf8794-ctsw5 to k8s-node03
   Normal  Pulled     81s   kubelet            Container image "docker.io/istio/proxyv2:1.22.2" already present on machine
   Normal  Created    81s   kubelet            Created container istio-init
   Normal  Started    81s   kubelet            Started container istio-init
   Normal  Pulled     81s   kubelet            Container image "curlimages/curl" already present on machine
   Normal  Created    81s   kubelet            Created container sleep
   Normal  Started    81s   kubelet            Started container sleep
   Normal  Pulled     81s   kubelet            Container image "docker.io/istio/proxyv2:1.22.2" already present on machine
   Normal  Created    81s   kubelet            Created container istio-proxy
   Normal  Started    81s   kubelet            Started container istio-proxy
这样我们就实现了 Pod 应用自动注入 Envoy Sidecar 代理,以后 default 命名空间中的应用部署后都会自动注入了。当然要取消自动注入功能,只需要将 istio-injection 标签去掉即可:
$ kubectl label namespace default istio-injection-
当然除了在命名空间级别启用和禁用注入功能之外,注入也可以通过配置 Pod 上的 sidecar.istio.io/inject: "true" 标签,在每个 Pod 的基础上进行控制。
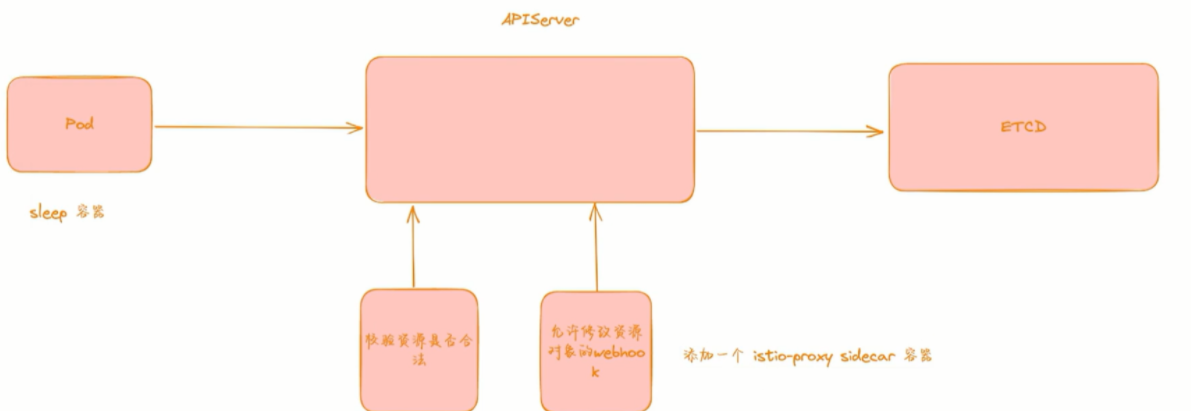
自动注入 Envoy Sidecar 的原理其实很简单,如果你对 Kubernetes 比较熟悉的话,肯定听过准入控制器的,其中就有两个对象 validatingwebhookconfigurations、mutatingwebhookconfigurations,前面是用来校验资源是否合法的,后面是用来修改资源对象的,那么要实现自动注入功能,也就相当于去为 Pod 自动添加一个容器,所以就需要用到 mutate 功能了,我们可以查看下系统中是否包含一个 istio-sidecar-injector 的准入控制器:
 $ kubectl get mutatingwebhookconfigurations
 NAME                                             WEBHOOKS   AGE
 istio-sidecar-injector                           4          63m
而实现准入控制器逻辑的也正是 istiod 这个组件了。
3、BookInfo 示例应用
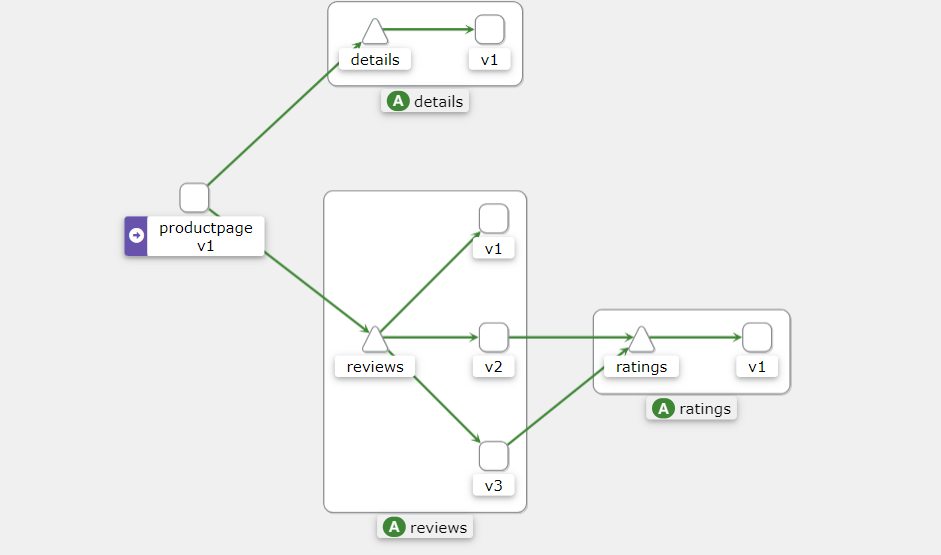
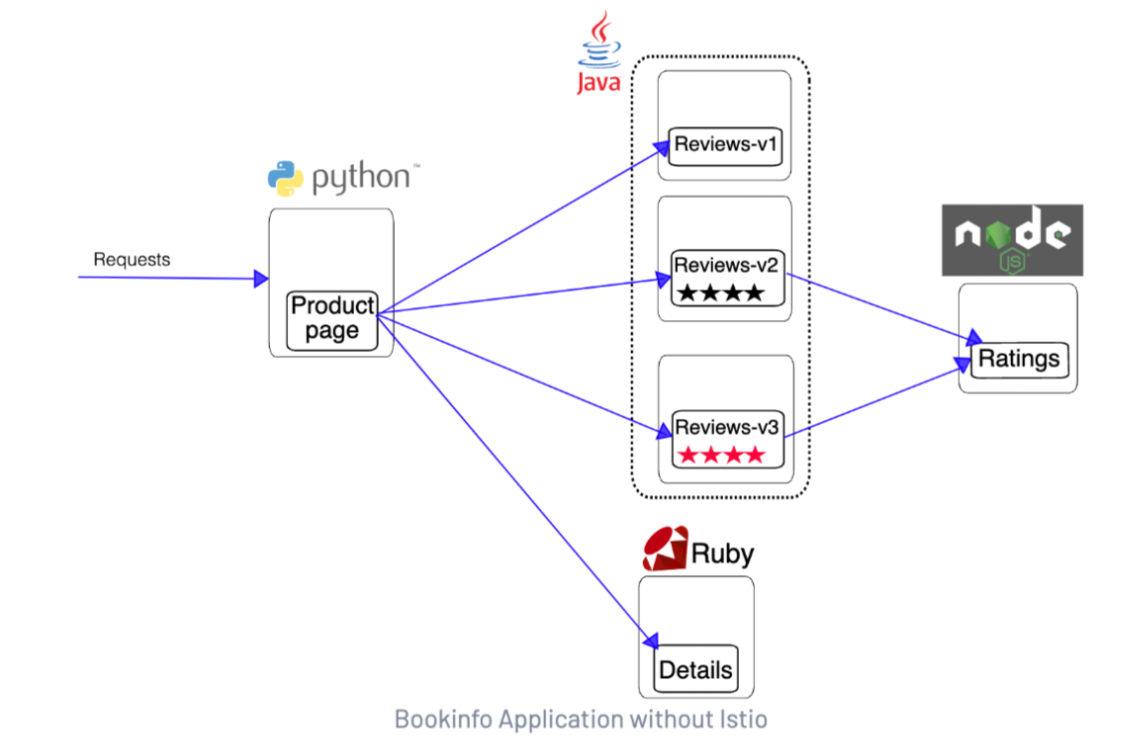
是一个非常经典的微服务示例项目,它由四个独立的微服务组成,每个微服务都是用不同的语言编写的,可以用于演示多种 Istio 特性的应用。这个应用模仿在线书店的一个分类,显示一本书的信息,页面上会显示一本书的描述,书籍的细节(ISBN、页数等),以及关于这本书的一些评论。
Bookinfo 应用分为以下四个单独的微服务:
-
productpage:这个微服务会调用details和reviews两个微服务,用来生成页面。
-
details:这个微服务中包含了书籍的信息。
-
reviews:这个微服务中包含了书籍相关的评论,它还会调用ratings微服务。
-
ratings:这个微服务中包含了由书籍评价组成的评级信息。
reviews 微服务有 3 个版本:
-
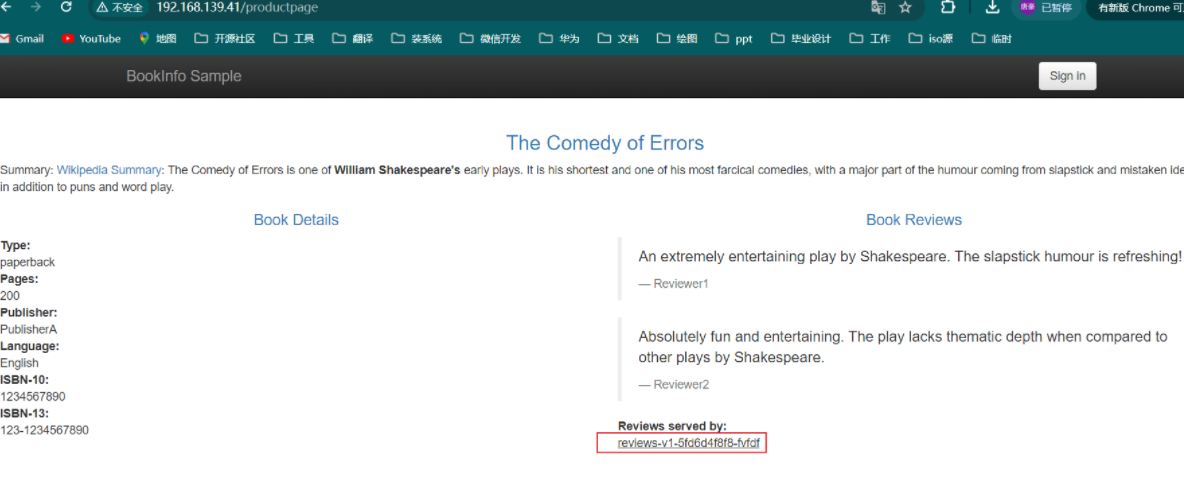
v1版本不会调用ratings服务。
-
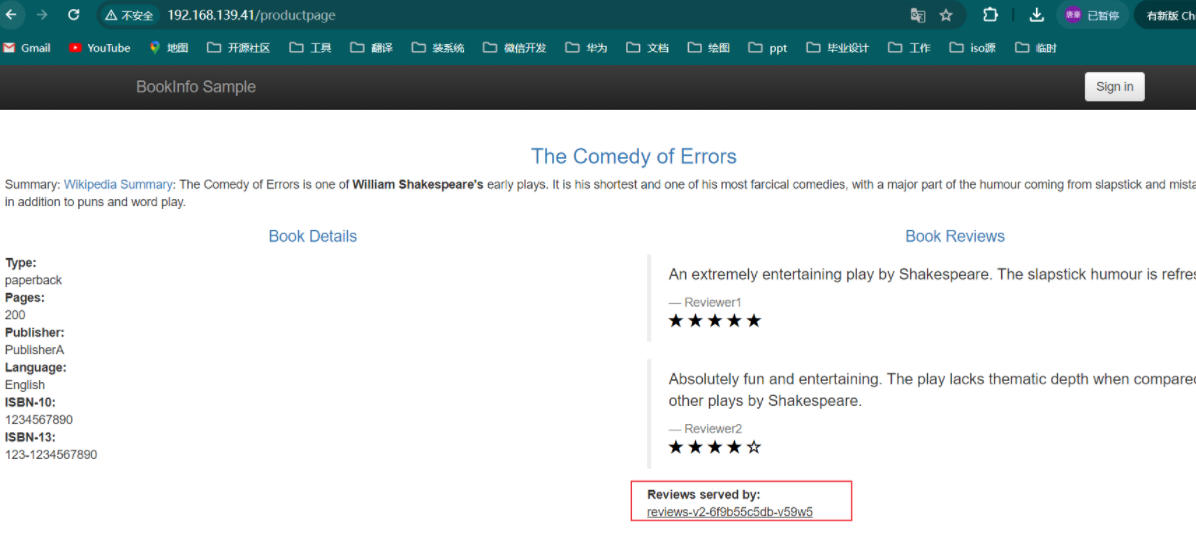
v2版本会调用ratings服务,并使用 1 到 5 个黑色星形图标来显示评分信息。
-
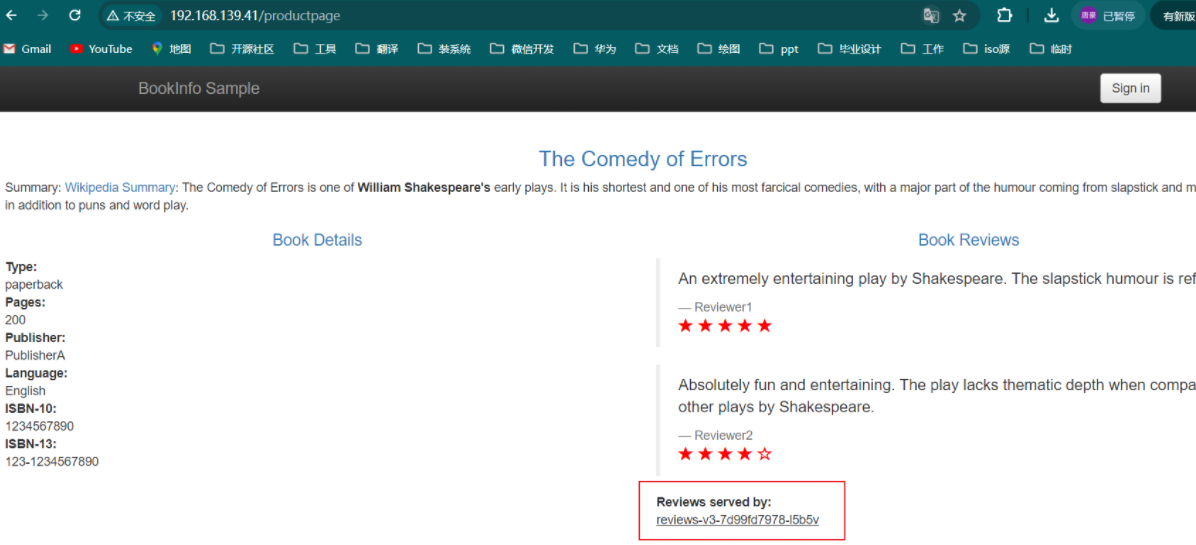
v3版本会调用ratings服务,并使用 1 到 5 个红色星形图标来显示评分信息。
下图展示了这个应用的端到端架构。
现在我们来为 Bookinfo 应用提供 Istio 支持,无需对应用自身做出任何改变。只要简单的在 Istio 环境中对服务进行配置和运行即可,其实就是把 Envoy Sidecar 注入到每个服务之中。最终的部署结果将如下图所示:
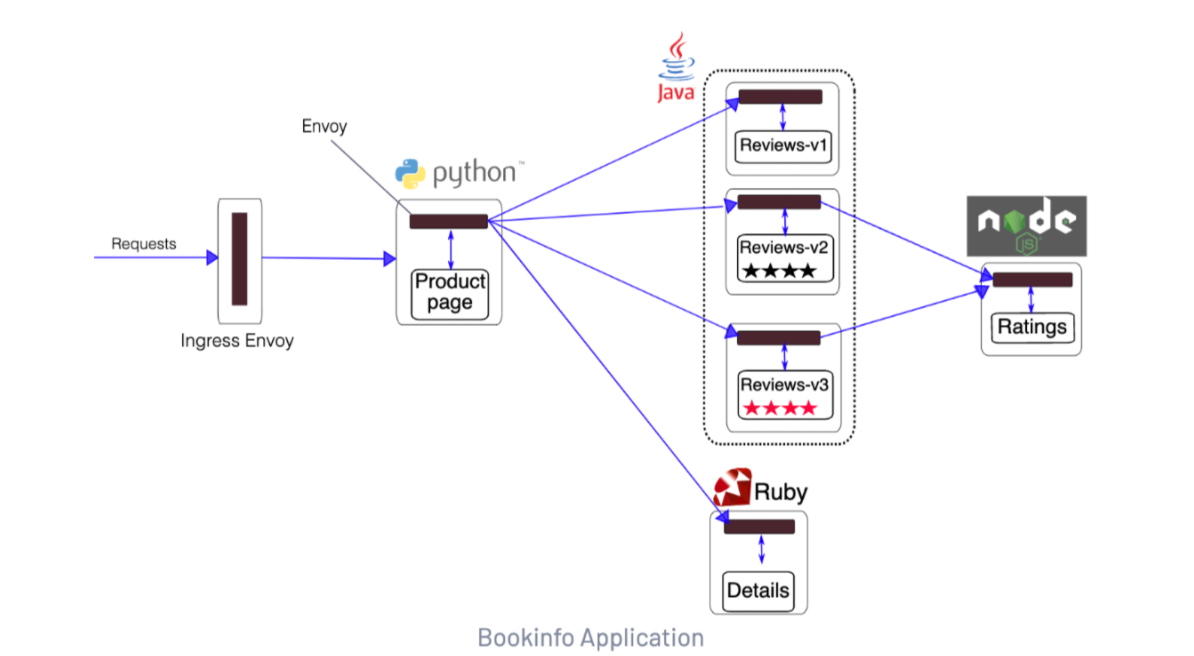
所有的微服务都和 Envoy Sidecar 集成在一起,服务所有的出入流量都被 Sidecar 所劫持,然后我们就可以利用 Istio 控制平面为应用提供服务路由、遥测数据收集以及策略实施等服务治理功能了。
🚩 实战:BookInfo 示例应用-2024.7.14(测试成功)
实验环境:
k8s v1.29.4(cri-dockerd)
~/istio# istioctl version
client version: 1.22.2
control plane version: 1.22.2
data plane version: 1.22.2 (4 proxies)
实验步骤:

-
部署示例应用
🍀
我们首先进入 Istio 安装目录,该目录中的 samples 目录中就包含了 Bookinfo 部署到 Kubernetes 集群中的配置文件,我们只需要为这些资源注入 Sidecar。这里我们为 default 命名空间打上标签 istio-injection=enabled,开启自动注入功能即可:
~/istio# kubectl label namespace default istio-injection=enabled --overwrite

🍀
然后只需要使用 kubectl 正常部署应用即可:
 root@k8s-master01:~/istio# kubectl apply -f istio-1.22.2/samples/bookinfo/platform/kube/bookinfo.yaml
 service/details created
 serviceaccount/bookinfo-details created
 deployment.apps/details-v1 created
 service/ratings created
 serviceaccount/bookinfo-ratings created
 deployment.apps/ratings-v1 created
 service/reviews created
 serviceaccount/bookinfo-reviews created
 deployment.apps/reviews-v1 created
 deployment.apps/reviews-v2 created
 deployment.apps/reviews-v3 created
 service/productpage created
 serviceaccount/bookinfo-productpage created
 deployment.apps/productpage-v1 created
注意:
如果在安装过程中禁用了 Sidecar 自动注入功能而选择手动注入 Sidecar,可以使用 istioctl kube-inject 命令来手动注入:
$ kubectl apply -f <(istioctl kube-inject -f samples/bookinfo/platform/kube/bookinfo.yaml)
自己本次手动注入:(我的自动注入有点问题,这里使用手动注入方式)
 ~/istio # kubectl apply -f < (istioctl kube-inject -f istio-1.22.2/samples/bookinfo/platform/kube/bookinfo.yaml)
 service/details created
 serviceaccount/bookinfo-details created
 deployment.apps/details-v1 created
 service/ratings created
 serviceaccount/bookinfo-ratings created
 deployment.apps/ratings-v1 created
 service/reviews created
 serviceaccount/bookinfo-reviews created
 deployment.apps/reviews-v1 created
 deployment.apps/reviews-v2 created
 deployment.apps/reviews-v3 created
 service/productpage created
 serviceaccount/bookinfo-productpage created
 deployment.apps/productpage-v1 created
🍀
上面的命令会启动全部的四个服务,其中也包括了 reviews 服务的三个版本(v1、v2 以及 v3)。
隔一会儿,我们可以查看下 Pod 的状态:
 root@k8s-master01:~/istio# kubectl get pod
 NAME                             READY   STATUS    RESTARTS   AGE
 demoapp-7c58cd6bb-d6bgr          2/2     Running   0          25m
 details-v1-cf74bb974-nkjwc       2/2     Running   0          12m
 productpage-v1-87d54dd59-l4bwx   2/2     Running   0          12m
 ratings-v1-7c4bbf97db-rcwzl      2/2     Running   0          12m
 reviews-v1-5fd6d4f8f8-fvfdf      2/2     Running   0          12m
 reviews-v2-6f9b55c5db-v59w5      2/2     Running   0          12m
 reviews-v3-7d99fd7978-l5b5v      2/2     Running   0          12m
 sleep-7656cf8794-ctsw5           2/2     Running   0          30m
 root@k8s-master01:~/istio# kubectl get svc
 NAME          TYPE        CLUSTER-IP        EXTERNAL-IP   PORT(S)        AGE
 demoapp       NodePort    173.109.70.29     <none>        80:31820/TCP   23m
 details       ClusterIP   173.105.207.205   <none>        9080/TCP       13m
 kubernetes    ClusterIP   173.96.0.1        <none>        443/TCP        48d
 productpage   ClusterIP   173.97.255.180    <none>        9080/TCP       13m
 ratings       ClusterIP   173.103.235.253   <none>        9080/TCP       13m
 reviews       ClusterIP   173.99.44.173     <none>        9080/TCP       13m
 sleep         ClusterIP   173.99.190.99     <none>        80/TCP         33m
当每个 Pod 准备就绪时,Istio Sidecar 将伴随应用一起部署。
🍀
要确认 Bookinfo 应用是否正在运行,我们可以在某个 Pod 中用 curl 命令对应用发送请求来验证,例如 ratings:
 root@k8s-master01:~/istio#  kubectl exec "$(kubectl get pod -l app=ratings -o jsonpath='{.items[0].metadata.name}')" -c ratings -- curl -sS productpage:9080/productpage | grep -o "<title>.*</title>"
 <title>Simple Bookstore App</title>
如果能够正常数据,说明应用已经部署成功了,而且已经被 Istio 管控起来了。
-
对外暴露应用
上面我们已经将 Bookinfo 应用部署成功了,但是还不能被外界访问,如果没有 Istio 的情况下我们可以直接通过 NodePort 或者 Ingress 的方式来对外进行暴露,但是现在我们使用了 Istio,需要创建 Istio 入站网关(Ingress Gateway)来对外暴露应用了。
🍀
在 samples 目录下面有一个 Bookinfo 对外暴露的配置文件 bookinfo-gateway.yaml,这个配置文件中定义了一个 Gateway 和一个 VirtualService 对象,Gateway 定义了入站流量的端口和协议,VirtualService 定义了流量的路由规则,内容如下所示:
 root@k8s-master01:~/istio# cat istio-1.22.2/samples/bookinfo/networking/bookinfo-gateway.yaml
 apiVersion: networking.istio.io/v1alpha3
 kind: Gateway
 metadata:
   name: bookinfo-gateway
 spec:
   selector:               # 如果使用的是 Helm 方式安装,则默认应该是 istio=ingress 标签
     istio: ingressgateway # 匹配 ingress gateway pod 的标签(kubectl get pods -l istio=ingressgateway -n istio-system)
   servers:
     - port:
         number: 8080
         name: http
         protocol: HTTP
       hosts:
         - "*"
 ---
 apiVersion: networking.istio.io/v1alpha3
 kind: VirtualService
 metadata:
   name: bookinfo
 spec:
   hosts:
     - "*"
   gateways:
     - bookinfo-gateway
   http:
     - match:
         - uri:
             exact: /productpage
         - uri:
             prefix: /static
         - uri:
             exact: /login
         - uri:
             exact: /logout
         - uri:
             prefix: /api/v1/products
       route:
         - destination:
             host: productpage
             port:
               number: 9080
这两个资源对象我们后面还会详细讲解的,现在我们只需要知道这两个资源对象是用来定义入站流量的端口和协议以及流量的路由规则的即可。如果你联想到前面我们讲解的 Envoy 配置,那么你就会发现这两个资源对象其实分别对应着 Envoy 配置中的 Listener 和 VirtualHosts(包括 Cluster),只不过这里是用我们更熟悉的 Kubernetes CRD 的方式来进行配置的,当我们创建了这两个资源对象后,Istio 控制平面会自动把这些配置下发到 Envoy Sidecar 中,然后 Envoy Sidecar 就会根据这些配置来进行流量的路由了。
🍀
接下来我们执行下面的命令来把应用关联到 Istio 网关:
 root@k8s-master01:~/istio# kubectl apply -f  istio-1.22.2/samples/bookinfo/networking/bookinfo-gateway.yaml
 gateway.networking.istio.io/bookinfo-gateway created
 virtualservice.networking.istio.io/bookinfo created
🍀
然后我们就可以通过 istio-ingressgateway 这个统一的入口来访问应用了,我们可以通过 kubectl get svc -n istio-system 命令来查看下 istio-ingressgateway 的地址:
 root@k8s-master01:~/istio# kubectl get svc istio-ingressgateway -n istio-system
 NAME                   TYPE           CLUSTER-IP      EXTERNAL-IP      PORT(S)                                                                      AGE
 istio-ingressgateway   LoadBalancer   173.99.255.57   192.168.139.41   15021:31578/TCP,80:31615/TCP,443:30854/TCP,31400:30223/TCP,15443:31752/TCP   57m
注意: 因为我在集群里面安装了metallb,如果没有安装LB可以执行下面的操作
由于我们这里没有负载均衡器,所以
EXTERNAL-IP的值一直是<pending>状态,这种情况下我们可以用 NodePort 来访问网关。可以通过如下命令获取 HTTP 和 HTTPS 的访问端口:# export INGRESS_PORT=$(kubectl -n istio-system get service istio-ingressgateway -o jsonpath='{.spec.ports[?(@.name=="http2")].nodePort}') # export SECURE_INGRESS_PORT=$(kubectl -n istio-system get service istio-ingressgateway -o jsonpath='{.spec.ports[?(@.name=="https")].nodePort}')然后获取集群中任意一个节点的 IP 地址:
# export INGRESS_HOST=$(kubectl get po -l istio=ingressgateway -n istio-system -o jsonpath='{.items[0].status.hostIP}')设置环境变量 GATEWAY_URL:
# export GATEWAY_URL=$INGRESS_HOST:$INGRESS_PORT确保 IP 地址和端口均成功地赋值给了环境变量:
# echo "$GATEWAY_URL" xxx.xxx.xxx.xxx:31896 # echo "$GATEWAY_URL" xxx.xxx.xxx.xxx:31814
这样我们就得到了 Istio 入口网关的访问地址,然后我们只需要在浏览器中通过 http://$GATEWAY_URL/productpage 即可访问到 Bookinfo 应用了。(三个版本)
-
查看 Dashboard
Istio 和几个遥测应用做了集成。遥测能帮我们了解服务网格的结构、展示网络的拓扑结构、分析网格的健康状态。
🍀
我们可以使用下面的方式来安装 Kiali,包括 Prometheus、Grafana 以及 jaeger。
root@k8s-master01:~/istio# kubectl apply -f istio-1.22.2/samples/addons/
root@k8s-master01:~/istio# kubectl rollout status deployment/kiali -n istio-system
Waiting for deployment "kiali" rollout to finish: 0 of 1 updated replicas are available...
deployment "kiali" successfully rolled out
root@k8s-master01:~/istio# kubectl get pod -n istio-system
NAME READY STATUS RESTARTS AGE
grafana-7b8849796-v4mxf 1/1 Running 0 6m5s
istio-egressgateway-cd779987c-2trkl 1/1 Running 0 79m
istio-ingressgateway-9fc98cc99-kw6n2 1/1 Running 0 79m
istiod-d799c6b59-tdcbj 1/1 Running 0 80m
jaeger-85b4ff864f-6jlqg 1/1 Running 0 6m5s
kiali-6d7cb48555-s7ssg 1/1 Running 0 6m4s
loki-0 0/1 Pending 0 6m4s # 这个 Pending 是因为需要一个 PVC 暂时不管
prometheus-66f897d897-zkxf6 2/2 Running 0 6m4s
如果在安装插件时出错,再运行一次命令。有一些和时间相关的问题,再次运行就能解决。
🍀
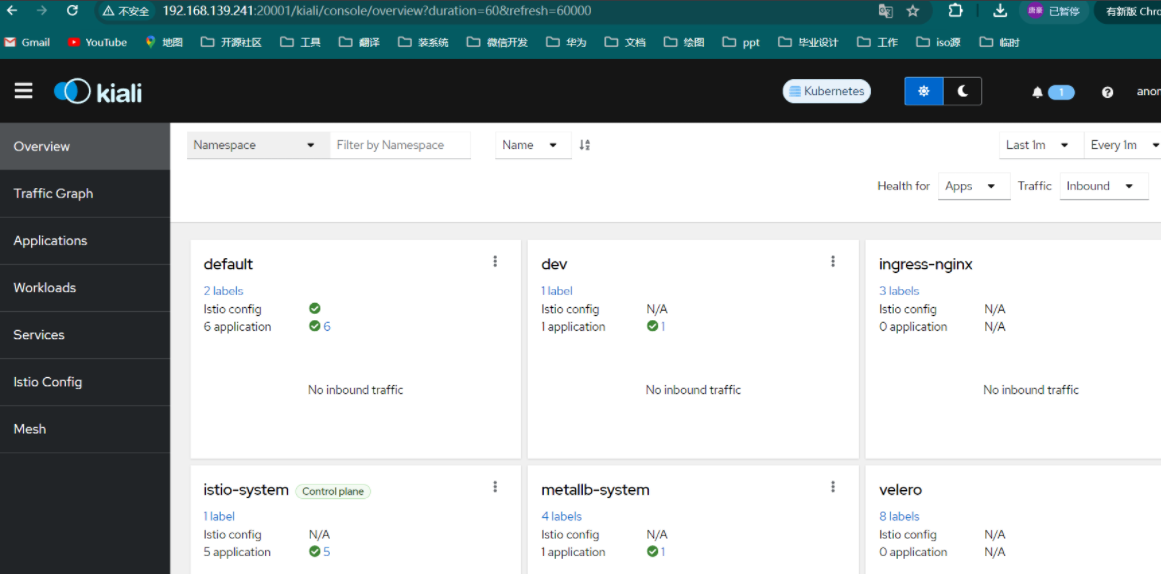
安装完成后我们可以使用 istioctl dashboard 命令来开启访问 Kiali 面板。
root@k8s-master01:~/istio# istioctl dashboard kiali --address 0.0.0.0
http://0.0.0.0:20001/kiali
Failed to open browser; open http://0.0.0.0:20001/kiali in your browser.
# http://192.168.139.241:20001/kiali/
🍀
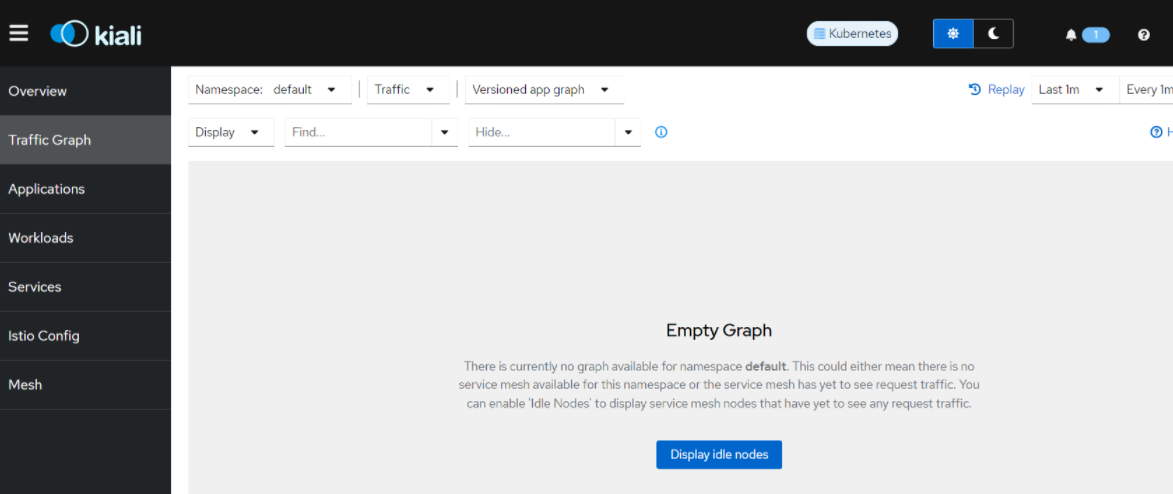
在左侧的导航菜单,选择 Graph ,然后在 Namespace 下拉列表中,选择 default。
🍀
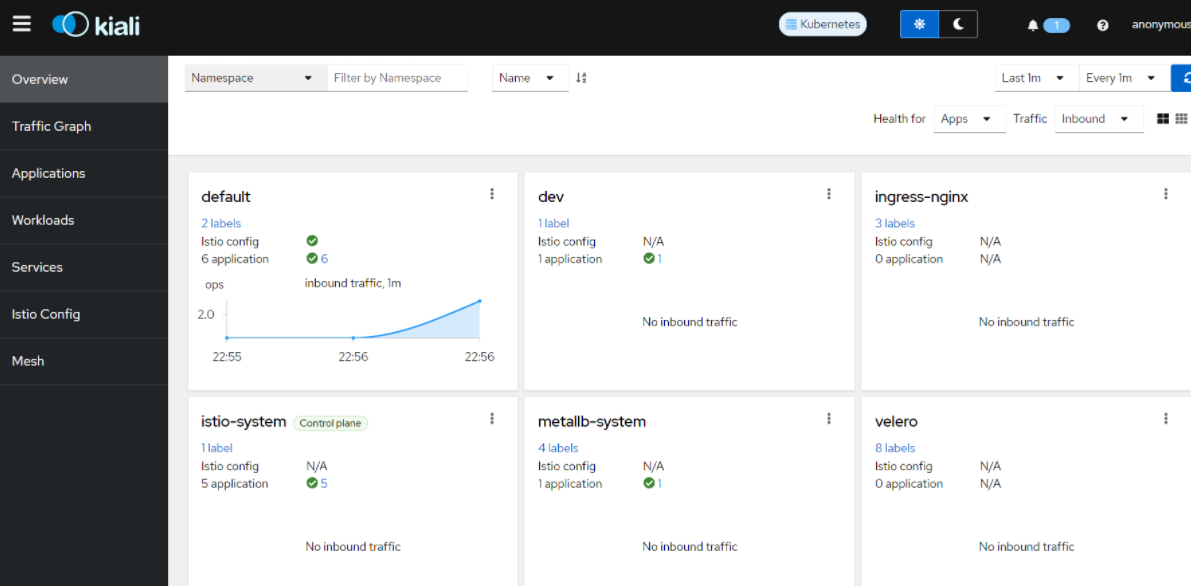
要查看链路追踪数据,必须向服务发送请求。请求的数量取决于 Istio 的采样率,采样率在安装 Istio 时设置,默认采样速率为 1%。也就是说在第一个 tracing 可见之前,需要发送至少 100 个请求:
 $ for i in $(seq 1 100); do curl -s -o /dev/null "http://$GATEWAY_URL/productpage"; done
 # for i in $(seq 1 100); do curl -s -o /dev/null "http://192.168.139.41/productpage"; done
🍀
Kiali 的仪表板展示了网格的概览以及 Bookinfo 示例应用的各个服务之间的关系。 它还提供过滤器来可视化流量的流动。
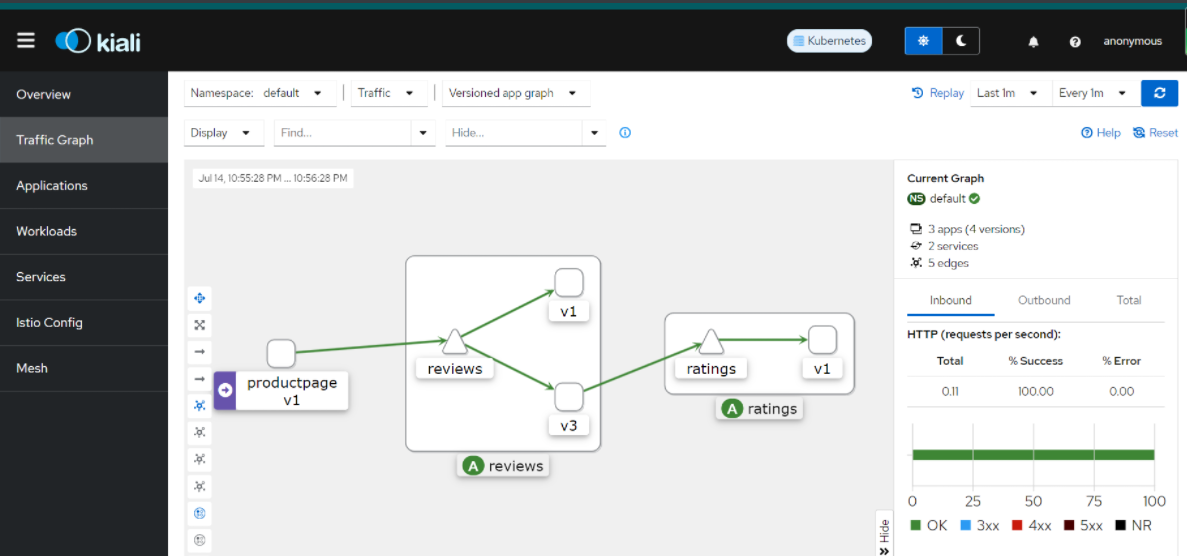
到这里我们就完成了 Bookinfo 示例应用的部署,以及对外暴露应用的配置。

文章评论